Dacia Solenza (engine E7J). Manual - part 103
 

  Index      Dacia     Dacia Solenza (engine E7J) - service repair manual 2004 year


Search            


Content   ..  101  102  103  104   ..


Dacia Solenza (engine E7J). Manual - part 103


REAR UPPER STRUCTURE

44

44 - 4

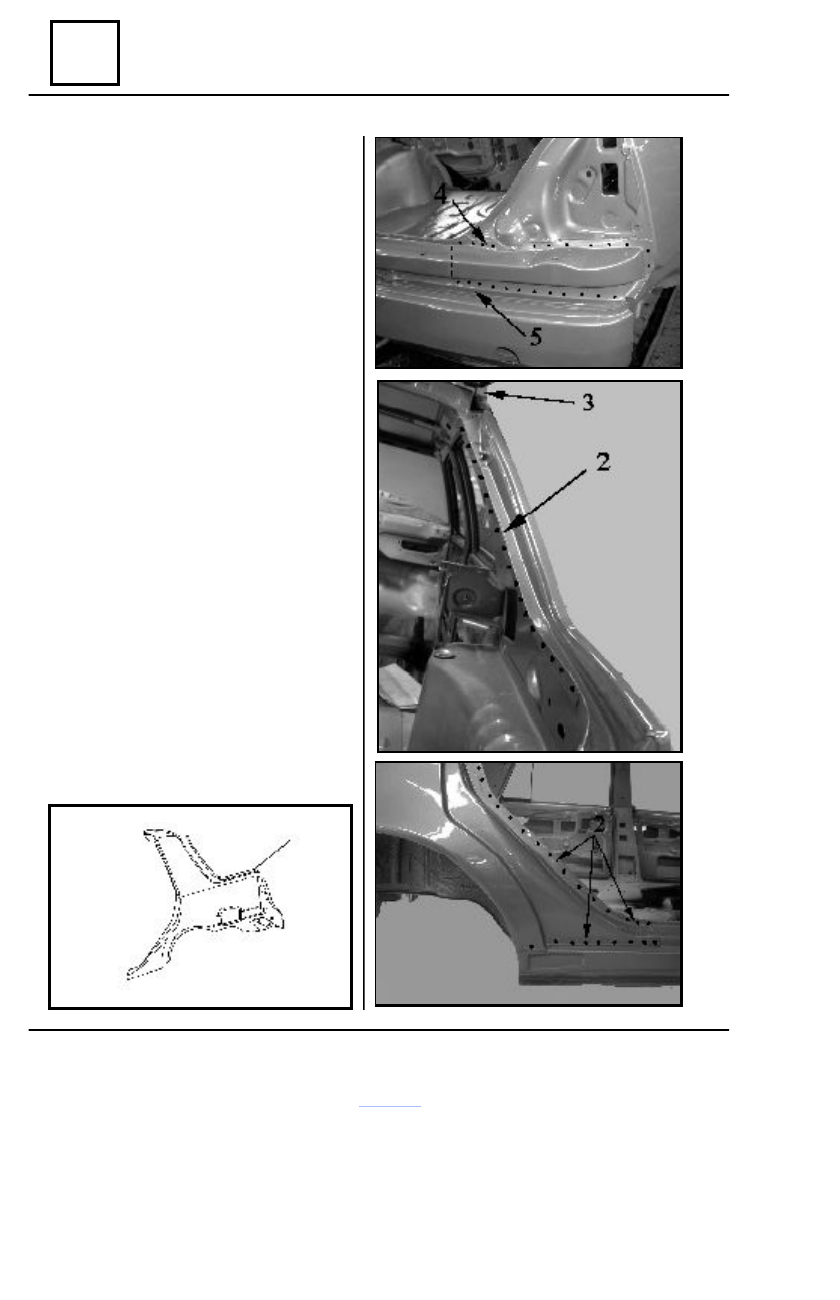
Side panel

DISMOUNTING

Dismount the elements, which are in con-

tact with the side panel (1).

Detach the welding points of the side panel,

which are in connection  with :

- side frame lining in the area  (2);
- roof in the area (3);
- rear lower panel in the area (4)
- rear extreme cross member in the area (5).

Straighten the areas resulted by dismounting.
Grind the areas resulted by dismounting.

REMOUNTING

Apply a layer of 5322 size material on the

joint areas of the side panel with the side frame
lining and the rear lower panel.

Position and center the new element.
Check the correct positioning of the side panel.
Weld the side panel  (1) following the welding

outlines 234, and 5.

Retouch possible deformations.
Grind the performed welding.
Protect the welding with a corrosion-

preventive product.

Apply a layer of sealant material in the joint

areas of the side panel with the rear extreme
cross member and the rear lower panel.

Paint the affected area in the carriage body color.
Mount the connection elements by

performing the dismounting operations in  the
reverse order.

1

45

TOP OF BODY

45 - 1

Roof

DISMOUNTING

Dismount the elements, which are in con-

tact with the roof (front/rear doors,
windscreen, hatchback, roof and rear quar-
ter panel lining).).

Detach the welding points of roof (1),

which are in connection  with :

- roof belt in the area (2) ( left/right);
- side frame lining in the area (3). (left/

right)

- windscreen frame in the area (4);
- middle pillar in the area (5);
- side panel (left/right)  in the area (6).

Straighten the areas resulted by dismount-

ing.

Grind the areas resulted by dismounting.

REMOUNTING

Position and center the new element.
Check the correct positioning of the roof.
Weld the roof following the welding outlines

(2), (3(4), (5), and (6).

Grind the performed welding.
Protect the performed welding with an

anticorrosive product.

Paint the  affected area.
Mount the elements in connection with the

roof by performing the dismounting operations
in the reverse order.

TOP OF BODY

45

45- 2

Windscreen frame

DISMOUNTING

Dismount the elements in connection with the

windscreen frame (front bonnet, windscreen, left/
right front wing, left/right front door).

Detach the welding points of the windscreen

frame (1), which are in contact with :

- side frame lining and roof belt in the area

(2) left/right;

- windscreen lower cross member in the

area (3);

- front pillar and front pillar lining in the

area (4) left/right

- roof in the area (5).

Detaching is to be performed by means of a

special sharp drill Ø 6 for plate elements.

Straighten the areas resulted from dismounting
Grind the area resulted from dismounting.

REMOUNTING

Position and center the  new element on the

side frame lining (left/right).

Clench in 2-3 points by means of sliding tongs.
Joint the front pillar border  with windscreen

frame side border (left/right).

Perform a spot welding of the windscreen

frame on the outlines (2)(3)(4) and (5).

Perform an additional SE CO

2

 welding in  the

connection area of the front pillar upper border
with the windscreen frame side border  (left/right)
(4 weld x 15 mm).

Check and restore the windscreen frame.
Grind the performed welding.
Protect the performed welding with  an anti-

corrosion product.

Paint the  affected area.
Mount the elements in connection with the

windscreen frame by performing the dismount-
ing operations in the reverse order.

46

BODY PROTECTION

46 -1


Engine shield

DISMOUNTING

Dismount four M 6x1 – 20 Embase screws attached in four (3) M6x1 safety nuts on the

power train support.

Release the engine shield (1).

REMOUNTING

Perform the dismounting operations in  the reverse order.

1

2

3


Content   ..  101  102  103  104   ..