Freelander 1. Manual - part 282


  Index      Land Rover     Freelander 1 - service manual 2002 year


Search            


Content   ..  280  281  282  283   ..


Freelander 1. Manual - part 282


WINDOWS

REPAIRS

86-5-1

WINDOWS

REPAIRS

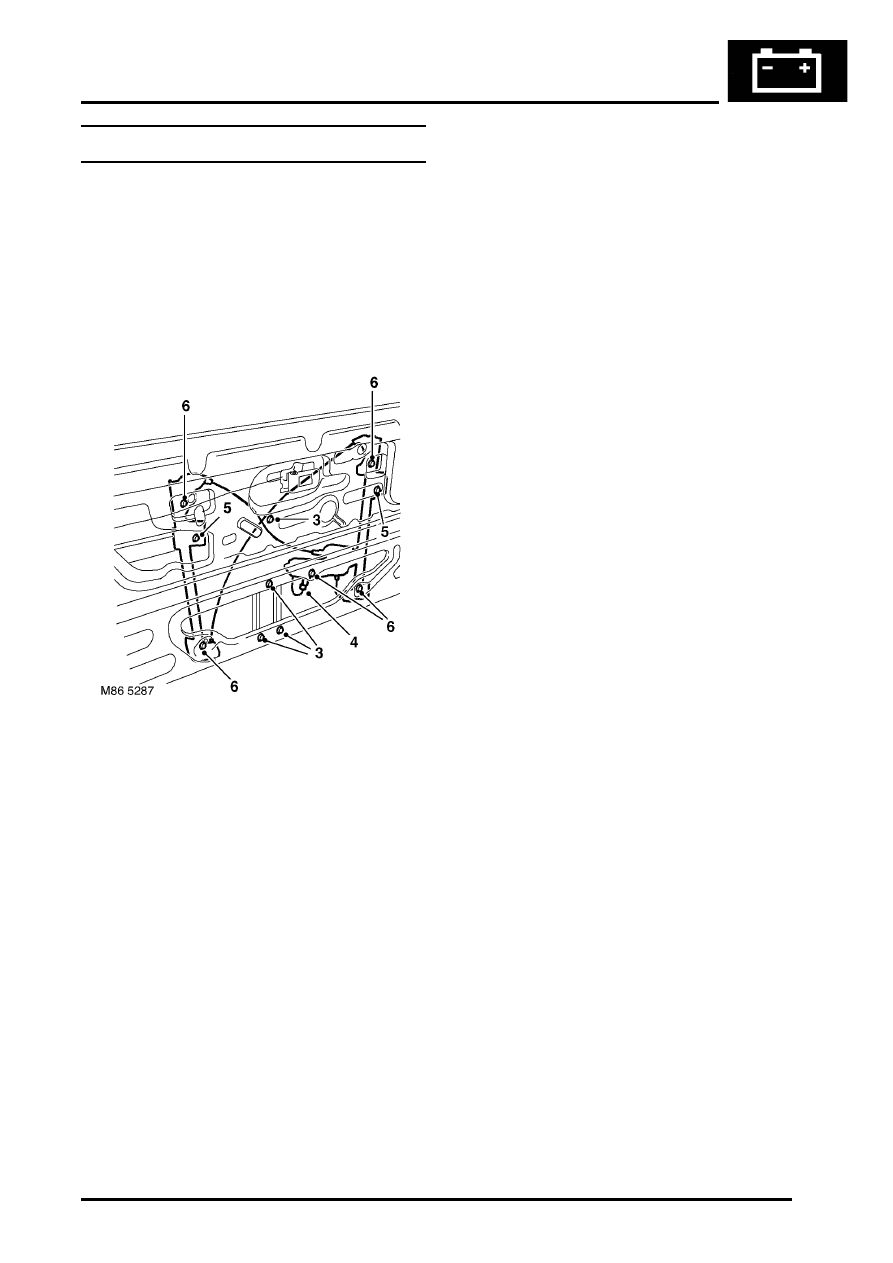
Motor & control unit - front door - 3 door

$% 86.25.01

Remove

1. Remove upper plastic sheet.


 + 

 DOORS, REPAIRS, Plastic sheet - 

front door - upper - 3 door.

2. Remove lower plastic sheet.


 + 

 DOORS, REPAIRS, Plastic sheet - 

front door - lower.

3. Remove 4 Torx screws securing door stiffener, 

release bowden cable from clip and remove 
door stiffener.

4. Disconnect multiplug from door glass motor.
5. Loosen 2 screws clamping control unit to glass 

and release glass from clamps.

6. Remove 5 screws securing control unit to door.
7. Manoeuvre motor and control unit out from 

door aperture.

Refit

1. Position motor and control unit in door aperture 

and locate to glass.

CAUTION: It is very important when fitting 
the control unit that the cable with the anti-
rattle sleeve is next to the trim casing and 
the motor cable next to the glass.

2. Secure control unit to door with screws.
3. Tighten clamps securing control unit to glass, to 

9 Nm (7 lbf.ft).

4. Connect multiplug to door glass motor.
5. Position door stiffener, fit and tighten Torx 

screws to 9 Nm (7 lbf.ft).

6. Secure cable in door stiffener clip.
7. Fit lower plastic sheet.


 + 

 DOORS, REPAIRS, Plastic sheet - 

front door - lower.

8. Fit upper plastic sheet.


 + 

 DOORS, REPAIRS, Plastic sheet - 

front door - lower.

WINDOWS

86-5-2

REPAIRS

Motor & control unit - front door - 5 door

$% 86.25.01

Remove

1. Remove front door plastic sheet.


 + 

 DOORS, REPAIRS, Plastic sheet - 

front door - 5 door.

2. Disconnect multiplug from door glass motor.
3. Loosen 2 screws clamping control unit to glass.
4. Release cable from door clip.
5. Remove 5 screws securing control unit to door.
6. Release cable from door clip and manoeuvre 

motor and control unit out from door aperture.

Refit

1. Position motor and control unit in door aperture 

and locate to glass.

CAUTION: It is very important when fitting 
the control unit that the cable with the anti-
rattle sleeve is next to the trim casing and 
the motor cable next to the glass.

2. Fit and tighten screws securing control unit to 

door.

3. Secure cable in door clip.
4. Tighten clamps securing control unit to glass, to 

9 Nm (7 lbf.ft).

5. Connect multiplug to door glass motor.
6. Fit front door plastic sheet.


 + 

 DOORS, REPAIRS, Plastic sheet - 

front door - 5 door.

Relay - control - tail door glass

$% 86.25.45

Remove

1. Remove RH rear quarter lower trim casing.


 + 

 INTERIOR TRIM COMPONENTS, 

REPAIRS, Trim casing - rear quarter - lower 
- 3 door.
 

 + 

 INTERIOR TRIM COMPONENTS, 

REPAIRS, Trim casing - rear quarter - lower 
- 5 door.

2. Remove tail door glass control relay.

Refit

1. Fit tail door glass control relay.
2. Fit RH rear quarter lower casing.


 + 

 INTERIOR TRIM COMPONENTS, 

REPAIRS, Trim casing - rear quarter - lower 
- 3 door.
 

 + 

 INTERIOR TRIM COMPONENTS, 

REPAIRS, Trim casing - rear quarter - lower 
- 5 door.

WINDOWS

REPAIRS

86-5-3

Microswitch - hardtop sensing - 3 door

$% 86.25.46

Remove

1. Remove hard-back or soft-back.


 + 

 HOOD, REPAIRS, Frame & hood 

cover - assembly - remove for access & refit.

2. Remove RH rear quarter upper trim casing.


 + 

 INTERIOR TRIM COMPONENTS, 

REPAIRS, Trim casing - rear quarter - upper 
- 3 door.

3. Remove 2 bolts securing soft-back support 

bracket.

4. Disconnect micro-switch multiplug and release 

from retainer.

5. Remove peg securing micro-switch, and 

remove micro-switch.

6. Collect micro-switch seal.

Refit

1. Locate micro-switch seal, position micro-switch 

and secure with peg.

2. Connect multiplug and secure to retainer.
3. Position soft-back support bracket, fit bolts and 

tighten to 25 Nm (18 lbf.ft).

4. Fit RH rear quarter upper trim casing.


 + 

 INTERIOR TRIM COMPONENTS, 

REPAIRS, Trim casing - rear quarter - upper 
- 3 door.

5. Fit hard-back or soft-back.


 + 

 HOOD, REPAIRS, Frame & hood 

cover - assembly - remove for access & refit.

WINDOWS

86-5-4

REPAIRS

Switch - backlight heater

$% 86.65.36

Remove

1. Remove radio.


 + 

 IN CAR ENTERTAINMENT, 

REPAIRS, Radio.

2. Remove selector knobs from heater controls.
3. Remove 2 screws securing heater control 

finisher to heater controls and remove finisher.

4. Release heated rear screen switch from heater 

controls.

5. Disconnect multiplug from heated rear screen 

switch and remove switch.

Refit

1. Position heated rear screen switch and connect 

multiplug.

2. Fit switch to heater control panel.
3. Fit heater contol finisher to heater controls and 

secure with screws.

4. Fit heater control knobs.
5. Fit radio.


 + 

 IN CAR ENTERTAINMENT, 

REPAIRS, Radio.


Content   ..  280  281  282  283   ..