Freelander 1. Manual - part 283


  Index      Land Rover     Freelander 1 - service manual 2002 year


Search            


Content   ..  281  282  283  284   ..


Freelander 1. Manual - part 283


IN CAR ENTERTAINMENT

REPAIRS

86-6-1

IN CAR ENTERTAINMENT

REPAIRS

Radio

$% 86.50.03

Remove

1. Using tool SMD 4091 release radio from centre 

console.

2. Disconnect multiplugs and aerial from radio 

and remove radio.

Refit

1. Position radio cassette player to fascia aperture 

and connect multiplugs and aerial.

2. Fit radio to centre console.

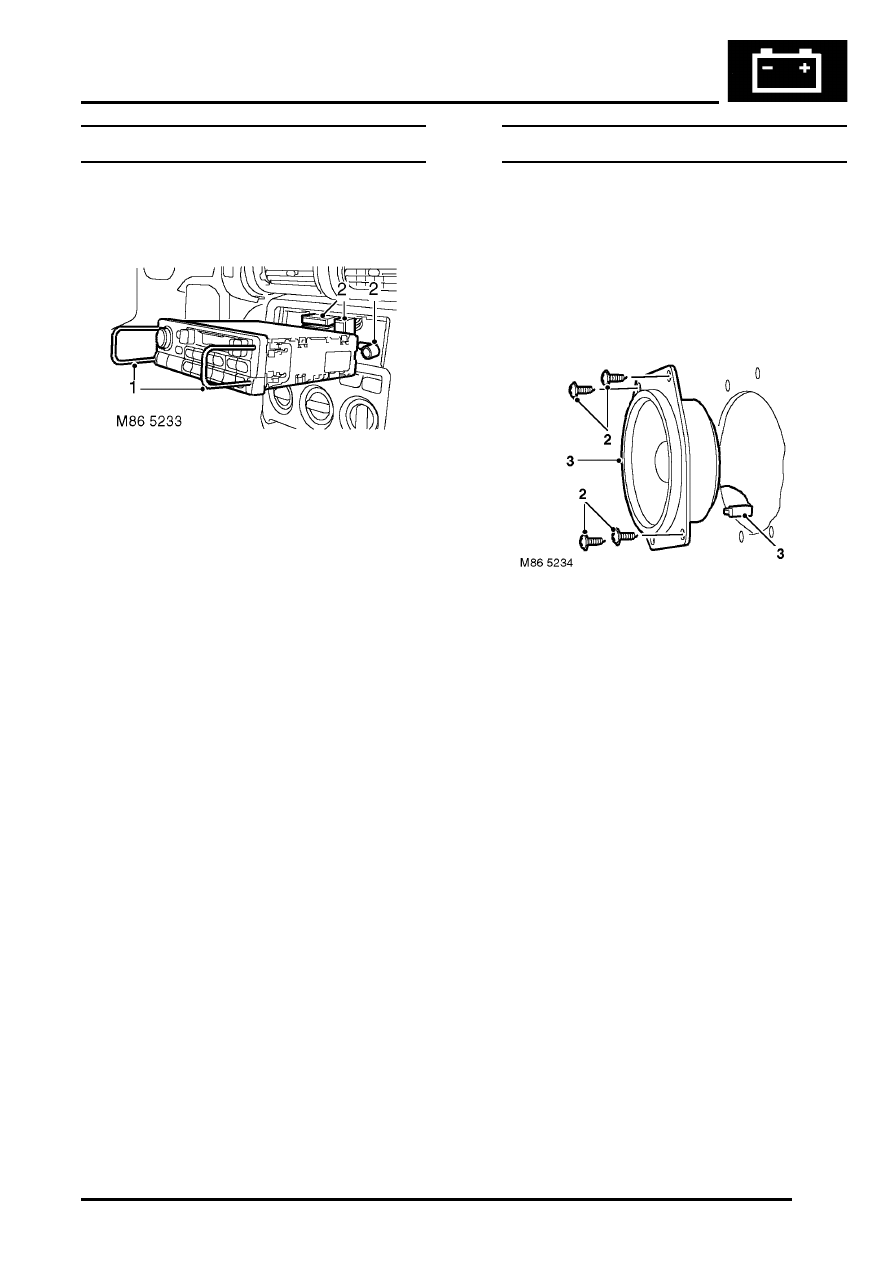
Speaker - rear - 3 door

$% 86.50.12

Remove

1. Remove body rear side casing.


 + 

 INTERIOR TRIM COMPONENTS, 

REPAIRS, Trim casing - body side - rear - 
LH.

2. Remove 4 screws securing speaker to body.
3. Disconnect multiplug from speaker and remove 

speaker.

Refit

1. Position speaker to door and connect multiplug.
2. Fit speaker to body and secure with screws.
3. Fit body rear side casing.


 + 

 INTERIOR TRIM COMPONENTS, 

REPAIRS, Trim casing - body side - rear - 
LH.

IN CAR ENTERTAINMENT

86-6-2

REPAIRS

Speaker - rear - 5 door

$% 86.50.12

Remove

1. Remove rear door trim casing.


 + 

 DOORS, REPAIRS, Trim casing - 

rear door.

2. Remove 4 screws securing speaker to door.
3. Disconnect multiplug from speaker and remove 

speaker.

Refit

1. Position speaker to door and connect multiplug.
2. Fit screws securing speaker to door.
3. Fit rear door trim casing.


 + 

 DOORS, REPAIRS, Trim casing - 

rear door.

Speaker - front

$% 86.50.15

Remove

1. Remove front door trim casing.


 + 

 DOORS, REPAIRS, Trim casing - 

front door - 3 door.
 

 + 

 DOORS, REPAIRS, Trim casing - 

front door - 5 door.

2. Remove 4 screws securing speaker to front 

door.

3. Disconnect multiplug from speaker and remove 

speaker.

Refit

1. Position speaker to door and connect multiplug.
2. Fit speaker to door and secure with screws.
3. Fit front door trim casing.


 + 

 DOORS, REPAIRS, Trim casing - 

front door - 3 door.
 

 + 

 DOORS, REPAIRS, Trim casing - 

front door - 5 door.

IN CAR ENTERTAINMENT

REPAIRS

86-6-3

Aerial - manual - 3 door

$% 86.50.18

Remove

1. Remove headlining.


 + 

 INTERIOR TRIM COMPONENTS, 

REPAIRS, Headlining - 3 door.

2. Remove 2 screws and release volumetric 

sensor mounting bracket.

3. Remove nut securing coaxial cable to aerial 

base.

4. Remove aerial base from roof panel and 

remove rubber seal.

Refit

1. Position rubber seal and fit aerial base to roof 

panel.

2. Connect coaxial cable and secure with nut.
3. Position volumetric sensor bracket and secure 

with screws.

4. Fit headlining.


 + 

 INTERIOR TRIM COMPONENTS, 

REPAIRS, Headlining - 3 door.

Aerial - manual - 5 door

$% 86.50.18

Remove

1. Remove lens from front interior lamp.
2. Remove 2 bolts securing front interior lamp to 

body.

3. Release interior lamp from headlining, 

disconnect multiplug and remove lamp.

4. Remove nut securing coaxial cable to aerial 

base.

IN CAR ENTERTAINMENT

86-6-4

REPAIRS

5. Remove aerial base from roof panel and 

remove rubber seal.

Refit

1. Position rubber seal and fit aerial base to roof 

panel.

2. Connect coaxial cable and secure with nut.
3. Position front interior lamp and connect 

multiplug.

4. Fit front interior lamp to headlining and secure 

with bolts.

5. Fit lens to rear interior lamp.

Coaxial lead - front aerial - 3 door

$% 86.50.24

Remove

1. Remove aerial.


 + 

 IN CAR ENTERTAINMENT, 

REPAIRS, Aerial - manual - 3 door.

NOTE: Original coaxial lead cannot be 
removed as it is part of the body harness.

2. Disconnect coaxial lead from link lead behind 

fuse box.

Refit

1. Position new coaxial lead to roof panel.
2. Align coaxial lead behind fascia and connect to 

link lead.

3. Secure coaxial lead to harness with cable ties.
4. Fit aerial.


 + 

 IN CAR ENTERTAINMENT, 

REPAIRS, Aerial - manual - 3 door.


Content   ..  281  282  283  284   ..