Discovery 2. Manual - part 761


  Index      Land Rover     Land Rover Discovery 2 - service manual 1999 year


Search            


Content   ..  759  760  761  762   ..


Discovery 2. Manual - part 761


HARNESSES

REPAIRS

86-7-9

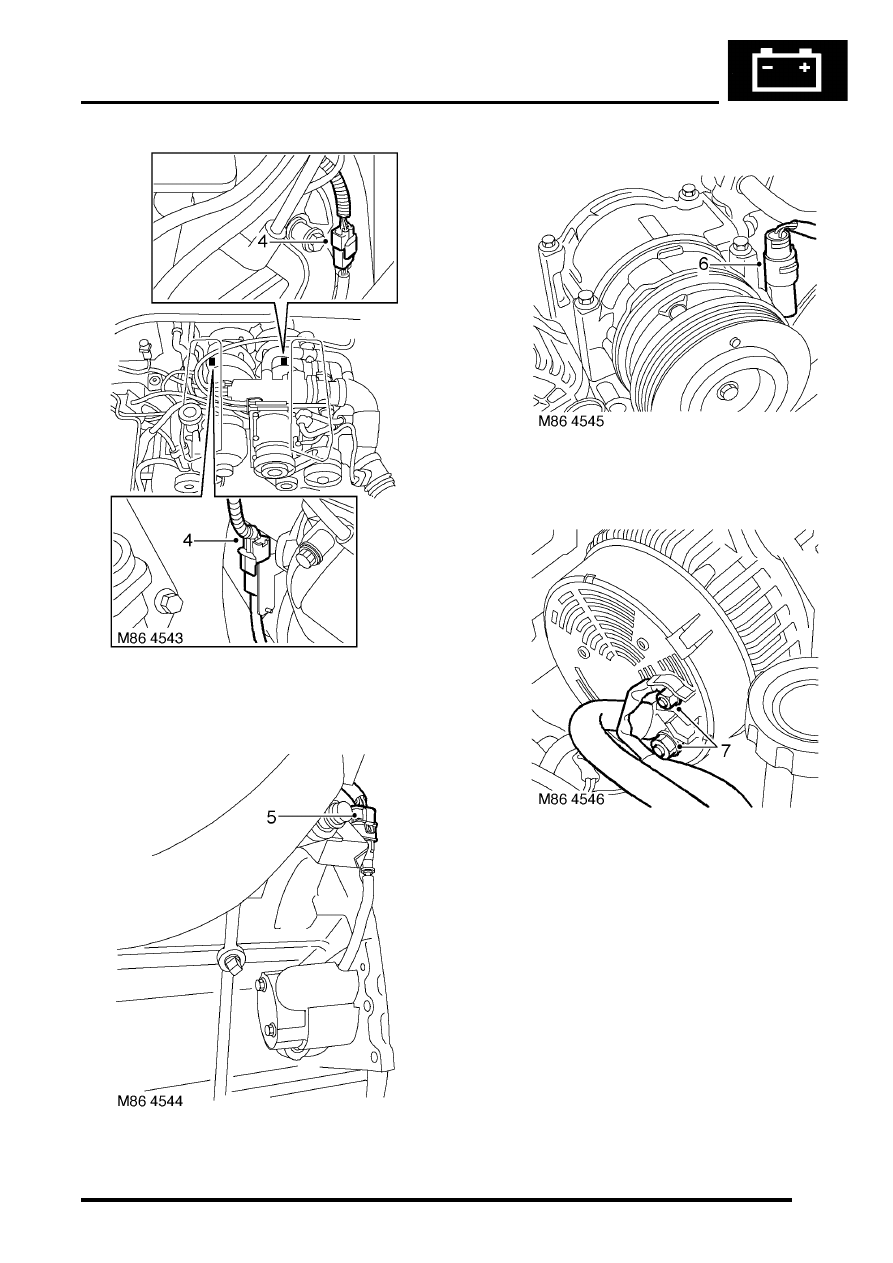
4. Release and disconnect both HS

2

O sensor 

multiplugs.

5. Disconnect CKP sensor multiplug. 

6. Disconnect air conditioning compressor 

multiplug. 

7. Remove 2 nuts securing alternator cables  and 

release cables. 

HARNESSES

86-7-10 REPAIRS

8. Disconnect coolant temperature sensor 

multiplug.

9. Release 2 harness clips from coolant  rail. 

10. Remove nut securing engine harness  positive 

lead to battery, release lead and  position 
aside. 

11. Release clips and remove fuse box cover. 
12. Remove bolt securing starter lead to fuse box, 

release lead and position aside. 

13. Disconnect 2 engine harness multiplugs from 

fuse box. 

14. Disconnect EVAP solenoid multiplug. 

15. Remove nut securing engine harness earth to 

body and disconnect engine harness  to main 
harness multiplug. 

HARNESSES

REPAIRS 86-7-11

16. Remove trim fixings securing toe board  and 

remove toe board. 

17. Disconnect 5 multiplugs connecting engine 

harness to ECM. 

18. Release engine harness, pull into engine bay.
19. Raise front of vehicle.

WARNING: Do not work on or under a 
vehicle supported only by a jack. Always 
support the vehicle on safety stands.

20. Remove 3 nuts securing RH exhaust front pipe 

to manifold. Remove and discard gasket.

21. Remove bolt securing starter heat shield  and 

remove heat shield. 

22. Remove nut securing battery cable to  starter 

and disconnect solenoid cable. 

23. Disconnect both knock sensor multiplugs.

HARNESSES

86-7-12 REPAIRS

24. Remove bolt securing harness clip to LH side of 

engine.

25. Disconnect camshaft sensor and oil  pressure 

switch multiplugs. 

26. Remove engine harness. 

Refit

1. Position engine harness around engine.  
2. Connect oil pressure switch and camshaft  

sensor multiplugs. 

3. Fit and tighten bolt securing harness to LH side 

of engine. 

4. Connect both knock sensor multiplugs. 
5. Connect battery cable and solenoid cable  to 

starter motor. 

6. Position starter heat shield and secure  with 

bolt. 

7. Clean  exhaust flange mating faces, using  a 

new gasket align exhaust fit nuts and  tighten to  
60 Nm (44 lbf.ft). 

8. Remove stand(s) and lower vehicle.
9. Position harness into footwell and  secure 

grommet. 

10. Connect ECM multiplugs. 
11. Position toe board and secure with trim  fixings. 
12. Connect engine harness to main harness  

multiplug and secure earth lead. 

13. Connect EVAP solenoid multiplug. 
14. Connect both fuse box multiplugs. 
15. Position starter lead to fuse box and  secure 

screw. 

16. Fit fuse box cover. 
17. Position battery positive lead to  battery and 

secure nut. 

18. Secure harness to coolant rail. 
19. Position alternator cables and  tighten terminal 

B+ to 18 Nm (13 lbf.ft) and  terminal D+ to 5 Nm 
(3.7 lbf.ft)

20. Connect coolant temperature sensor multiplug.
21. Connect A/C compressor multiplug. 
22. Secure harness clip to rear of LH cylinder head. 
23. Connect CKP sensor multiplug. 
24. Secure injector harness and connect  injector 

multiplugs. 

25. Connect coil multiplugs. 
26. Connect and secure HS

2

O sensor multiplug 

27. Fit upper inlet manifold.


 MANIFOLDS AND EXHAUST 

SYSTEMS - V8, REPAIRS, Gasket - inlet 
manifold - upper - Without Secondary Air 
Injection.

28. Connect battery earth lead.


Content   ..  759  760  761  762   ..