Isuzu Amigo / Axiom / Trooper / Rodeo / VehiCross. Manual - part 989


  Index      Isuzu     Isuzu Amigo / Axiom / Trooper / Rodeo / VehiCross - service repair manual 1999-2002 year


Search            


Content   ..  987  988  989  990   ..


Isuzu Amigo / Axiom / Trooper / Rodeo / VehiCross. Manual - part 989


8F–6

BODY STRUCTURE

Removal

1. Remove front fog light connector.
2. Remove front bumper assembly fixing bolt.

D

Remove the two bolts from both sides of the front
bumper.

601RW010

3. Remove front bumper assembly.
4. Remove bumper fascia lower bolts.
5. Remove front bumper retainer.
6. Remove reinforce lower bolts.

D

Loosen the five bolts and release claws.

7. Remove reinforce assembly.
8. Remove backbar fixing bolts.

D

Remove the four bolts at each backbar.

9. Remove front fog light assembly.

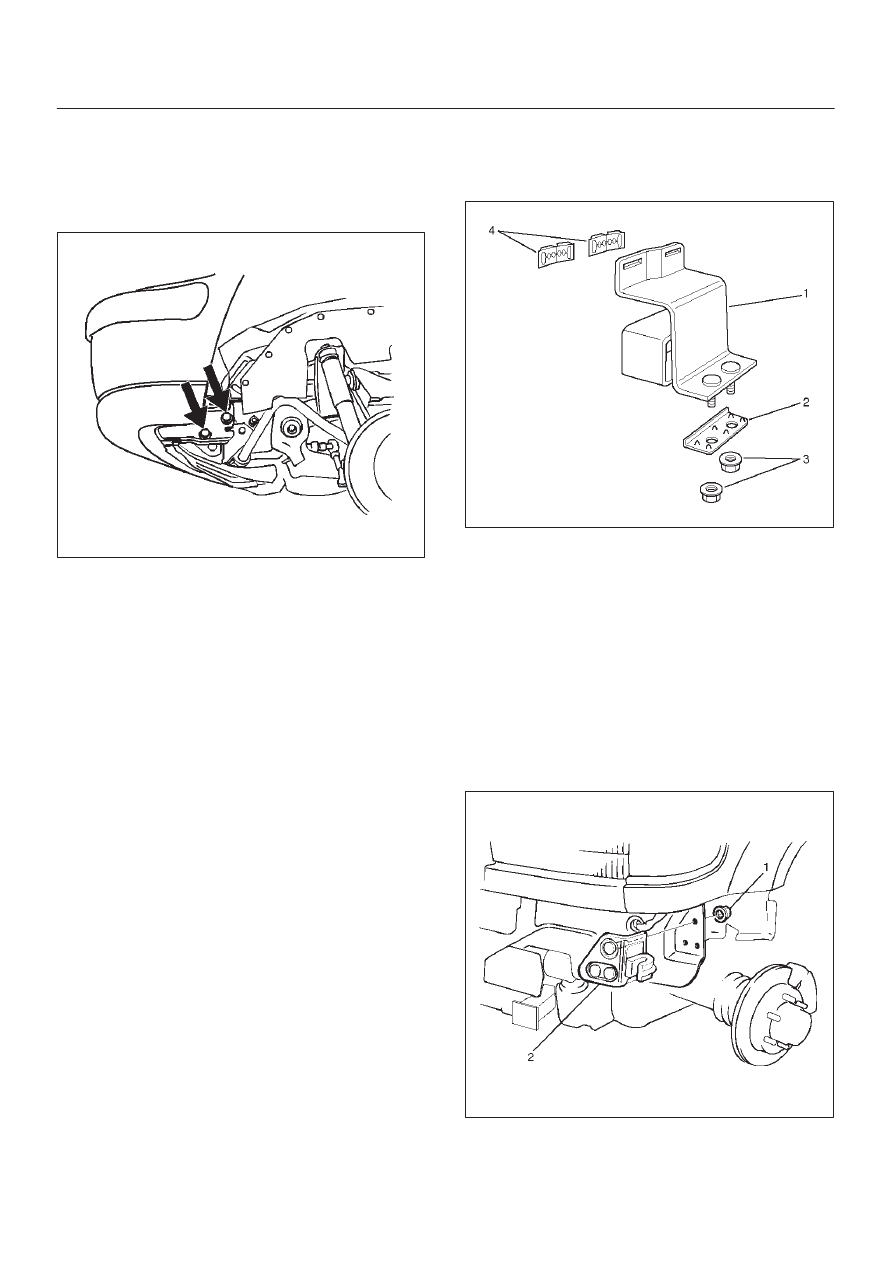
10. Remove the front bumper slider(1).

D

Remove the two clips(4) and the two nuts(3), and
release the claw from the washer(2). 

601RW009

Installation

To install, follow the removal steps in reverse order noting
the following points:

1. Tighten the front bumper assembly fixing bolts to the

specified torque.

Torque: 132 N

m (98 lb ft)

Front Bumper Slider Bracket

Removal

1. Remove the Front bumper.

D

Refer to Front Bumper in this section.

2. Remove the three nuts(1) and draw out the slider

bracket(2).

601RW003

Installation

To install, follow the removal steps in reverse order.

8F–7

BODY STRUCTURE

Rear Bumper

Parts Location

690RW001

Legend

(1) Back Bars
(2) Reinforce Assembly
(3) Rear Bumper Slider Brackets
(4) Rear Step Clips
(5) Reinforce Lower Bolts
(6) Reinforce Upper Bolts
(7) Rear Bumper Fascia Brackets

(8) Rear Bumper Fascia Bracket Screws
(9) Rear Bumper Assembly

(10) Rear Bumper Side Covers

(11) Mud Flaps

(12) Rear Bumper Assembly Fixing Bolts
(13) Rear Bumper Retainers
(14) Clips

8F–8

BODY STRUCTURE

Removal

1. Remove rear bumper side covers.
2. Remove mud flaps.

D

Remove three screws.

3. Remove bumper fascia bracket screws.
4. Remove rear bumper assembly fixing bolts.

D

Remove two bolts from each side.

690RW002

5. Remove rear bumper assembly.
6. Remove rear bumper retainers.
7. Remove reinforce upper bolts.

D

Remove the rear bumper retainer from each side,
and then remove two upper bolts.

8. Remove reinforce lower screws.
9. Remove clips.

10. Remove rear step clips.

11. Remove reinforce assembly.

D

Pull out both ends of the bumper fascia and take out
the reinforce assembly.

12. Remove backbars.

D

Remove the three bolts from each backbar.

13. Remove rear bumper slider brackets(4).

D

Remove the two clips(1) and two screws(3), and
then remove claw caught in the washer(2).

690RS003

14. Remove bumper fascia brackets.

D

Remove the fixing nut on the back side of the fender
panel.

Installation

To install, follow the removal steps in reverse order noting
the following points:

1. Tighten the front bumper assembly fixing bolts to the

specified torque.

Torque: 132 N

m (98 lb ft)

2. Apply chassis grease to the slider and the slider

bracket moving surface.

8F–9

BODY STRUCTURE

Rear Bumper Slider

Removal

1. Remove the rear bumper.

D

Refer to Rear Bumper in this section.

2. Remove the three bolts (2).
3. Remove rear bumper slider (1).

690RS004

Installation

To install, follow the removal steps in reverse order noting
the following points:

1. Apply chassis grease to the slider and the slider

bracket moving surface.


Content   ..  987  988  989  990   ..