Isuzu Amigo / Axiom / Trooper / Rodeo / VehiCross. Manual - part 486


  Index      Isuzu     Isuzu Amigo / Axiom / Trooper / Rodeo / VehiCross - service repair manual 1999-2002 year


Search            


Content   ..  484  485  486  487   ..


Isuzu Amigo / Axiom / Trooper / Rodeo / VehiCross. Manual - part 486


SEATS

8G–3

4. Pull out the reclining knob.
5. Remove the side cover.

D

Remove the two screws.

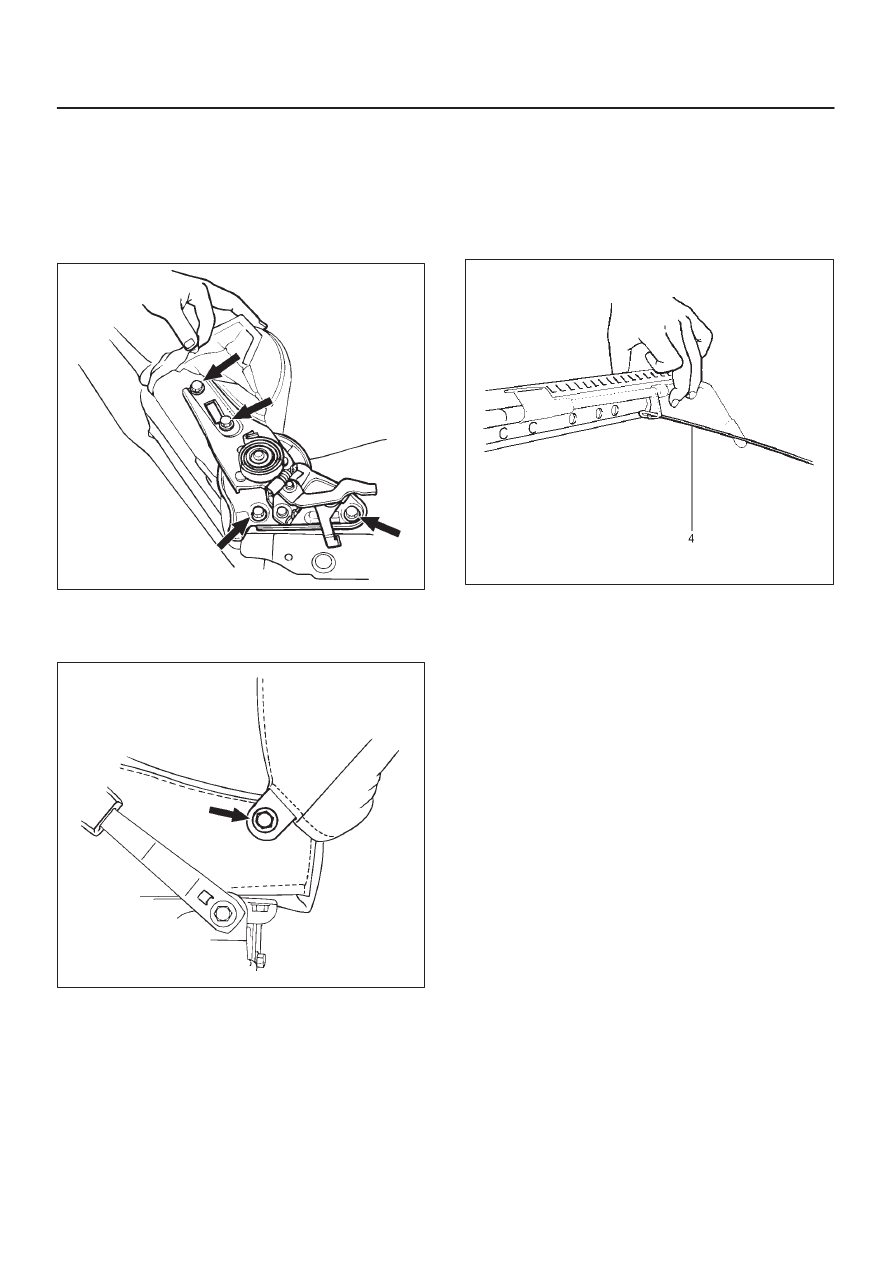
6. Remove the headrest.
7. Remove the reclining device.

D

Pull up on the seat back trim cover in order to
remove the reclining device fixing bolts.

750R200007

8. Remove the seat back assembly.

D

Remove the seat back assembly fixing nut on the
opposite side of the reclining device.

750R200008

9. Remove the trim cover (Seat back side).

10. Remove the guide holder.

D

Pull the guide holder out by holding the bottom end
of it from the seat back assembly.

11. Remove the seat adjuster.

D

Disconnect the release wire (4) and remove the
fixing bolts.

750RW006

12. Remove the seat belt buckle assembly.
13. Remove the trim cover (Seat cushion side).

Installation

To install, follow the removal steps in the reverse order,
noting the following points:

1. Tighten the reclining device fixing bolts to the

specified torque.

Torque: 46  N·m (34  lb ft)

2. Tighten the front seat assembly fixing bolts to the

specified torque.

Torque: 39  N·m (29  lb ft)

8G–4

SEATS

Power Seat Assembly

Power Seat Assembly and Associated Parts

750R200009

Legend

(1) Headrest
(2) Guide Holder
(3) Seat Back Frame Assembly
(4) Connecting Pipe
(5) Seat Back Pad
(6) Seat Heater (Required Option)
(7) Reclining Device Cover
(8) Reclining Device
(9) Outer Side Cover

(10) Reclining Switch Knob

(11) Slide Switch Knob

(12) Power Lumbar Switch (Driver’s Side)
(13) Power Seat Switch
(14) Seat Cushion Frame Assembly

(15) Power Seat Harness
(16) Adjuster Bracket Rear Cover
(17) Outer Seat Adjuster Assembly
(18) Adjuster Bracket Front Cover
(19) Front Cover
(20) Sliding Motor Cable 
(21) Inner Seat Adjuster Assembly
(22) Seat Cushion Pad
(23) Seat Cushion Assembly/Seat Cushion Trim

Cover

(24) Seat Belt Buckle Assembly
(25) Inner Side Cover
(26) Power Lumbar Support Assembly (Driver’s

Side)

(27) Seat Back Assembly/Seat Back Trim Cover

SEATS

8G–5

Removal

1. Remove the adjuster bracket rear cover and the fixing

bolts on the rear side of the seat adjuster assembly.

D

Before removal, slide the power seat assembly
forward.

2. Remove the adjuster bracket front cover and the

fixing bolts on the front side of the seat adjuster
assembly.

D

Before removal, slide the power seat assembly
backward.

3. Disconnect the battery ground cable.
4. Remove the power seat assembly.

D

Disconnect the power seat harness connectors and
the seat belt warning connector of the driver side.

CAUTION: When raising power seat assembly (1),
use the handle (2) not the cable (3). A bent cable
causes noise to occur during power seat operation.

D

Please grip the handle (4).

D

Don’t grip the cable (5).

750R200012

5. Pull the switch knobs out.
6. Remove the outer side cover.

D

Remove the two fixing screws and disconnect the
power seat switch connector.

7. Remove the power seat switch.

D

Remove the two fixing screws.

8. Remove the power lumber switch.

D

Remove the two fixing screws and connectors.

9. Remove the inner side cover.

10. Remove the headrest.

11. Remove the reclining device (2).

D

Flip up the seat back trim cover (1) in order to
remove the reclining device fixing bolts.

D

Disconnect the reclining motor harness connector
(3).

760R100037

12. Remove the reclining device covers.
13. Remove the trim cover and pad (Seat back side).
14. Remove the seat heater and connector (seat back

side).

15. Remove the power lumbar support assembly.
16. Remove the guide holder.

D

Pull the guide holder out by holding the bottom end
of it from the seat back assembly.

17. Remove the seat adjuster assembly.

D

Remove the four fixing bolts and disconnect the
sliding motor connector.

18. Remove the sliding motor cable (2).

D

Remove the nuts of each side.

CAUTION: Be sure to maintain the same position for
both outer and inner seat adjust assembly (1).

760R100038

8G–6

SEATS

19. Remove the seat belt buckle assembly.
20. Remove the trim cover and pad (Seat cushion side)
21. Remove the seat heater and connector (Seat cushion

side).

22. Remove the power seat harness.

Installation

To install, follow the removal steps in the reverse order,
noting the following points:

1. Tighten the reclining device fixing bolts to the

specified torque.

Torque: 46  N·m (34  lb ft)

2. Tighten the seat adjuster fixing bolts to the specified

torque.

Torque: 21  N·m (15  lb ft) to seat cushion

Torque: 39  N·m (29  lb ft) to body

3. Tighten the seat belt buckle assembly fixing bolts to

the specified torque.

Torque: 29 N·m (22  lb ft)


Content   ..  484  485  486  487   ..