Isuzu Amigo / Axiom / Trooper / Rodeo / VehiCross. Manual - part 88


  Index      Isuzu     Isuzu Amigo / Axiom / Trooper / Rodeo / VehiCross - service repair manual 1999-2002 year


Search            


Content   ..  86  87  88  89   ..


Isuzu Amigo / Axiom / Trooper / Rodeo / VehiCross. Manual - part 88


4A2–10

DIFFERNTIAL (REAR)

Pinion Oil Seal

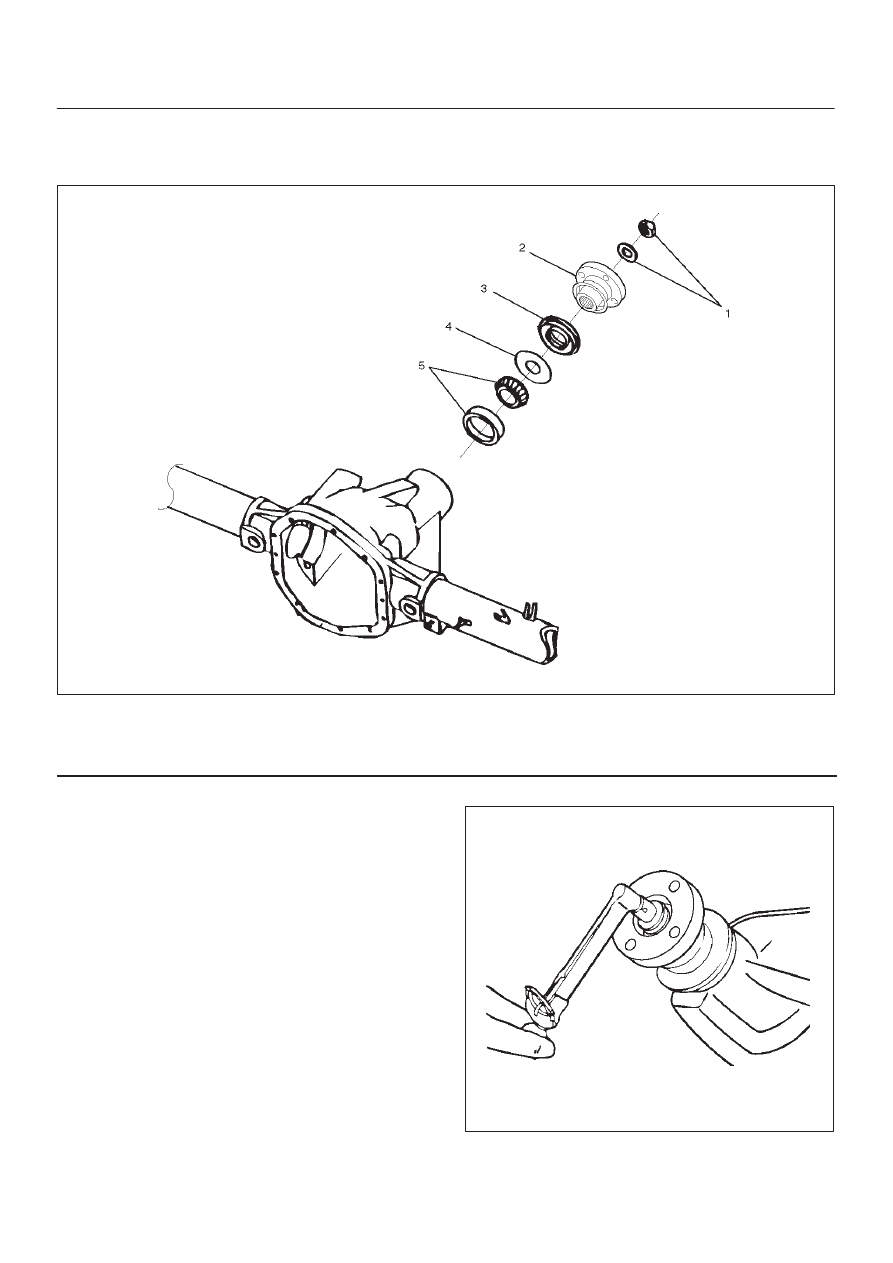
Pinion Oil Seal and Associated Parts

420RW013

Legend

(1) Flange Nut and Washer
(2) Flange

(3) Oil Seal
(4) Outer Oil Seal Slinger
(5) Outer Pinion Bearing (Cup and Cone)

Removal

1. Remove the rear propeller shaft.  Refer to 

Rear

Propeller Shaft in this section.

2. Drain the rear axle oil.
3. Check and record preload with an inch pound torque

wrench. This will give combined pinion bearing, seal,
carrier bearing, axle bearing and seal preload.

425RW018

DIFFERENTIAL (REAR)

4A2–11

4. Remove flange nut and washer by using pinion flange

holder J–8614–01 after raising up its staked parts
completely.

425RW037

5. Remove flange by using SST J–8614–1 

 3.

D

Have a suitable container in place to catch
lubricant.

425RW038

6. Remove oil seal.
7. Remove pinion oil seal slinger.
8. Remove outer bearing by using remover J–39602.

425RS090

9. Remove collapsible spacer.

Inspection and Repair

Make necessary correction or parts replacement if wear,
damage, corrosion or any other abnormal condition are
found through inspection.
Check the following parts.

1. Seal surface of the flange.
2. Cage bore for burns.

Installation

1. Install collapsible spacer, discard the used collapsible

spacer and install a new one.

2. Install outer bearing.

NOTE: Do not drive in, but just temporarily set in the outer
bearing by hand, which should be indirectly pressed in
finally by tightening the flange nut.

4A2–12

DIFFERNTIAL (REAR)

3. By using the seal installer J–37263, install a new oil

seal (1) that has grease on seal lip.

425RS004

4. Install flange.
5. The pinion washer and a new nut while holding the

pinion flange with J–8614–01.

D

Tighten the nut until the pinion end play is just taken
up. Rotate the pinion while tightening the nut to seat
the bearings. Once there is not end play in the
pinion, the preload torque should be checked.

D

Remove J–8614–01. Using an inch-pound torque
wrench, check to make sure the pinion preload is
equal to or slightly over the reading recorded during
removal.

425RW018

6. Install propeller shaft to the frange.
7. Install bolt and nut. Tighten the bolt and nut to the

specified torque.

Torque: 63 N·m (46 lb ft)

DIFFERENTIAL (REAR)

4A2–13

Differential Assembly

Disassembled View

420RW018

Legend

(1) ABS Speed Sensor
(2) Housing
(3) Outer Pinion Bearing (Cup and Cone)
(4) Outer Oil Slinger
(5) Oil Seal
(6) Companion Flange Assembly
(7) Pinion Nut Washer
(8) Pinion Nut
(9) Collapsible Spacer

(10) Baffle Plate

(11) Inner Pinion Bearing (Cup and Cone)

(12) Inner Oil Slinger
(13) Pinion gear adj. Shim-Selective (Position)
(14) Ring gear and Pinion Gear Assembly
(15) Exciter Ring
(16) Differential Case

(17) Lock Pin
(18) Axle Vent
(19) Gasket
(20) Cover and Clip Assembly
(21) Fill Plug (with Magnet)
(22) Mounting Bracket
(23) Side Bearing Cap Bolt
(24) Side Bearing Cap
(25) Ring Gear Bolts
(26) Differential Adjustment Shims (Side Bearing

Preload and Ring Gear/Pinion Backlash)

(27) Side Bearing (Cup and Cone)
(28) Differential Shaft
(29) Differential Side Gears
(30) Side Gear Thrust Washer
(31) Pinion Mate Gears
(32) Thrustwasher-Differential Pinion Mate Gear


Content   ..  86  87  88  89   ..