Isuzu Amigo / Axiom / Trooper / Rodeo / VehiCross. Manual - part 86


  Index      Isuzu     Isuzu Amigo / Axiom / Trooper / Rodeo / VehiCross - service repair manual 1999-2002 year


Search            


Content   ..  84  85  86  87   ..


Isuzu Amigo / Axiom / Trooper / Rodeo / VehiCross. Manual - part 86


4A2–2

DIFFERNTIAL (REAR)

General Description

The rear axle assembly is of the semi–floating type in
which the vehicle weight is carried on the axle housing .
The center line  of the pinion gear is below the center line
of the ring gear (hypoid drive).
All parts necessary to transmit power from the propeller
shaft to the rear wheels are enclosed in a salisbury type
axle housing (a carrier casting with tubes pressed and
welded into the carrier).  A removable aluminum cover at
the rear of the axle housing permits rear axle service
without removal of the entire assembly from the vehicle.
The 8.9 inch ring gear rear axle uses a conventional ring
and pinion gear set to transmit the driving force of the
engine to the rear wheels. This gear set transfers this
driving force at a 90 degree angle from the propeller shaft
to the drive shafts.
The axle shafts are supported at the wheel end of the
shaft by a roller bearing.
The pinion gear is supported by two tapered roller
bearings. The pinion depth is set by a shim pack located
between the gear end of the pinion and the roller bearing
that is pressed onto the pinion.  The pinion bearing
preload is set by crushing a collapsible spacer between
the bearings in the axle housing.
The ring gear is bolted onto the differential case with 10
bolts.
The differential case is supported in the axle housing by
two tapered roller bearings. The differential and ring gear
are located in relationship to the pinion by using selective
shims and spacers between the bearing and the
differential case. To move the ring gear, shims are deleted
from one side and an equal amount are added to the other
side.  These shims are also used to preload the bearings
which are pressed onto the differential case. Two bearing
caps are used to hold the differential into the rear axle
housing.
The differential is used to allow the wheels to turn at
different rates of speed while the rear axle continues to
transmit the driving force.  This prevents tire scuffing
when going around corners and prevents premature wear
on internal axle parts.
The rear axle is sealed with a pinion seal, a seal at each
axle shaft end, and by a liquid gasket between the rear
cover and the axle housing.

Limited Slip Differential (LSD)

The axle assembly may be equipped with an limited slip
differential (LSD). It is similar to the standard differential
except that part of the torque from the ring gear is
transmitted through clutch packs between the side gears
and differential case.
The LSD construction permits differential action when
required for turning corners and transmits equal torque to
both wheels when driving straight ahead. However, when
one wheel tries to spin due to a patch of ice, etc., the
clutch packs automatically provide more torque to the
wheel which is not trying to spin.
In diagnosing customer complaints, it is important to
recognize two things:

1. If, both wheels slip, with unequal traction, the LSD

has done all it can possibly do.

2. In extreame cases of differences in traction, the

wheel with the least traction may spin after the LSD
has transferred as much torque as possible to the
non-slipping wheel.

Limited Slip Differntials impose additional requirements
on lubricants, and require a special lubricant or lubricant
additive. Use 80W90 GL–5 LSD lubricant.

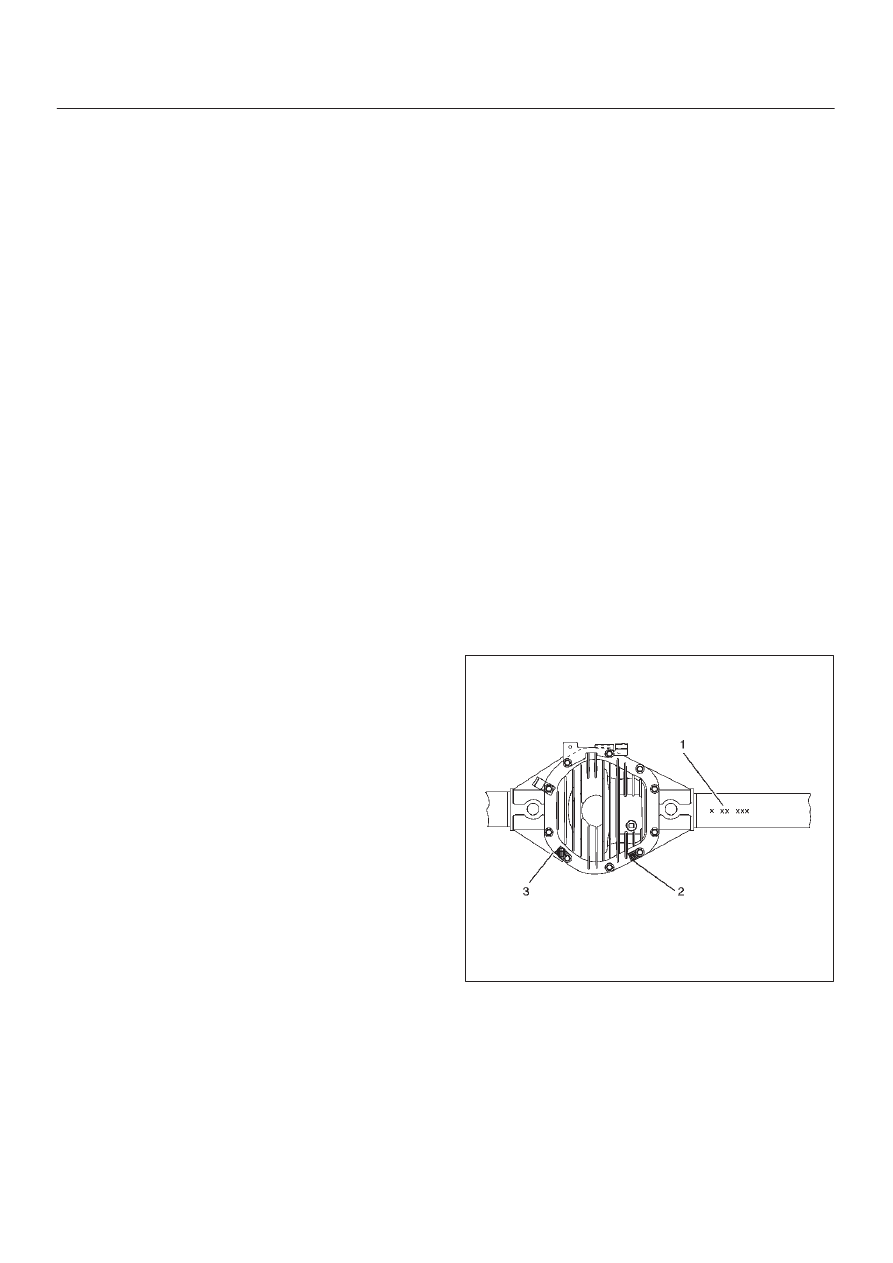
Rear Axle Identification

The Bill of Material and build date information(1) is
stamped on the right axle tube on the rearward side.
The axle ratio is identified by a tag(3) which is secured by
a cover bolt. If the axle has limited-slip differntial, it also
will be identified with a tag(2) secured by a cover bolt.

425RX001

DIFFERENTIAL (REAR)

4A2–3

Diagnosis

Many noises that seem to come from the rear axle
actually originate from other sources such as tires, road
surface, wheel bearings, engine, transmission, muffler, or
body drumming.  Investigate to find the source of the
noise before disassembling the rear axle.  Rear axles, like
any other mechanical device, are not absolutely quiet but
should be considered quiet unless some abnormal noise
is present.
To make a systematic check for axle noise, observe the
following:

1. Select a level asphalt road to reduce tire noise and

body drumming.

2. Check rear axle lubricant level to assure correct level,

and then drive the vehicle far enough to thoroughly
warm up the rear axle lubricant.

3. Note the speed at which noise occurs. Stop the

vehicle and put the transmission in neutral. Run the
engine speed slowly up and down to determine if the
noise is caused by exhaust, muffler noise, or other
engine conditions.

4. Tire noise changes with different road surfaces; axle

noises do not. Temporarily inflate all tires to 344 kPa
(50 psi) (for test purposes only). This will change
noise caused by tires but will not affect noise caused
by the rear axle.
Rear axle nose usually stops when coasting at
speeds under 48 km/h (30 mph); however, tire noise
continues with a lower tone. Rear axle noise usually
changes when comparing pull and coast, but tire
noise stays about the same.
Distinguish between tire noise and rear axle noise by
noting if the noise changes with various speeds or
sudden acceleration and deceleration. Exhaust and
axle noise vary under these conditions, while tire
noise remains constant and is more pronounced at
speeds of 32 to 48 km/h (20 to 30 mph). Further check
for tire noise by driving the vehicle over smooth
pavements or dirt roads (not gravel) with the tires at
normal pressure. If the noise is caused by tires, it will
change noticeably with changes in road surface.

5. Loose or rough front wheel bearings will cause noise

which may be confused with rear axle noise; however,
front wheel bearing noise does not change when
comparing drive and coast. Light application of the
brake while holding vehicle speed steady will often
cause wheel bearing noise to diminish. Front wheel
bearings may be checked for noise by jacking up the
wheels and spinning them or by shaking the wheels to
determine if bearings are loose.

6. Rear suspension rubber bushings and spring

insulators dampen out rear axle noise when correctly
installed. Check to see that there is no link or rod
loosened or metal–to–metal contact.

7. Make sure that there is no metal–to–metal contact

between the floor and the frame.

After the noise has been determined to be in the axle, the
type of axle noise should be determined, in order to make
any necessary repairs.

Gear Noise

Gear noise (whine) is audible from 32 to 89 km/h (20 to 55
mph) under four driving conditions.

1. In drive under acceleration or heavy pull.
2. Driving under load or under constant speed.
3. When using enough throttle to keep the vehicle from

driving the engine while the vehicle slows down
gradually (engine still pulls slightly).

4. When coasting with the vehicle in gear and the throttle

closed.  The gear noise is usually more noticeable
between 48 and 64 km/h (30 and 40 mph) and 80 and
89 km/h (50 and 55 mph).

Bearing Noise

Bad bearings generally produce a rough growl or grating
sound, rather than the whine typical of gear noise.
Bearing noise frequently “wow–wows” at bearing rpm,
indicating a bad pinion or rear axle side bearing.  This
noise can be confused with rear wheel bearing noise.

Rear Wheel Bearing Noise

Rear wheel bearing noise continues to be heard while
coasting at low speed with transmission in the neutral.
Noise may diminish by gentle braking. Jack up the rear
wheels, spin them by hand and listen for noise at the
hubs. Replace any faulty wheel bearings.

Knock At Low Speeds

Low speed knock can be caused by worn universal joints
or a side gear hub counter bore in the cage that is worn
oversize.  Inspect and replace universal joints or cage and
side gears as required.

Backlash Clunk

Excessive clunk on acceleration and deceleration can be
caused by a worn rear axle pinion shaft, a worn cage,
excessive clearance between the axle and the side gear
splines, excessive clearance between the side gear hub
and the counterbore in the cage, worn pinion and side
gear teeth, worn thrust washers, or excessive drive pinion
and ring gear backlash. Remove worn parts and replace
as required. Select close–fitting parts when possible.
Adjust pinion and ring gear backlash.

4A2–4

DIFFERNTIAL (REAR)

Rear Axle Noise

Condition

Possible cause

Correction

Noise in Drive

Excessive pinion to ring gear
backlash.

Adjust.

Worn pinion and ring gear.

Replace

Worn pinion .bearings.

Replace.

Loose pinion bearings.

Adjust.

Excessive pinion end play.

Adjust.

Worn side bearings.

Replace.

Loose side bearings.

Adjust.

Excessive ring gear run-out.

Replace.

Low oil level.

Replenish.

Wrong or poor grade oil.

Replace.

Bent axle housing.

Replace.

Noisy when coasting

Axle noise heard when driving will
usually be heard also on coasting,
although not as loud.

Adjust or replace.

Pinion and ring gear too tight (audible
when slowing down and disappears
when driving).

Adjust.

Intermittent noise

Warped bevel ring.

Replace.

Loose differential case bolts.

Tighten.

Constant noise

Flat spot on pinion or ring gear teeth.

Replace.

Flat spot on bearing.

Replace.

Worn pinion splines.

Replace.

Worn axle shaft dowel holes.

Replace.

Worn hub studs.

Replace.

Bent axle shaft.

Replace.

Noisy on turns

Worn differential side gears and
pinions.

Replace.

Worn differential shaft.

Replace.

Worn axle shaft splines.

Replace.

Limited Slip Differential

Condition

Possible cause

Correction

Does not lock

Broken clutch plates.

Replace the clutch plates.

Chatters in turns

Lubricant contaminated.

Drain lube when hot. Wipe carrier
clean. Refill with lube specified in
Main Data and Specifications at the
end of this section.

Clutch plates dateriorated.

Replace clutch plates.

Noise (in addition to normal clutch
engagement)

Broken clutch plates.

Replace clutch plates.

engagement)

Damaged case.

Replace unit.

Broken differential gears.

Replace gears.

DIFFERENTIAL (REAR)

4A2–5

Axle Housing

Axle Housing and Associated Parts

420RW030

Legend

(1) Lower Link
(2) Stabilizer
(3) Upper Link
(4) Rear Propeller shaft
(5) Shock Absorber

(6) Lateral Rod
(7) Brake Hose
(8) Coil Spring
(9) Parking Cable

(10) Axle Assembly

Removal

1. Raise the vehicle and support it with suitable safety

stands.
The hoist must remain under the rear axle housing.

2. Take out brake fluid.  Refer to 

Hydraulic Brakes in

Brake section.

3. Remove rear wheels and tires.  Refer to 

Wheel

Replacement in Suspension section.

4. Remove propeller shaft.  Refer to 

Rear Propeller

Shaft in this section.

5. Drain the rear axle oil into a proper container.
6. Remove parking brake cable, release the connection

between the cable fixing clip equalizer.  Refer to
Parking Brakes in Brake section.

7. Move the clip aside and pull out the breather hose.
8. Disconnect the ABS connectors (1) and remove the

brackets attached to the frame and center link.

350RW023


Content   ..  84  85  86  87   ..