Honda Ridgeline. Manual - part 463


  Index      Honda     Honda Ridgeline - service repair manual 2006-2008 year


Search            


Content   ..  461  462  463  464   ..


Honda Ridgeline. Manual - part 463


03

01

SJC8A00J46660520703FEAT00

Rear Door (RTS, RTL, and EXL models)

22-148

22-148

Keyless/Power Door Locks/Security System

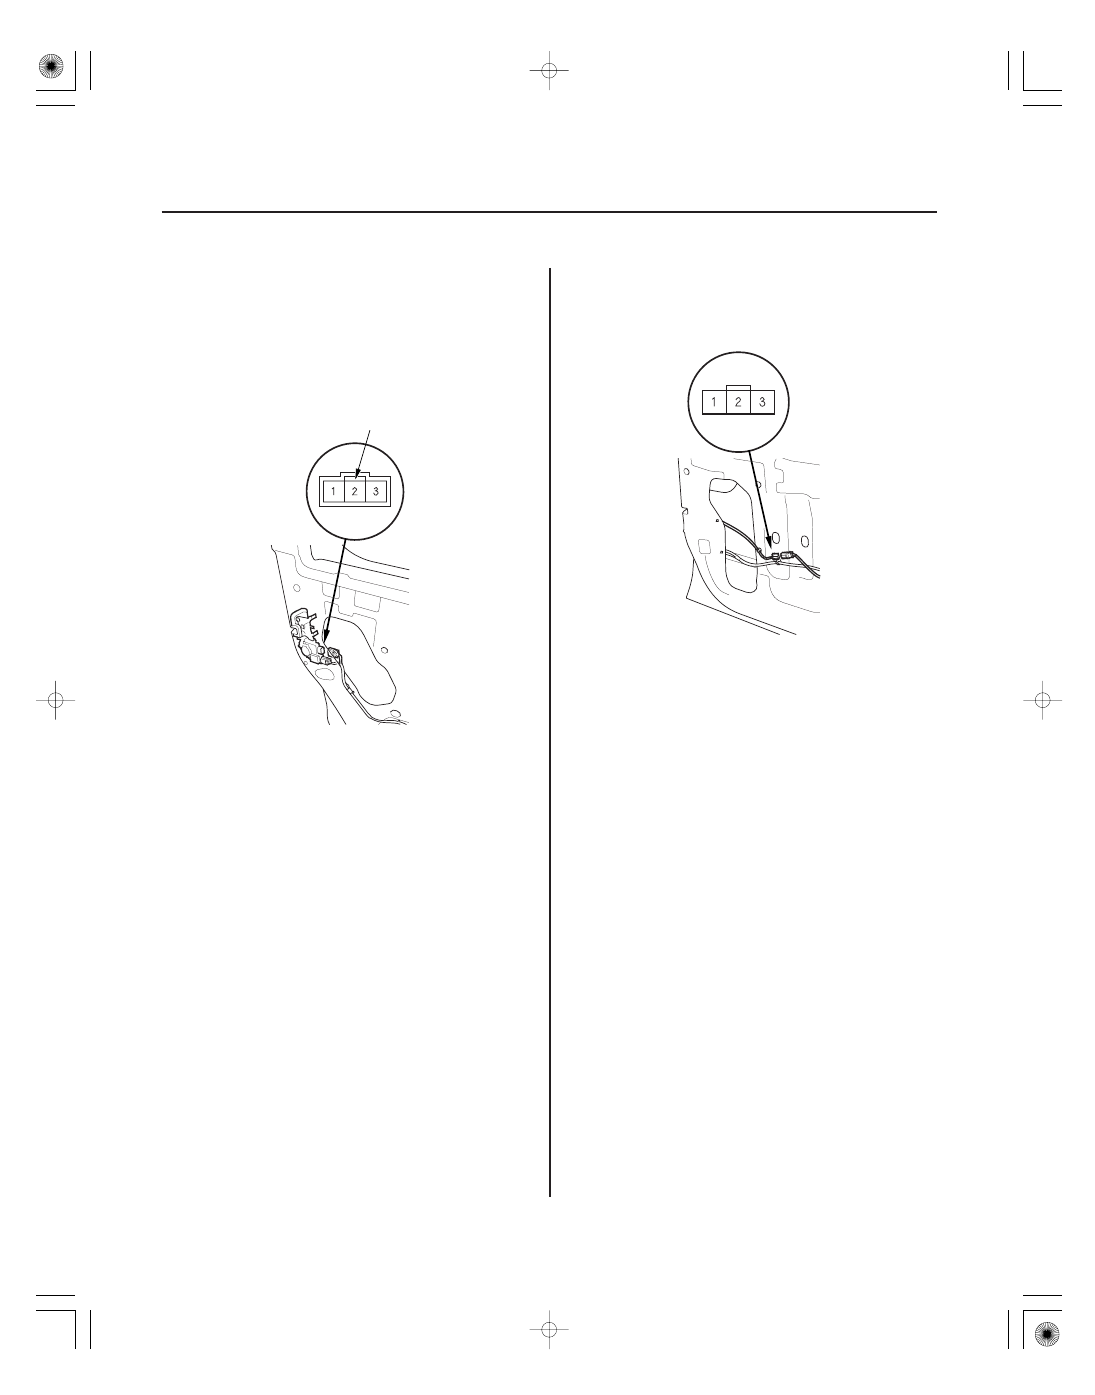
Door Lock Knob Switch Test
(cont’d)

Door Key Cylinder Switch Test

Not used

1. Remove the left or right rear door panel (see page

20-14).

2. Disconnect the 3P connector from the actuator.

3. Check for continuity between the terminals.

There should be continuity between the No. 1 and
No. 3 terminals when the door lock knob switch is
UNLOCK position and no continuity when the
switch is in the LOCK position.

4. If the continuity is not as specified, replace the door

lock actuator.

1. Remove the driver’s door panel (see page 20-7).

2. Disconnect the 3P connector from the key cylinder

switch.

3. Check for continuity between the terminals.

• There should be continuity between the No. 2

and No. 3 terminals when the door key cylinder
switch is in LOCK position.

• There should be no continuity between the No. 2

and No. 3 terminals when the door key cylinder
switch is in the neutral or UNLOCK position.

• There should be continuity between the No. 1

and No. 2 terminals when the door key cylinder
switch is in UNLOCK position.

• There should be no continuity between the No. 1

and No. 2 terminals when the door key cylinder
switch is in the neutral or LOCK position.

4. If the continuity is not as specified, replace the door

key cylinder assembly (see page 20-8).

01

SJC8A00J46660521021FEAT00

01

SJC8AGCJ46643432301FEAT00

Passenger’s Door Lock Switch

RTS, RTL, and EXL models

22-149

22-149

Door Lock Switch Test

Hood Switch Test

1. Remove the front passenger’s door panel (see page

20-7).

2. Check for continuity between the terminals.

• There should be continuity between the No. 2

and No. 9 terminals when the door lock switch is
in LOCK position. There should be no continuity
between the No. 2 and No. 9 terminals when the
door lock switch is in the neutral position.

• There should be continuity between the No. 1

and No. 9 terminals when the door lock switch is
in UNLOCK position. There should be no
continuity between the No. 1 and No. 9 terminals
when the door lock switch is in the neutral
position.

3. If the continuity is not as specified, replace the door

lock switch.

1. Open the hood.

2. Disconnect the 2P connector from the hood switch.

3. Check for continuity between the terminals.

There should be continuity between the No. 1 and
No. 2 terminals when the hood is opened (lever
released). There should be no continuity between
the No. 1 and No. 2 terminals when the hood is
closed (lever pushed down).

4. If the continuity is not as specified, replace the

hood latch (see page 20-185).

01

SJC8AGCJ46643454301FHAT10

01

SJC8AGCJ46643435241FEAT00

RTS, RTL, and EXL models

RTS, RTL, and EXL models

22-150

22-150

Keyless/Power Door Locks/Security System

Security Indicator Test/
Replacement

In-Bed Trunk Lid Key Cylinder
Switch Test

A

1. Remove the driver’s door panel (see page 20-7).

2. Remove the security indicator (A) from the door

panel.

3. Test the indicator by connecting battery power to

the No. 2 terminal and grounding the No.1 terminal.
The LED should come on.

4. If the LED does not come on, replace the security

indicator.

1. Remove the in-bed trunk lid inner cover (see step 2

on page 20-187).

2. Disconnect the 2P connector from the key cylinder

switch.

3. Check for continuity between the terminals.

There should be continuity between the No. 1 and
No. 2 terminals when the in-bed trunk lid key
cylinder switch is in UNLOCK position. There
should be no continuity between the No. 1 and
No. 2 terminals when the in-bed trunk lid key
cylinder switch is in the released (neutral) position.

4. If the continuity is not as specified, replace the in-

bed trunk lid key cylinder switch.

01

02

SJC8A00J46643436101FEAT00

With HDS

22-151

Transmitter Test

A

NOTE:

• If the doors unlock or lock with the transmitter, but

the LED on the transmitter does not come on, the LED
is faulty; replace the transmitter.

• If any door is open, you cannot lock the doors with

the transmitter.

• If you unlocked the doors with the transmitter, but do

not open any of the doors within 30 seconds, the
doors relock automatically.

• The doors do not lock or unlock with the transmitter if

the ignition key is inserted in the ignition switch.

1. Press the lock or unlock button five or six times to

reset the transmitter.

• If the locks work, the transmitter is OK.
• If any of the transmitter buttons do not work,

replace the transmitter, then reprogram and
register the transmitter (see page 22-324).

• If the locks don’t work, go to step 2.

2. Connect the HDS to the data link connector.

3. Select the KEYLESS from the BODY ELECTRICAL

menu, then enter the KEYLESS CHECK.

4. Press the lock, unlock, trunk, or panic button and

check the response on the screen of the HDS.

NOTE: The door lock actuators may or may not
cycle when receiving input from the transmitter.

• If KEYLESS ENTRY TRANSMITTER CODE IS

RECEIVED is indicated, the transmitter is OK.

• If DIFFERENT KEYLESS ENTRY TRANSMITTER

CODE IS RECEIVED is indicated, the transmitter is
not registered to the vehicle, if necessary,
reprogram and register the transmitter (see page
22-324).

• If KEYLESS ENTRY TRANSMITTER CODE IS NOT

RECEIVED is indicated, go to step 5.

5. Open the transmitter and check for water damage.

• If you find any water damage, replace the

transmitter, then reprogram and register the
transmitter (see page 22-324).

• If there is no water damage, go to step 6.

6. Replace the transmitter battery (A) with a new one,

and press lock or unlock button and check the
receive condition on the screen of the HDS.

• If KEYLESS ENTRY TRANSMITTER CODE IS

RECEIVED is indicated, the transmitter is OK.

• If KEYLESS ENTRY TRANSMITTR CODE IS NOT

RECEIVED is indicated, go to step 7.

(cont’d)


Content   ..  461  462  463  464   ..