Honda Element. Manual - part 239


  Index      Honda     Honda Element - service repair manual 2007-2008 year


Search            


Content   ..  237  238  239  240   ..


Honda Element. Manual - part 239


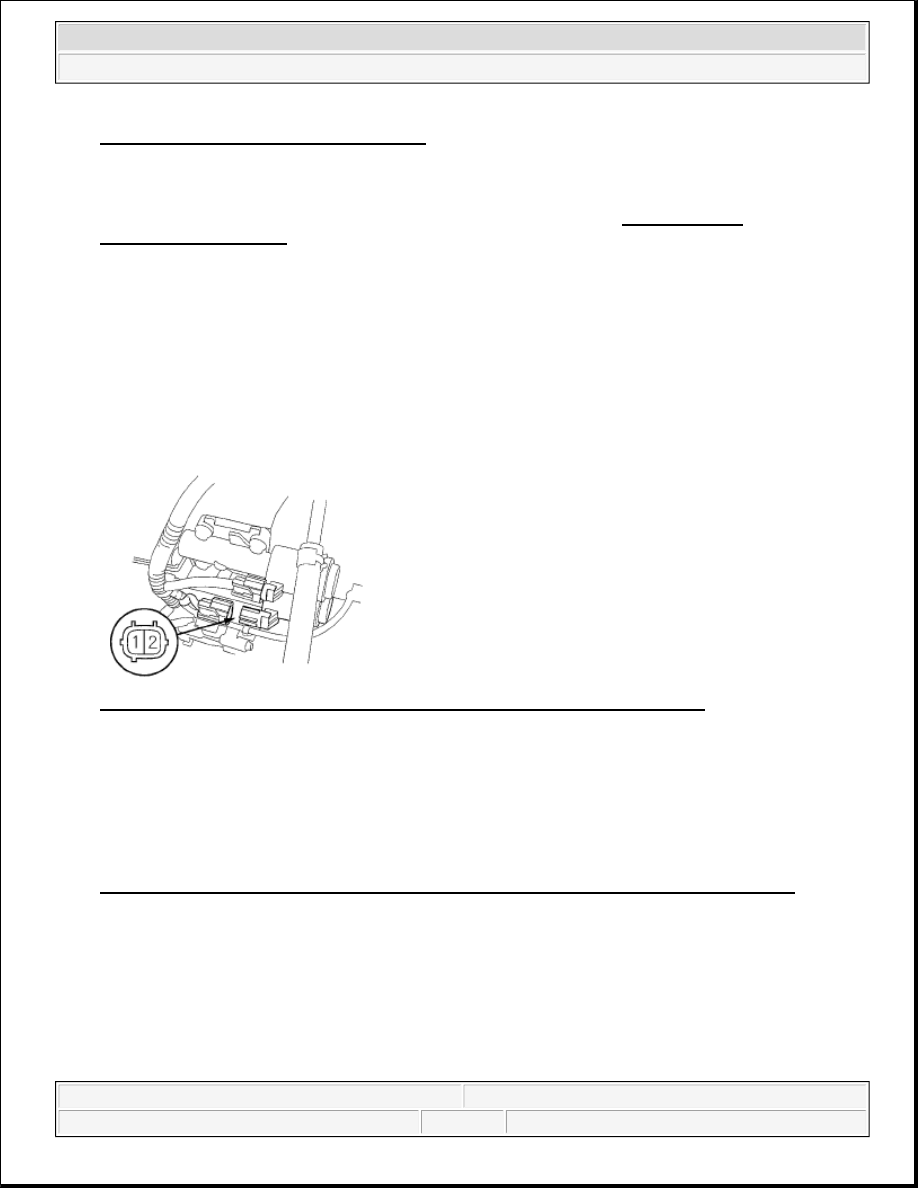
Fig. 188: Identifying Data Link Connector
Courtesy of AMERICAN HONDA MOTOR CO., INC.
 

2. Select Clutch Pressure Control (Linear) Solenoid B in Miscellaneous Test Menu on the HDS. If the HDS 

does not communicate with the PCM, troubleshoot the DLC circuit (see DLC CIRCUIT 
TROUBLESHOOTING
 ).  

3. Test A/T clutch pressure control solenoid valve B with the HDS.  

4. Follow the instructions indicated on the HDS by the test result. If the HDS has not determined the cause 

of the failure, remove A/T clutch pressure control solenoid valves B and C, and test.  

5. Make sure you have the anti-theft code for the audio system, and write down the audio presets.  

6. Disconnect the battery negative terminal, then disconnect the battery positive terminal.  

7. Remove the battery hold-down bracket, then remove the battery and battery tray.  

8. Remove the battery base.  

9. Disconnect the A/T clutch pressure control solenoid valve B connector. 

Fig. 189: Identifying A/T Clutch Pressure Control Solenoid Valve B Connector 
Courtesy of AMERICAN HONDA MOTOR CO., INC. 

10. Measure A/T clutch pressure control solenoid valve B resistance between solenoid valve B terminals No. 

land No. 2. 

Standard: 3-10 ohms  

11. If the resistance is out of the. standard, replace A/T clutch pressure control solenoid valves B and C (see 

A/T CLUTCH PRESSURE CONTROL SOLENOID VALVE B AND C REPLACEMENT ).  

12. Connect the battery positive terminal to A/T clutch pressure control solenoid valve B connector terminal 

No. 1, and connect the battery negative terminal to terminal No. 2. A clicking sound should be heard.  

13. If no sound is heard, remove A/T clutch pressure control solenoid valves B and C.  

14. Remove the mounting bolts, harness clamp bracket (A), and A/T clutch pressure control solenoid valves 

B and C. 


2007 Honda Element EX 

2007-2008 TRANSMISSION Automatic Transmission - Element


Fig. 190: Identifying Harness Clamp Bracket And A/T Clutch Pressure Control Solenoid Valves 
With Torque Specification
 
Courtesy of AMERICAN HONDA MOTOR CO., INC. 

15. Remove the ATF joint pipes (D), O-rings (E), and gasket (F).  

16. Check the fluid passage of the A/T clutch pressure control solenoid valve for dust or dirt, and clean the 

passage.  

17. Connect A/T clutch pressure control solenoid valve B connector terminal No. 1 to the battery positive 

terminal, and connect terminal No. 2 to the battery negative terminal. Make sure A/T clutch pressure 
control solenoid valve B moves. 


2007 Honda Element EX 

2007-2008 TRANSMISSION Automatic Transmission - Element


Fig. 191: Checking A/T Clutch Pressure Control Solenoid Valve B Moves 
Courtesy of AMERICAN HONDA MOTOR CO., INC. 

18. Disconnect one of the battery terminals, and check valve movement. 

19. If the valve binds or moves sluggishly, or if the solenoid valve does not operate, replace A/T clutch 

pressure control solenoid valves B and C (see A/T CLUTCH PRESSURE CONTROL SOLENOID 
VALVE B AND C REPLACEMENT
 ).  

20. Install a new gasket on the transmission housing, and install the ATF joint pipes.  

21. Install new O-rings over the ATF joint pipes.  

22. Install A/T clutch pressure control solenoid valves B and C, and harness clamp bracket.  

23. Check the A/T clutch pressure control solenoid valve B and C connectors for rust, dirt, or oil, then 

connect the connectors securely.  

24. Install the battery base, battery tray, and battery, then secure the battery with its hold-down bracket.  

25. Connect the battery terminals.  

26. Enter the anti-theft code for the audio system, then enter the audio presets.  

27. Do the power window control unit reset procedure (see RESETTING THE POWER WINDOW 

CONTROL UNIT ).  

28. Set the clock.  

A/T CLUTCH PRESSURE CONTROL SOLENOID VALVE C TEST 

1. Connect the HDS to the DLC (A). 

NOTE:

You can see valve movement through the fluid passage in the mounting 
surface of the A/T clutch pressure control solenoid valves B and C body.


2007 Honda Element EX 

2007-2008 TRANSMISSION Automatic Transmission - Element


Fig. 192: Identifying Data Link Connector 
Courtesy of AMERICAN HONDA MOTOR CO., INC. 

2. Select Clutch Pressure Control (Linear) Solenoid C in Miscellaneous Test Menu on the HDS. If the HDS 

does not communicate with the PCM, troubleshoot the DLC circuit (see DLC CIRCUIT 
TROUBLESHOOTING
 ).  

3. Test A/T clutch pressure control solenoid valve C with the HDS.  

4. Follow the instructions indicated on the HDS by the test result. If the HDS has not determined the cause 

of the failure, remove A/T clutch pressure control solenoid valves B and C, and test.  

5. Make sure you have the anti-theft code for the audio system, and write down the audio presets.  

6. Disconnect the battery negative terminal, then disconnect the battery positive terminal.  

7. Remove the battery hold-down bracket, then remove the battery and battery tray.  

8. Remove the battery base.  

9. Disconnect the A/T clutch pressure control solenoid valve C connector. 

Fig. 193: Identifying A/T Clutch Pressure Control Solenoid Valve C Connector 
Courtesy of AMERICAN HONDA MOTOR CO., INC. 

10. Measure A/T clutch pressure control solenoid valve C resistance between solenoid valve C terminals No. 

1 and No. 2. 

Standard: 3-10 ohms  

11. If the resistance is out of the standard, replace A/T clutch pressure control solenoid valves B and C (see 


2007 Honda Element EX 

2007-2008 TRANSMISSION Automatic Transmission - Element


Content   ..  237  238  239  240   ..