Honda Element. Manual - part 236


  Index      Honda     Honda Element - service repair manual 2007-2008 year


Search            


Content   ..  234  235  236  237   ..


Honda Element. Manual - part 236


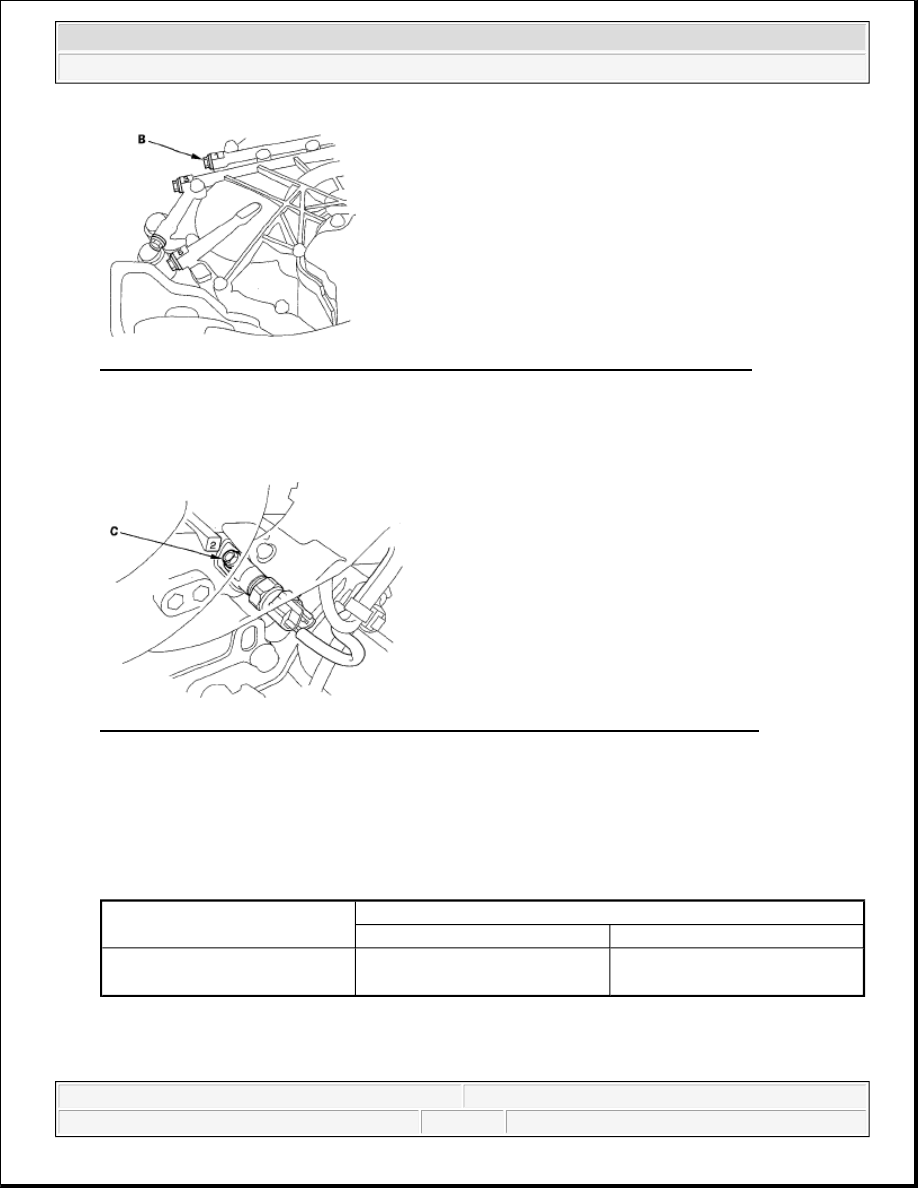
Fig. 172: Connecting A/T Oil Pressure Gauge To 1st Clutch Pressure Inspection Port 
Courtesy of AMERICAN HONDA MOTOR CO., INC. 

11. Remove the intake air duct and air cleaner assembly, and connect the A/T oil pressure gauge to the 2nd 

clutch pressure inspection port (C). Then temporarily install the air cleaner assembly and intake air duct. 

Fig. 173: Connecting A/T Oil Pressure Gauge To 2nd Clutch Pressure Inspection Port 
Courtesy of AMERICAN HONDA MOTOR CO., INC. 

12. Start the engine, shift to the 1 position, and measure the 1st clutch pressure at the 1st clutch pressure 

inspection port (B) while holding engine speed at 2,000 rpm.  

13. Shift to the 2 position, and measure the 2nd clutch pressure at the 2nd clutch pressure inspection port (C) 

while holding engine speed at 2,000 rpm. 

FLUID PRESSURE SPECIFICATIONS 

14. Turn the engine off, then disconnect the A/Toil pressure gauges from the 1st clutch pressure and 2nd 

clutch pressure inspection ports.  

15. Install the sealing bolts to the 1st clutch pressure and 2nd clutch pressure inspection ports with the new 

Pressure

Fluid Pressure

Standard

Service Limit

1st clutch (B) 2nd clutch (C)

890-970 kPa (9.1-9.9 kgf/cm

2

 , 

130-140 psi)

840 kPa (8.6 kgf/cm

2

 , 120 psi)


2007 Honda Element EX 

2007-2008 TRANSMISSION Automatic Transmission - Element


sealing washers, and tighten the bolts to 18 N.m (1.8 kgf.m, 13 lbf.ft). Do not reuse old sealing washers. 

16. Connect the A/Toil pressure gauge to the 3rd clutch pressure inspection port (D) and 5th clutch pressure 

inspection port (F). 

Fig. 174: Connecting A/T Oil Pressure Gauge To 3rd Clutch Pressure Inspection Port And 5th 
Clutch Pressure Inspection Port
 
Courtesy of AMERICAN HONDA MOTOR CO., INC. 

17. Connect the A/T oil pressure gauge to the 4th clutch pressure inspection port (E). 

Fig. 175: Connecting A/T Oil Pressure Gauge To 4th Clutch Pressure Inspection Port 
Courtesy of AMERICAN HONDA MOTOR CO., INC. 

18. Select Pressure Test Assistance Mode in the Miscellaneous Test Menu of the A/T Mode Menu.  

19. Start the engine, then shift to the D position and select D3 driving mode by pressing the D3 switch.  

20. Measure the 3rd clutch pressure at the 3rd clutch pressure inspection port (D) while holding the engine 

speed at 2,000 rpm.  

21. Disable the D3 driving mode by pressing the D3 switch, and measure the 4th clutch pressure at the 4th 

clutch pressure inspection port (E) and the 5th clutch pressure at the 5th clutch pressure inspection port 
(F) while holding the engine speed at 2,000 rpm. 

FLUID PRESSURE SPECIFICATIONS 

Pressure

Fluid Pressure

Standard

Service Limit


2007 Honda Element EX 

2007-2008 TRANSMISSION Automatic Transmission - Element


22. Bring the engine back to an idle, then apply the brake pedal to stop the wheels from rotating.  

23. Shift to the R position, then release the brake pedal. Raise the engine speed to 2,000 rpm, and measure the 

4th clutch pressure at the 4th clutch pressure inspection port (E). 

FLUID PRESSURE SPECIFICATIONS 

24. Turn the engine off, then disconnect the A/T oil pressure gauges from the 3rd, 4th, and 5th clutch 

pressure inspection ports.  

25. Install the sealing bolts to the 3rd, 4th, and 5th clutch pressure inspection ports with the new sealing 

washers, and tighten the bolts to 18 N.m (1.8 kgf.m, 13 lbf.ft). Do not reuse old sealing washers.  

26. If the pressures are out of the service limit, problems and probable causes are listed in the table. 

SYMPTOM PROBLEM CHART 

3rd clutch (D) 4th clutch (E) 5th 
clutch (F)

890-920 kPa (9.1-9.9 kgf/cm

2

 , 

130-140 psi)

840 kPa (8.6 kgf/cm

2

 , 120 psi)

Pressure

Fluid Pressure

Standard

Service Limit

4th clutch (E) in R

890-920 kPa (9.1-9.9 kgf/cm

2

 , 

130-140 psi)

840 kPa (8.6 kgf/cm

2

 , 120 psi)

Problem

Probable causes

No or low line pressure

Torque converter  

ATF pump  

Regulator valve  

Torque converter check valve  

Clogged ATF strainer  

No or low 1st clutch pressure

1st clutch  

O-rings  

No or low 2nd clutch pressure

2nd clutch  

O-rings  

No or low 3rd clutch pressure

3rd clutch  

O-rings  

No or low 4th clutch pressure

4th clutch  

O-rings  

No or low 5th clutch pressure

5th clutch  

O-rings  

No or low 4th clutch pressure in the R position

Servo valve  

4th clutch  

O-rings  


2007 Honda Element EX 

2007-2008 TRANSMISSION Automatic Transmission - Element


27. Install the air cleaner assembly and intake air duct.  

28. Install the splash shield.  

SHIFT SOLENOID VALVE TEST 

1. Connect the HDS to the DLC (A). 

Fig. 176: Identifying Data Link Connector 
Courtesy of AMERICAN HONDA MOTOR CO., INC. 

2. Select Shift Solenoid A, B, C, D, and E test in Miscellaneous Test Menu on the HDS. If the HDS does not 

communicate with the PCM, troubleshoot the DLC circuit (see DLC CIRCUIT 
TROUBLESHOOTING
 ).  

3. Check that shift solenoid valves A, B, C, D, and E operate with the HDS. A clicking sound should be 

heard.  

4. The shift solenoid valves test is finished if the test results are OK. 

If no sound is heard, remove the shift solenoid valves and test. 

5. Remove the drain plug (A), and drain the automatic transmission fluid (ATF). 


2007 Honda Element EX 

2007-2008 TRANSMISSION Automatic Transmission - Element


Content   ..  234  235  236  237   ..