Honda Element. Manual - part 235


  Index      Honda     Honda Element - service repair manual 2007-2008 year


Search            


Content   ..  233  234  235  236   ..


Honda Element. Manual - part 235


14. Drive the vehicle in 4th or 5th gear in the D position, then shift to the 2 position. The vehicle should 

immediately begin to slow down from engine braking.  

15. Shift to the 1 position, accelerate from a stop at full throttle, and check for abnormal noise and clutch 

slippage. Upshifts should not occur in this position.  

16. Shift to the 2 position, accelerate from a stop at full throttle, and check for abnormal noise and clutch 

slippage. Upshifts and downshifts should not occur in this position.  

17. Shift to the R position, accelerate from a stop at full throttle momentarily, and check for abnormal noise 

and clutch slippage.  

18. Park the vehicle on a slope (about 16 degrees), apply the brake, and shift into the P position. Release the 

brake; the vehicle should not move. 

STALL SPEED TEST 

1. Make sure the transmission fluid is filled to the proper level (see ATF LEVEL CHECK ).  

2. Apply the parking brake, and block all four wheels.  

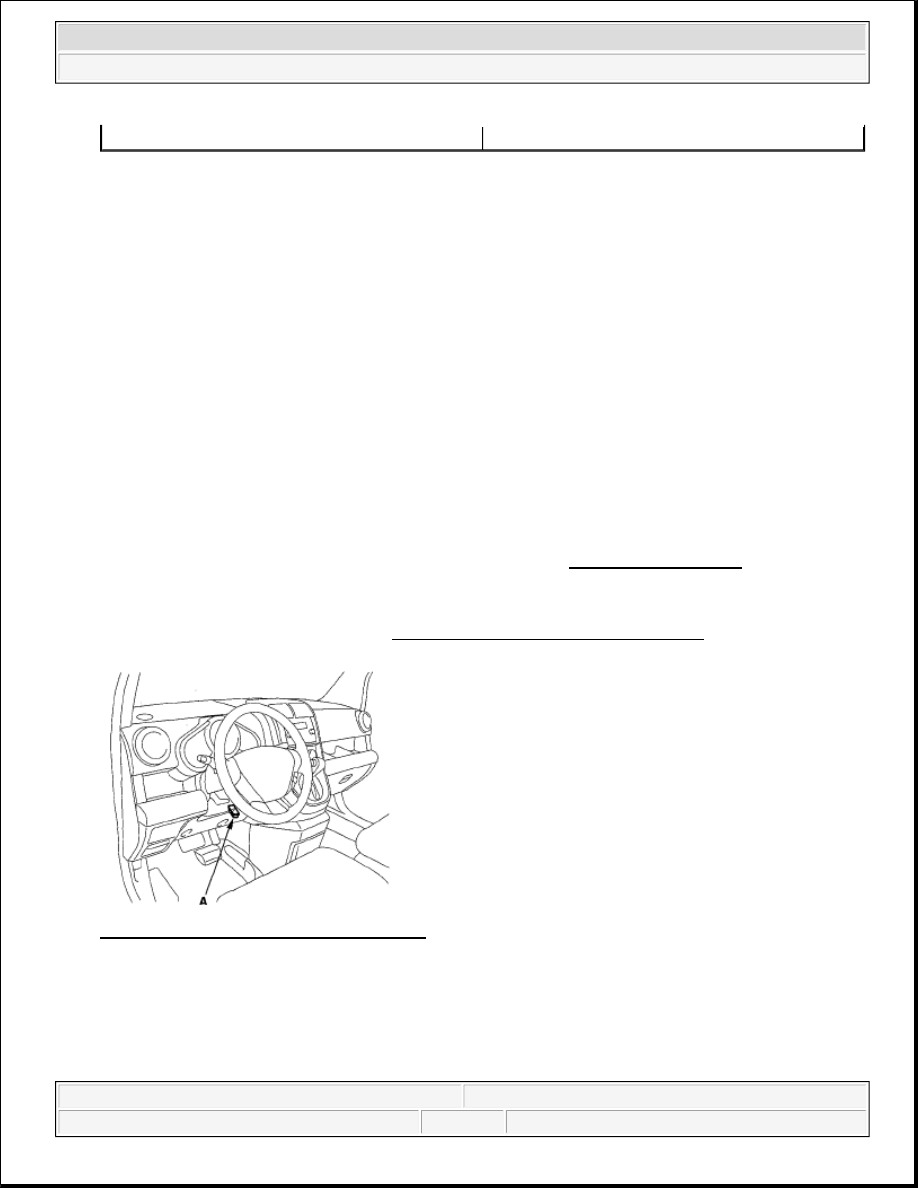
3. Connect the HDS to the DLC (A), and go to the A/T data list. If the HDS does not communicate with the 

PCM, troubleshoot the DLC circuit (see DLC CIRCUIT TROUBLESHOOTING ). 

Fig. 169: Identifying Data Link Connector 
Courtesy of AMERICAN HONDA MOTOR CO., INC. 

4. Make sure the A/C switch is OFF.  

5. After the engine has warmed up to normal operating temperature (the radiator fan comes on), shift to the 

2 position.  

6. Firmly press the brake pedal, then fully press the accelerator pedal for 6 to 8 seconds, and note the engine 

2nd-->1st

26-31 mph (42-50 km/h)

NOTE:

Always use the parking brake to hold the vehicle, when stopped on an 
incline in gear. Depending on the grade of the incline, the vehicle could 
roll if the brake is released.


2007 Honda Element EX 

2007-2008 TRANSMISSION Automatic Transmission - Element


speed. Do not move the shift lever while raising engine speed. 

7. Allow 2 minutes for cooling, then repeat the test in the D, 1, and R positions. 

Stall Speed rpm:  

Specification: 2,400 rpm  

Service Limit: 2,250-2,550 rpm  

8. If the measurements are out of the service limit, problems and probable causes are listed in the table. 

SYMPTOM PROBLEM CHART 

PRESSURE TEST 

Special Tools Required  

A/T oil pressure gauge set w/panel 07406-0020400 or 07406-0020401  

A/T pressure hose, 2,210 mm 07MAJ-PY4011A  

A/T pressure hose adapter 07MAJ-PY40120  

1. Make sure the transmission fluid is filled to the proper level (see ATF LEVEL CHECK ).  

2. 4WD: Raise the vehicle on a lift, make sure it is securely supported, and allow all four wheels to rotate 

freely. 

NOTE:

Do not test stall speed for more than 10 seconds at a time.  

Stall speed tests should be used for diagnostic purposes only.  

Stall speed tests should be the same in D, 2,1, and R positions.  

Do not test stall speed with the A/T oil pressure gauges installed. 

Problem

Probable causes

Stall speed rpm high in the D, 2,1, and R positions

ATF pump output low  

Clogged ATF strainer  

Regulator valve stuck  

Slipping clutch  

Stall speed rpm high in the 1 position

Slippage of 1st clutch

Stall speed rpm high in the 2 position

Slippage of 2nd clutch

Stall speed rpm high in the R position

Slippage of 4th clutch

Stall speed rpm low in the D, 2,1, and R positions

Engine output low  

Engine throttle valve closed  

Torque converter one-way clutch slipping  


2007 Honda Element EX 

2007-2008 TRANSMISSION Automatic Transmission - Element


2WD: Raise the front of the vehicle, make sure it is securely supported. Set the parking brake, block rear 
wheels securely, and allow the front wheels to rotate freely. Or raise the vehicle on a lift. 

3. Remove the splash shield.  

4. Connect the HDS to the DLC (A), and go to the A/T data list. If the HDS does not communicate with the 

PCM, troubleshoot the DLC circuit (see DLC CIRCUIT TROUBLESHOOTING ). 

Fig. 170: Identifying Data Link Connector 
Courtesy of AMERICAN HONDA MOTOR CO., INC. 

5. Connect the A/T oil pressure gauge to the line pressure inspection port (A). Do not allow dust or other 

foreign particles to enter the port while connecting the gauge. 


2007 Honda Element EX 

2007-2008 TRANSMISSION Automatic Transmission - Element


Fig. 171: Connecting A/T Oil Pressure Gauge To Line Pressure Inspection Port 
Courtesy of AMERICAN HONDA MOTOR CO., INC. 

6. Start the engine, and warm it up to normal operating temperature (the radiator fan comes on).  

7. With the shift lever in the P or N position while holding the engine speed at 2,000 rpm, measure the line 

pressure. 

FLUID PRESSURE SPECIFICATIONS 

8. Turn the engine off, then disconnect the A/T oil pressure gauge from the line pressure inspection port.  

9. Install the sealing bolt to the line pressure inspection port with the new sealing washer, and tighten the 

bolts to 18 N.m (1.8 kgf.m, 13 lbf.ft). Do not reuse old sealing washer.  

10. Connect the A/Toil pressure gauge to the 1st clutch pressure inspection port (B). 

NOTE:

Higher pressure may be indicated if measurements are made with shift 
lever in a position other than P or N.

Pressure

Fluid Pressure

Standard

Service Limit

Line (A)

900-960 kPa (9.2-9.8 kgf/cm

2

 , 

130-140 psi)

850 kPa (8.7 kgf/cm

2

 , 120 psi)


2007 Honda Element EX 

2007-2008 TRANSMISSION Automatic Transmission - Element


Content   ..  233  234  235  236   ..