Honda Civic. Manual - part 368


  Index      Honda     Honda Civic - service repair manual 2006-2009 year


Search            


Content   ..  366  367  368  369   ..


Honda Civic. Manual - part 368


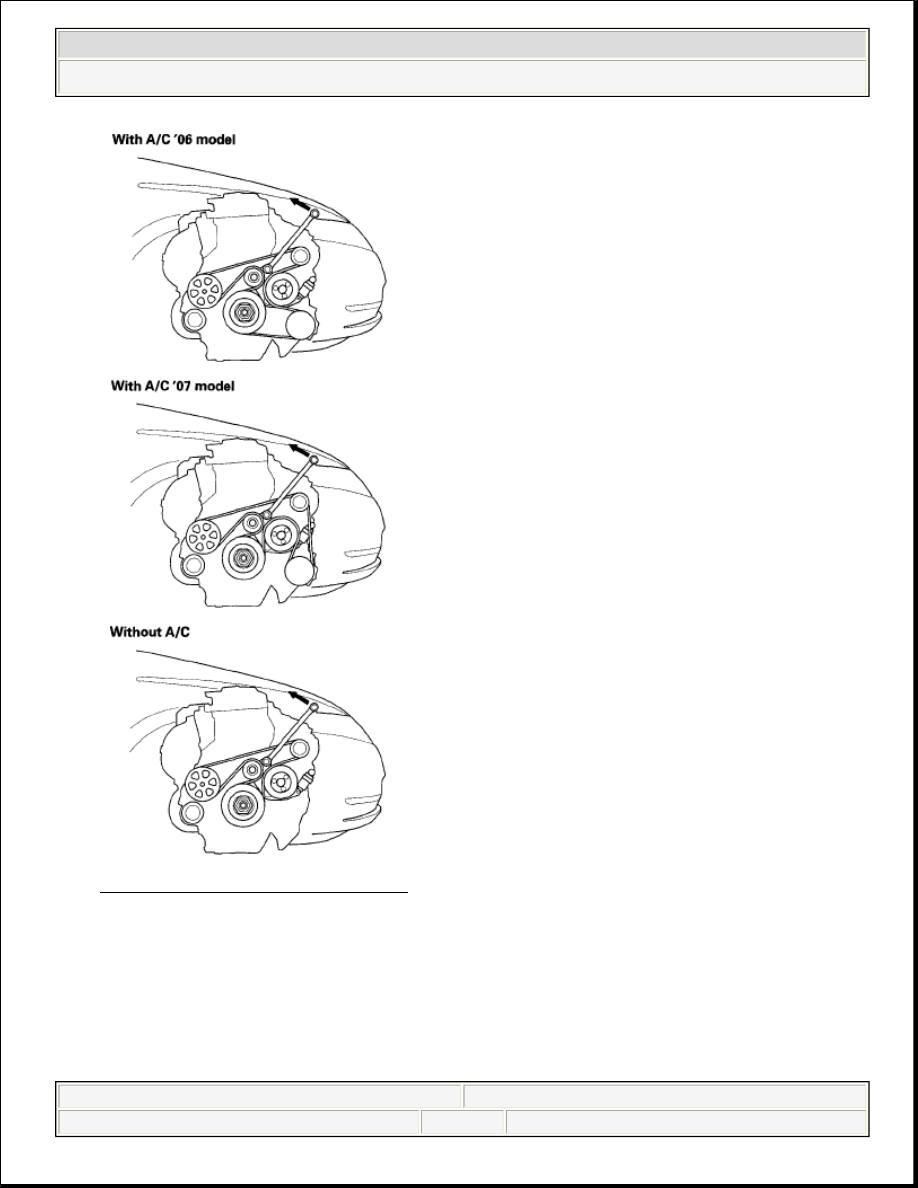
Fig. 11: Identifying Drive Belt 
Courtesy of AMERICAN HONDA MOTOR CO., INC. 

2. Install the new belt in the reverse order of removal.  

DRIVE BELT AUTO-TENSIONER INSPECTION 

1. Turn the ignition switch ON (II), and make sure to turn the A/C switch OFF. 


2008 Honda Civic GX 

2006-08 ELECTRICAL Charging System (R18A1) - Civic (All Except Hybrid)


Turn the ignition switch OFF.  

2. Check the position of the auto-tensioner indicator's pointer (A). Start the 

engine then check the position again with the engine idling. If the position of 
the indicator moves or fluctuates a lot, replace the auto-tensioner (see DRIVE 
BELT AUTO-TENSIONER REMOVAL/INSTALLATION
 ). 

Fig. 12: Identifying Drive Belt Auto-Tensioner Inspection 
Courtesy of AMERICAN HONDA MOTOR CO., INC. 

3. Check for abnormal noise from the tensioner pulley. If you hear abnormal 

noise, replace the auto-tensioner pulley (see DRIVE BELT AUTO-
TENSIONER REMOVAL/INSTALLATION
 ).  

4. Remove the drive belt (see DRIVE BELT INSPECTION ).  
5. Set a long-handled, boxed-end wrench on the drive belt auto-tensioner from 

above the engine. Slowly turn the wrench in the direction shown. Check that 
the tensioner moves smoothly and without any abnormal noise. If the tensioner 
does not move smoothly, or you hear abnormal noise, replace the auto-
tensioner (see DRIVE BELT AUTO-TENSIONER 
REMOVAL/INSTALLATION
 ). 

NOTE:

This is a hydraulic type auto-tensioner; you must turn 
the wrench slowly.


2008 Honda Civic GX 

2006-08 ELECTRICAL Charging System (R18A1) - Civic (All Except Hybrid)


Fig. 13: Identifying Long-Handled, Boxed-End Wrench 
Courtesy of AMERICAN HONDA MOTOR CO., INC. 

DRIVE BELT AUTO-TENSIONER REMOVAL/INSTALLATION 

1. Loosen the water pump pulley mounting bolts. 

Fig. 14: Identifying Water Pump Pulley Mounting Bolts 
Courtesy of AMERICAN HONDA MOTOR CO., INC. 

2. Remove the drive belt (see DRIVE BELT INSPECTION ).  
3. Remove the alternator (see ALTERNATOR REMOVAL AND 

INSTALLATION ).  

4. Remove the water pump pulley. 


2008 Honda Civic GX 

2006-08 ELECTRICAL Charging System (R18A1) - Civic (All Except Hybrid)


Fig. 15: Identifying Water Pump Pulley (With Torque Specifications) 
Courtesy of AMERICAN HONDA MOTOR CO., INC. 

5. Remove the drive belt auto-tensioner. 

Fig. 16: Identifying Drive Belt Auto-Tensioner (With Torque 
Specifications)
 
Courtesy of AMERICAN HONDA MOTOR CO., INC. 

6. Install the drive belt auto-tensioner in the reverse order of removal.  


2008 Honda Civic GX 

2006-08 ELECTRICAL Charging System (R18A1) - Civic (All Except Hybrid)


Content   ..  366  367  368  369   ..