Great Wall Hover. Manual - part 59


  Index      Great Wall     Great Wall Hover - service repair manual


Search            copyright infringement  


Content   ..  57  58  59  60   ..


Great Wall Hover. Manual - part 59


Replacement of major semiaxle oil seal

1. Make the electric clutch is in the 4WD status,

them stop the engine and remove the front drive

axle assembly (see the disassembly of front reducer

assembly)

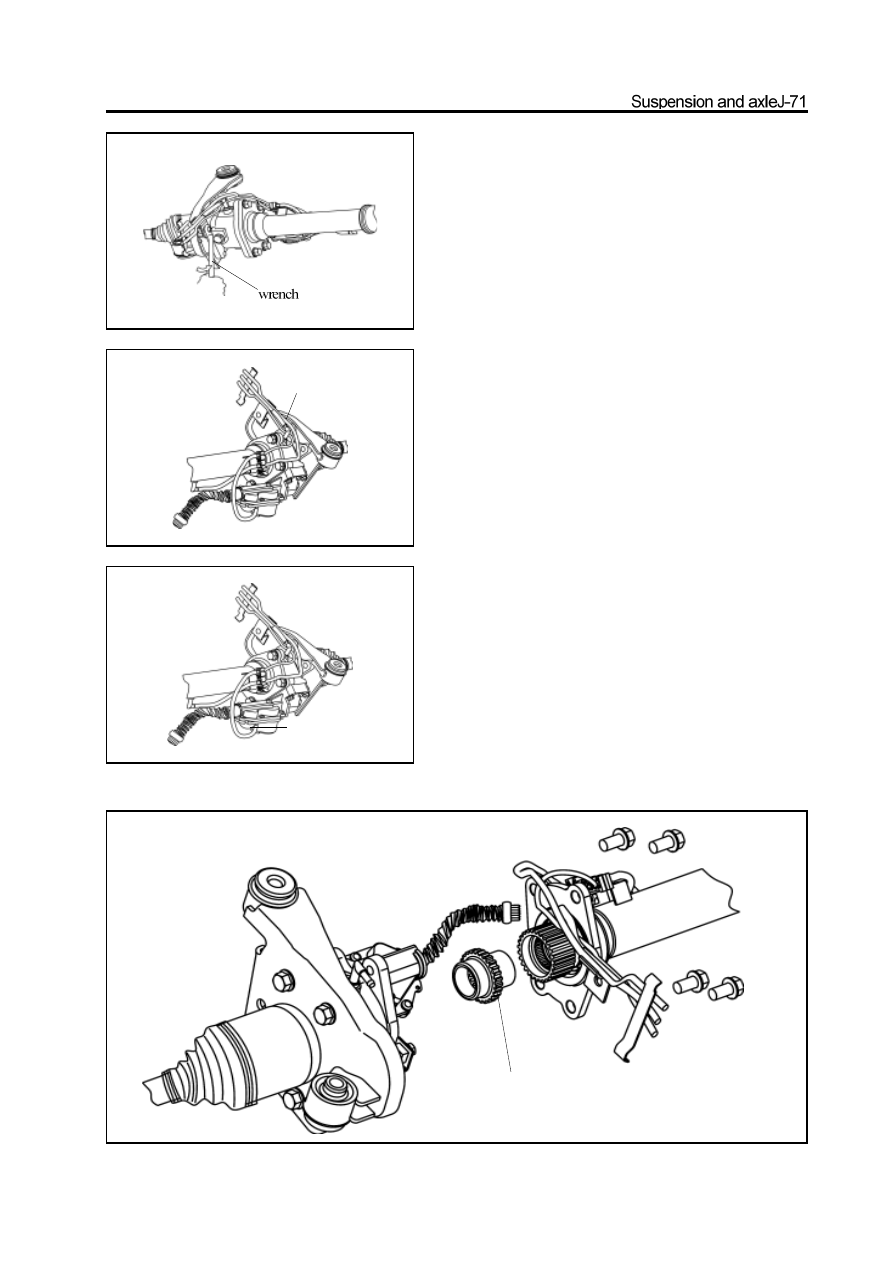
2. Use the wrench to screw off the bolt which fix the

front axle vent tube connectorassemblyonventtubeb

racket bolt

3. Disconnect the connector between vent tube of

electric clutch housing and front drive axle vent tube

connector assembly

4. Disconnect the connector between the vent tubes

on the electric clutch and vent tube connector

assembly.

5. Remove the bolt which is used to fix the electric

clutch housing and front axle tube flange; use the

brass bar to open the electric clutch housing and take

out the mechanical wheel of separator.

Caution: The lubrication oil will flow out when sepa-

rate the electric clutch housing from the front axle

flange. It should use the container to hold it.

mechanical wheel of separator

disconnect the place

disconnect the place

circlip

circlip pliers

special tools

8. Use the special tools to remove the major semiaxle

oil seal.

Caution: Do not scratch the inner surface of flange.

6

Use the circlip pliers to remove the circlip

which clamp the major semiaxle bearing outer race.

7

Use the special tools to remove the major

semiaxle and bearing, circlip assembly.

liftout bolt 

bolt pin

Pad

special tools

9. Remove the sealant on the matching surface

between the flange and electric clutch housing by

knife.

Caution: Do not scratch the matching surface.

10. Use the special tools to knock the new seal in the

oil seal position in flange.

Caution: Before install the new oil seal, it should

coat the lip with thin lithium base grease, and the oil

seal should be in alignment position.

11. Insert the spline of small end of major semiaxle

in the spline of front reducer half axle gear slightly,

then use the brass bar and hand hammer to knock it

in.

Caution: When knock in the major semiaxle, must

not damage the inside needle bearing of large end

spline of major semiaxle.

12. Use the circlip pliers to install the circlip in the

flange and clamp the bearing outer race.

Caution: The circlip should be replaced if it has

serious deformation.

13. Use the clean cloth to wipe the matching surface

of flange and electric clutch housing respectively.

14. Align the spline of mechanical wheel of separator

with the spline in front drive shaft and separator

shift fork sleeve, and install it in the front drive

shaft and separator shift fork sleeve.

15. Coat the flange matching surface with the 1596

silicon rubber plane sealant uniformly and level it by

plate.

Caution: Ensure the continuity of sealant and avoid

the sealant enter into the screw hole.

16. Align the shift fork bush with the spline on the

major semiaxle to make the mechanical wheel of

separator enters into the major semiaxle, then use

the bolt to connect the electric clutch housing and

front axle pipe flange and tighten it to the specified

torque. In which the bolt should be precoated with

the screw locking agent (drip one or two drops on the

middle of screw).

specified torque : 90-110N

m

Caution: Prevent the foreign material from entering into the

front drive axle during assembly.

17. Use the wrench to tighten the bolt of vent tube

bracket to tightening torque.

Tightening force: 23-26N

m

18. Screw off the oil filling plug on the electric clutch

housing, remove the washer and fill it with the gear

lubrication oil until flush with the bottom of oil

filling port.

Number of lubrication oil: GL-5

19. Place the washer of oil filling plug, tighten the oil

filling plug to specified torque.

Specified torque: 140-150N.m


Content   ..  57  58  59  60   ..