Dodge Durango (HB). Manual - part 360


  Index      Dodge     Dodge Durango (HB) - service repair manual 2005 year


Search            


Content   ..  358  359  360  361   ..


Dodge Durango (HB). Manual - part 360


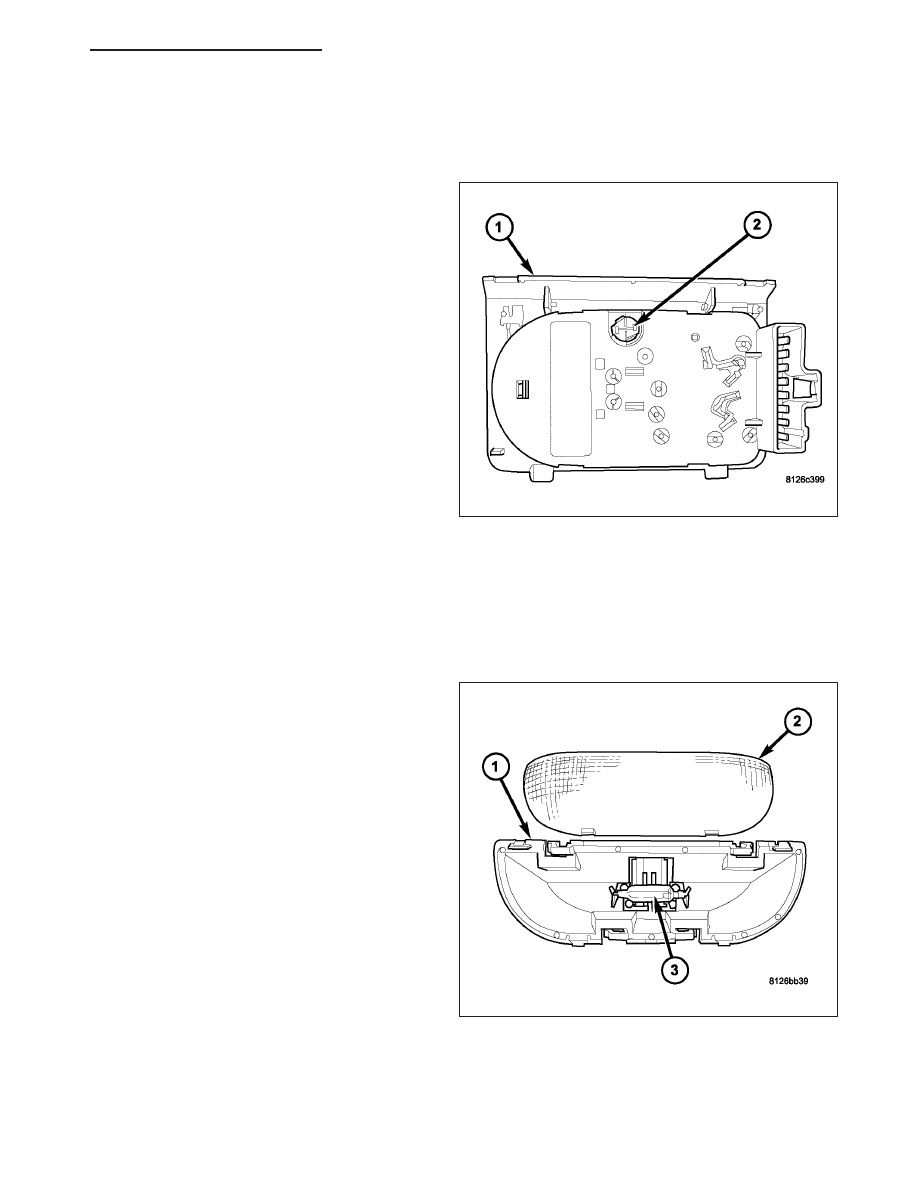
BULB - REAR A/C-HEAT CONTROL

CAUTION: Always use the correct bulb size and type for replacement. An incorrect bulb size or type may
overheat and cause damage to the lamp, the socket and/or the lamp wiring.

1. Align the bulb holder and bulb (2) with the keyed

opening in the circuit board of the rear A/C-heater
control (1).

2. Insert the bulb holder and bulb straight into the cir-

cuit board until the bulb holder is firmly seated.

3. Using a small thin-bladed screwdriver, rotate the

bulb holder clockwise about 30 degrees on the cir-
cuit board to lock it into place.

4. Reinstall the rear A/C-heater control onto the cen-

ter floor console. (Refer to 24 - HEATING & AIR
CONDITIONING/CONTROLS

-

REAR/A/C-

HEATER CONTROL - INSTALLATION).

5. Reconnect the battery negative cable.

LIFTGATE LAMP

REMOVAL

BULB

1. Disconnect and isolate the battery negative cable.

2. Remove the liftgate lamp unit from the liftgate trim

panel. (Refer to 8 - ELECTRICAL/LAMPS/LIGHT-
ING

-

INTERIOR/LIFTGATE

LAMP

UNIT

-

REMOVAL).

3. Using a small thin-bladed screwdriver, gently pry

between the lamp lens (2) and the lamp housing
(1) at the two upper or lower snap features to
remove the lens from the housing.

4. Disengage the ends of the bulb (3) from the two

bulb holders within the lamp housing.

HB

LAMPS/LIGHTING - INTERIOR - SERVICE INFORMATION

8L - 159

LAMP

1. Disconnect and isolate the battery negative cable.

2. Insert a trim stick or another suitable wide flat-

bladed tool, between the liftgate lamp housing (3)
and the lamp seat in the liftgate trim panel (1).

3. Carefully pry the liftgate lamp unit outward from the

trim panel.

4. Disconnect the wire harness connector (2) from the

back of the lamp housing.

5. Remove the lamp from the liftgate.

INSTALLATION

BULB

CAUTION: Always use the correct bulb size and type for replacement. An incorrect bulb size or type may
overheat and cause damage to the lamp, the socket and/or the lamp wiring.

1. Install the ends of the bulb (3) onto the two bulb

holders within the liftgate lamp housing (1).

2. Align the lamp lens (2) with the lamp housing, then

use firm and even hand pressure to snap the lens
onto the housing.

3. Reinstall the lamp onto the liftgate trim panel.

(Refer to 8 - ELECTRICAL/LAMPS/LIGHTING -
INTERIOR/LIFTGATE LAMP UNIT - INSTALLA-
TION).

4. Reconnect the battery negative cable.

8L - 160

LAMPS/LIGHTING - INTERIOR - SERVICE INFORMATION

HB

LAMP

1. Position the liftgate lamp unit (3) to the lamp seat

in the liftgate trim panel (1).

2. Reconnect the wire harness connector (2) to the

back of the lamp housing.

3. Align the latch tabs on the back of the lamp hous-

ing with the receptacles in the trim panel.

4. Using hand pressure, press firmly and evenly on

the lamp lens until the lamp snaps into the trim
panel.

5. Reconnect the battery negative cable.

READING LAMP

REMOVAL - BULB

1. Disconnect and isolate the battery negative cable.

2. Using a small thin-bladed screwdriver, gently pry

the rear edge of the bezel (2) and the overhead
console housing (4) to unsnap the bezel from the
housing.

3. Using a small thin-bladed screwdriver, gently pry

between the outboard edge of the lens (1) being
removed toward the center of the vehicle until it
unsnaps from the housing.

4. Remove the lens from the housing.

HB

LAMPS/LIGHTING - INTERIOR - SERVICE INFORMATION

8L - 161

5. Carefully unsnap the bulb (2) from the two bulb

holders within the overhead console lamp housing.

INSTALLATION - BULB

CAUTION: Always use the correct bulb size and type for replacement. An incorrect bulb size or type may
overheat and cause damage to the lamp, the socket and/or the lamp wiring.

1. Align the ends of the bulb (2) with the two bulb

holders within the overhead console lamp housing.

2. Carefully press the bulb firmly and evenly into the

bulb holders until it snaps into place.

8L - 162

LAMPS/LIGHTING - INTERIOR - SERVICE INFORMATION

HB


Content   ..  358  359  360  361   ..