Dodge Durango (HB). Manual - part 1407


  Index      Dodge     Dodge Durango (HB) - service repair manual 2005 year


Search            


Content   ..  1405  1406  1407  1408   ..


Dodge Durango (HB). Manual - part 1407


INSTALLATION

1. Position the carpet in vehicle and tuck up under the side trim panels.

2. Install the third row seat assembly, if equipped. (Refer to 23 - BODY/SEATS/SEAT - THIRD ROW - INSTALLA-

TION)

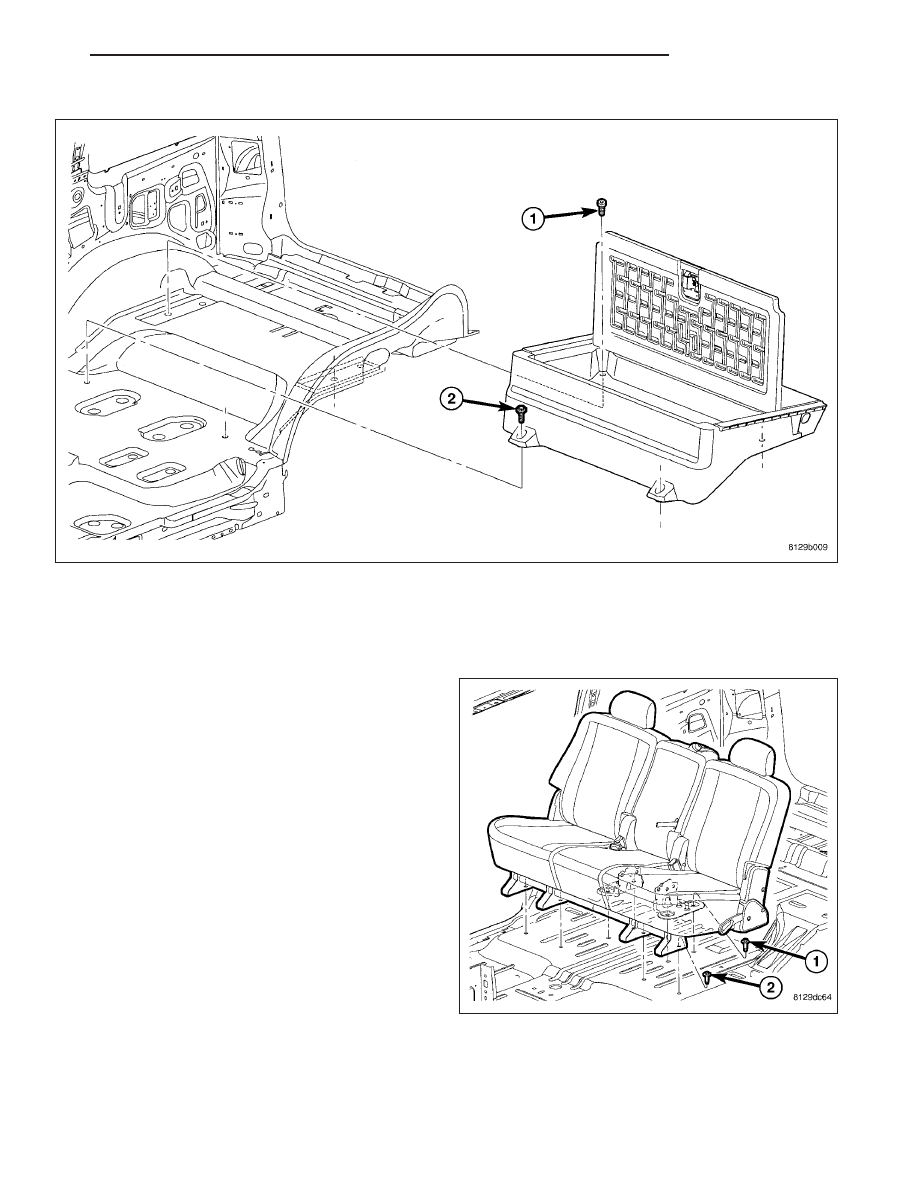
3. Install the storage bin, if equipped, and screws and tighten the rear screws to 7 N·m (60 in. lbs.).

4. Install the second row seat assembly and install

the bolts (1 & 2).

5. Tighten the front bolts (2) to 27 N·m (20 ft. lbs.).

6. Tighten the rear bolts (1) to 47 N·m (35 ft. lbs.).

7. Install the cowl trim panels. (Refer to 23 - BODY/

INTERIOR/COWL TRIM COVER - DESCRIPTION)

8. Position the door sill scuff plates and seat the clips

fully. (Refer to 23 - BODY/INTERIOR/DOOR SILL
SCUFF PLATE - DESCRIPTION)

9. Install the floor console. (Refer to 23 - BODY/INTE-

RIOR/FLOOR CONSOLE - INSTALLATION)

10. Install the front seats. (Refer to 23 - BODY/

SEATS/SEAT - FRONT - INSTALLATION)

HB

INTERIOR

23 - 141

MIRROR-INSIDE REARVIEW

REMOVAL

1. Loosen the mirror base set screw.

2. Slide the mirror base upward and off the bracket

(2).

INSTALLATION

INSTALLATION - REARVIEW MIRROR

1. Position the mirror base at the bracket (2) and slide

it downward onto the support bracket.

2. Tighten set screw to 1 N·m (9 in. lbs.).

23 - 142

INTERIOR

HB

INSTALLATION - REARVIEW MIRROR SUPPORT BRACKET

1. Mark the position for the mirror bracket on the outside of the windshield glass with a wax pencil.

2. Clean the bracket contact area on the glass. Use a mild powdered cleanser on a cloth saturated with isopropyl

(rubbing) alcohol. Finally, clean the glass with a paper towel dampened with alcohol.

3. Sand the surface on the support bracket with fine grit-sandpaper. Wipe the bracket surface clean with a paper

towel.

4. Apply accelerator to the surface on the bracket according to the following instructions:

Crush the vial to saturate the felt applicator.

Remove the paper sleeve.

Apply accelerator to the contact surface on the bracket.

Allow the accelerator to dry for five minutes.

Do not touch the bracket contact surface after the accelerator has been applied.

5. Apply adhesive accelerator to the bracket contact surface on the windshield glass. Allow the accelerator to dry

for one minute. Do not touch the glass contact surface after the accelerator has been applied.

6. Install the bracket according to the following instructions:

Apply one drop of adhesive at the center of the bracket contact-surface on the windshield glass.

Apply an even coat of adhesive to the contact surface on the bracket.

Align the bracket with the marked position on the windshield glass.

Press and hold the bracket in place for at least one minute.

NOTE: Verify that the mirror support bracket is correctly aligned, because the adhesive will cure rapidly.

7. Allow the adhesive to cure for 8-10 minutes. Remove any excess adhesive with an alcohol-dampened cloth.

8. Allow the adhesive to cure for an additional 8-10 minutes before installing the mirror.

HB

INTERIOR

23 - 143

PAINT

TABLE OF CONTENTS

page

page

PAINT

SPECIFICATIONS - PAINT CODES

. . . . . . . . . 144

BASECOAT/CLEARCOAT FINISH

DESCRIPTION

. . . . . . . . . . . . . . . . . . . . . . . . 144

PAINT CODE

DESCRIPTION

. . . . . . . . . . . . . . . . . . . . . . . . 145

PAINT TOUCH-UP

DESCRIPTION

. . . . . . . . . . . . . . . . . . . . . . . . 145

STANDARD PROCEDURE

. . . . . . . . . . . . . . . 145

FINESSE SANDING/BUFFING & POLISHING

DESCRIPTION

. . . . . . . . . . . . . . . . . . . . . . . . 145

PAINT

SPECIFICATIONS - PAINT CODES

EXTERIOR COLORS

EXTERIOR COLOR

DAIMLERCHRYSLER CODE

Deep Molten Red Pearlcoat

BR8

Flame Red Clearcoat

PR4

Light Khaki Metallic Clearcoat

AJC

Timberline Green Pearlcoat

AGW

Patriot Blue Pearlcoat

WB7

Atlantic Blue Pearlcoat

ZBJ

Graphite Metallic Clearcoat

ZDR

Bright Silver Metallic Clearcoat

WS2

Black Clearcoat

DX8

Bright White Clearcoat

GW7

INTERIOR COLORS

INTERIOR COLOR

DAIMLERCHRYSLER CODE

D M.Slate Gray

D5

Khaki

J3

Slate Gray/Light Greystone

BD1

Deep Gray

ZSP

BASECOAT/CLEARCOAT FINISH

DESCRIPTION

The original equipment paint finish is a multi step process that involves cleaning, applying electro de-position
(E-coat), anti-chip primer, basecoat, and clearcoat steps.

CAUTION: Do not use abrasive chemicals, abrasive compounds or harsh alkaline based cleaning solvents
on the painted surfaces of a vehicle. Failure to follow this caution can result in damage to vehicle finish.

On most vehicles a two-part paint application (basecoat/clearcoat) is used. Color paint that is applied to primer is
called basecoat. A clear coat paint is then applied to protect the basecoat from ultraviolet light and to provide a
durable high-gloss finish.

23 - 144

PAINT

HB


Content   ..  1405  1406  1407  1408   ..