Dodge Dakota (R1). Manual - part 682


  Index      Dodge     Dodge Dakota (R1) - service repair manual 2000 year


Search            


Content   ..  680  681  682  683   ..


Dodge Dakota (R1). Manual - part 682


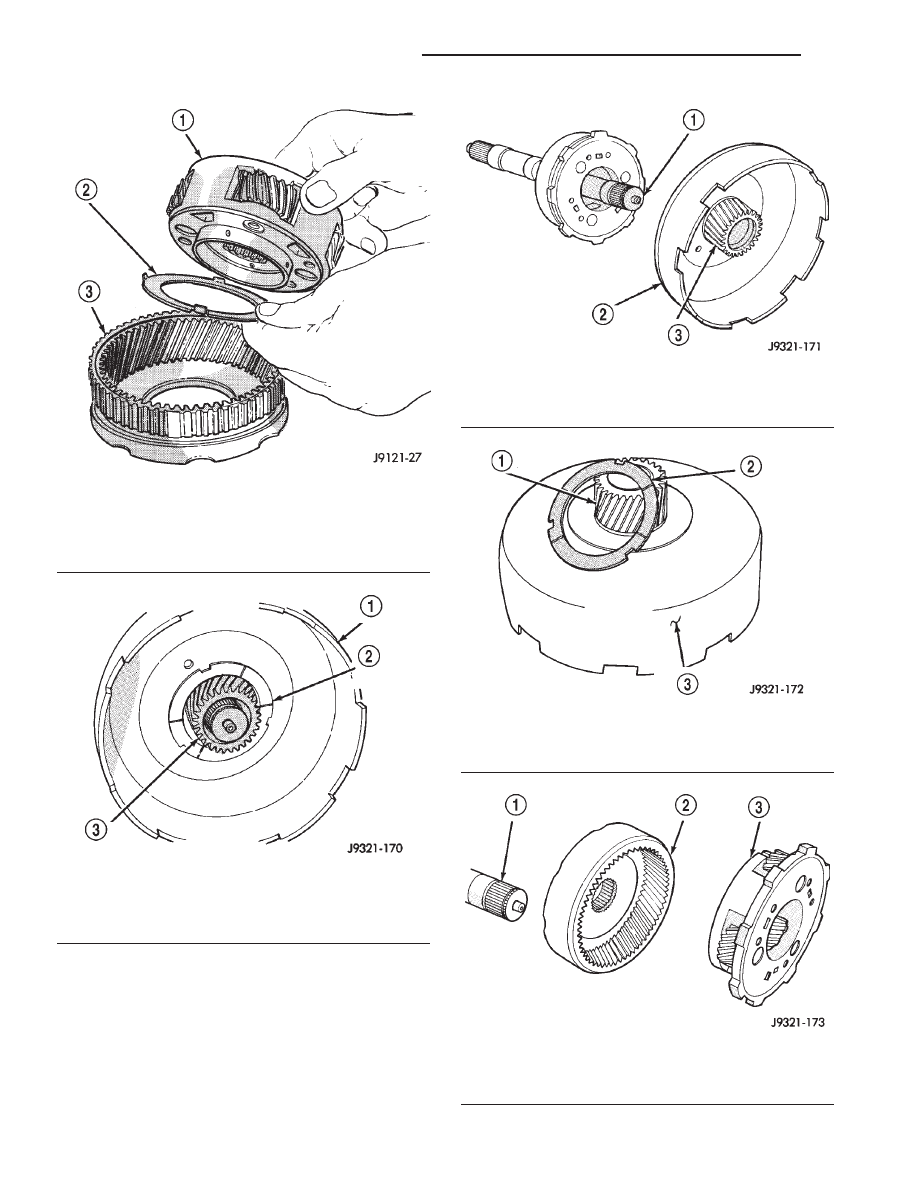
Fig. 211 Disassembling Front Planetary And

Annulus Gears

1 - FRONT PLANETARY GEAR
2 - TABBED THRUST WASHER
3 - FRONT ANNULUS GEAR

Fig. 212 Driving Shell Thrust Washer Removal

1 - DRIVING SHELL
2 - TABBED THRUST WASHER
3 - SUN GEAR

Fig. 213 Sun Gear And Driving Shell Removal

1 - INTERMEDIATE SHAFT
2 - DRIVING SHELL
3 - SUN GEAR

Fig. 214 Rear Planetary Thrust Washer Removal

1 - SUN GEAR
2 - REAR PLANETARY THRUST WASHER
3 - DRIVING SHELL

Fig. 215 Rear Planetary And Annulus Gear Removal

1 - INTERMEDIATE SHAFT
2 - REAR ANNULUS GEAR
3 - REAR PLANETARY GEAR

21 - 372

AUTOMATIC TRANSMISSION - 46RE

AN

PLANETARY GEARTRAIN/OUTPUT SHAFT (Continued)

INSPECTION

Inspect the planetary gear sets and annulus gears.

The planetary pinions, shafts, washers, and retaining
pins are serviceable. However, if a pinion carrier is
damaged, the entire planetary gear set must be
replaced as an assembly.

Replace the annulus gears if the teeth are chipped,

broken, or worn, or the gear is cracked. Replace the
planetary thrust plates and the tabbed thrust wash-
ers if cracked, scored or worn.

Inspect the machined surfaces of the intermediate

shaft. Be sure the oil passages are open and clear.
Replace the shaft if scored, pitted, or damaged.

Inspect the sun gear and driving shell. If either

component is worn or damaged, remove the sun gear
rear retaining ring and separate the sun gear and
thrust plate from the driving shell. Then replace the
necessary component.

Replace the sun gear as an assembly if the gear

teeth are chipped or worn. Also replace the gear as
an assembly if the bushings are scored or worn. The
sun gear bushings are not serviceable. Replace the
thrust plate if worn, or severely scored. Replace the
driving shell if distorted, cracked, or damaged in any
way.

Replace all snap-rings during geartrain assembly.

Reusing snap-rings is not recommended.

ASSEMBLY

(1) Lubricate sun gear and planetary gears with

transmission fluid during assembly. Use petroleum
jelly to lubricate intermediate shaft bushing surfaces,
thrust washers and thrust plates and to hold these
parts in place during assembly.

(2) Install front snap-ring on sun gear and install

gear in driving shell. Then install thrust plate over
sun gear and against rear side of driving shell (Fig.
217). Install rear snap-ring to secure sun gear and
thrust plate in driving shell.

(3) Install rear annulus gear on intermediate shaft

(Fig. 218).

(4) Install thrust plate in annulus gear (Fig. 219).

Be sure plate is seated on shaft splines and against
gear.

Fig. 216 Rear Annulus Thrust Plate Removal

1 - REAR ANNULUS GEAR
2 - THRUST PLATE

Fig. 217 Sun Gear Installation

1 - DRIVING SHELL
2 - SUN GEAR
3 - THRUST PLATE
4 - SUN GEAR REAR RETAINING RING

Fig. 218 Installing Rear Annulus Gear On

Intermediate Shaft

1 - REAR ANNULUS GEAR
2 - OUTPUT SHAFT

AN

AUTOMATIC TRANSMISSION - 46RE

21 - 373

PLANETARY GEARTRAIN/OUTPUT SHAFT (Continued)

(5) Install rear planetary gear in rear annulus

gear (Fig. 220). Be sure planetary carrier is seated
against annulus gear.

(6) Install tabbed thrust washer on front face of

rear planetary gear (Fig. 221). Seat washer tabs in
matching slots in face of gear carrier. Use extra
petroleum jelly to hold washer in place if desired.

(7) Lubricate sun gear bushings with petroleum

jelly or transmission fluid.

(8) Install sun gear and driving shell on interme-

diate shaft (Fig. 222). Seat shell against rear plane-
tary gear. Verify that thrust washer on planetary
gear was not displaced during installation.

(9) Install tabbed thrust washer in driving shell

(Fig. 223), be sure washer tabs are seated in tab slots
of driving shell. Use extra petroleum jelly to hold
washer in place if desired.

(10) Install tabbed thrust washer on front plane-

tary gear (Fig. 224). Seat washer tabs in matching
slots in face of gear carrier. Use extra petroleum jelly
to hold washer in place if desired.

(11) Install front annulus gear over and onto front

planetary gear (Fig. 225). Be sure gears are fully
meshed and seated.

(12) Install front planetary and annulus gear

assembly (Fig. 226). Hold gears together and slide
them onto shaft. Be sure planetary pinions are
seated on sun gear and that planetary carrier is
seated on intermediate shaft.

(13) Place geartrain in upright position. Rotate

gears to be sure all components are seated and prop-
erly assembled. Snap-ring groove at forward end of
intermediate shaft will be completely exposed when
components are assembled correctly.

(14) Install new planetary snap-ring in groove at

end of intermediate shaft (Fig. 227).

(15) Turn planetary geartrain over. Position wood

block under front end of intermediate shaft and sup-
port geartrain on shaft. Be sure all geartrain parts
have moved forward against planetary snap-ring.
This is important for accurate end play check.

(16) Check planetary geartrain end play with

feeler gauge (Fig. 228). Insert gauge between rear
annulus gear and shoulder on intermediate shaft as
shown. End play should be 0.15 to 1.22 mm (0.006 to
0.048 in.).

(17) If end play is incorrect, install thinner/thicker

planetary snap-ring as needed.

Fig. 219 Installing Rear Annulus Thrust Plate

1 - REAR ANNULUS GEAR
2 - THRUST PLATE

Fig. 220 Installing Rear Planetary Gear

1 - REAR ANNULUS GEAR
2 - REAR PLANETARY GEAR

Fig. 221 Installing Rear Planetary Thrust Washer

1 - REAR PLANETARY GEAR
2 - TABBED THRUST WASHER

21 - 374

AUTOMATIC TRANSMISSION - 46RE

AN

PLANETARY GEARTRAIN/OUTPUT SHAFT (Continued)

Fig. 222 Installing Sun Gear And Driving Shell

1 - OUTPUT SHAFT
2 - DRIVING SHELL
3 - REAR PLANETARY GEAR
4 - OUTPUT SHAFT
5 - SUN GEAR

Fig. 223 Installing Driving Shell Thrust Washer

1 - TAB SLOTS (3)
2 - DRIVING SHELL
3 - TABBED THRUST WASHER

Fig. 224 Installing Thrust Washer On Front

Planetary Gear

1 - TABBED THRUST WASHER
2 - FRONT PLANETARY GEAR

Fig. 225 Assembling Front Planetary And Annulus

Gears

1 - FRONT ANNULUS GEAR
2 - FRONT PLANETARY GEAR

AN

AUTOMATIC TRANSMISSION - 46RE

21 - 375

PLANETARY GEARTRAIN/OUTPUT SHAFT (Continued)


Content   ..  680  681  682  683   ..