Dodge Dakota (R1). Manual - part 671


  Index      Dodge     Dodge Dakota (R1) - service repair manual 2000 year


Search            


Content   ..  669  670  671  672   ..


Dodge Dakota (R1). Manual - part 671


STANDARD PROCEDURE - TRANSMISSION
FILL

To avoid overfilling transmission after a fluid

change or overhaul, perform the following procedure:

(1) Remove dipstick and insert clean funnel in

transmission fill tube.

(2) Add following initial quantity of Mopar

t ATF

+4, type 9602, to transmission:

(a) If only fluid and filter were changed, add 3

pints (1-1/2 quarts) of ATF +4 to transmission.

(b) If transmission was completely overhauled,

torque converter was replaced or drained, and
cooler was flushed, add 12 pints (6 quarts) of ATF
+4 to transmission.
(3) Apply parking brakes.
(4) Start and run engine at normal curb idle

speed.

(5) Apply

service

brakes,

shift

transmission

through all gear ranges then back to NEUTRAL, set
parking brake, and leave engine running at curb idle
speed.

(6) Remove funnel, insert dipstick and check fluid

level. If level is low, add fluid to bring level to
MIN mark on dipstick. 
Check to see if the oil level
is equal on both sides of the dipstick. If one side is
noticably higher than the other, the dipstick has
picked up some oil from the dipstick tube. Allow the
oil to drain down the dipstick tube and re-check.

(7) Drive vehicle until transmission fluid is at nor-

mal operating temperature.

(8) With the engine running at curb idle speed, the

gear selector in NEUTRAL, and the parking brake
applied, check the transmission fluid level.

CAUTION: Do not overfill transmission, fluid foam-
ing and shifting problems can result.

(9) Add fluid to bring level up to MAX arrow

mark.

When fluid level is correct, shut engine off, release

park brake, remove funnel, and install dipstick in fill
tube.

FRONT CLUTCH

DESCRIPTION

The front clutch assembly (Fig. 92) is composed of

the front clutch retainer, pressure plate, clutch
plates, driving discs, piston, piston return spring,
return spring retainer, and snap-rings. The front
clutch is the forward-most component in the trans-
mission geartrain and is directly behind the oil pump
and is considered a driving component.

NOTE: The number of discs and plates may vary
with each engine and vehicle combination.

OPERATION

To apply the clutch, pressure is applied between

the clutch retainer and piston. The fluid pressure is
provided by the oil pump, transferred through the
control valves and passageways, and enters the
clutch through the hub of the reaction shaft support.
With pressure applied between the clutch retainer
and piston, the piston moves away from the clutch
retainer and compresses the clutch pack. This action
applies the clutch pack, allowing torque to flow
through the input shaft into the driving discs, and
into the clutch plates and pressure plate that are
lugged to the clutch retainer. The waved snap-ring is
used to cushion the application of the clutch pack.

When pressure is released from the piston, the

spring returns the piston to its fully released position
and disengages the clutch. The release spring also
helps to cushion the application of the clutch assem-
bly. When the clutch is in the process of being
released by the release spring, fluid flows through a
vent and one-way ball-check-valve located in the
clutch retainer. The check-valve is needed to elimi-
nate the possibility of plate drag caused by centrifu-
gal force acting on the residual fluid trapped in the
clutch piston retainer.

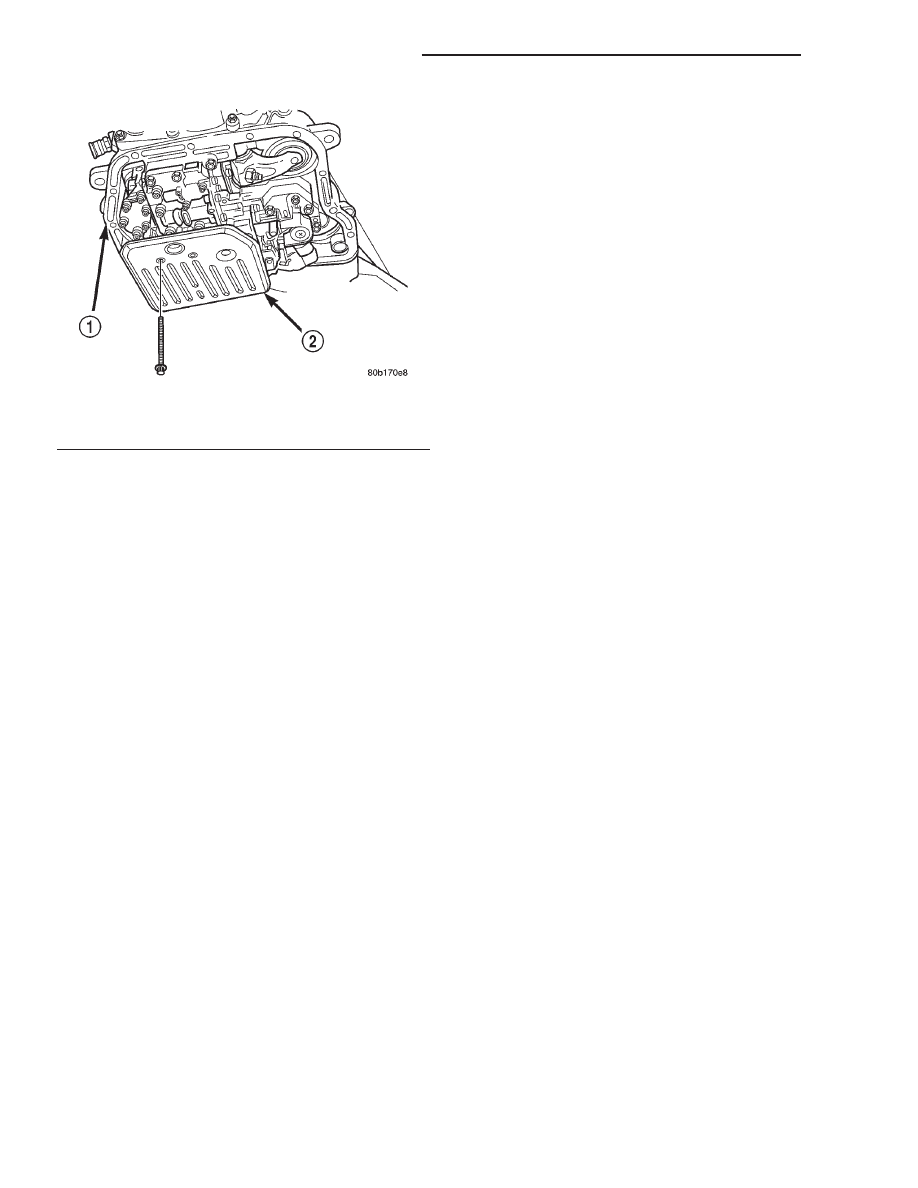
Fig. 91 Transmission Filter

1 - TRANSMISSION
2 - FILTER

21 - 328

AUTOMATIC TRANSMISSION - 46RE

AN

FLUID AND FILTER (Continued)

DISASSEMBLY

(1) Remove the waved snap-ring, reaction plate,

clutch plates, and clutch discs.

(2) Compress clutch piston retainer and piston

springs with Compressor Tool C-3863-A (Fig. 93).

(3) Remove retainer snap-ring and remove com-

pressor tool.

(4) Remove clutch piston springs (Fig. 94). Note

position of piston springs for assembly reference.

(5) Remove clutch piston from retainer with a

twisting motion.

(6) Remove and discard clutch piston inner and

outer seals.

(7) Assemble Tool Handle C-4171 and Bushing

Remover SP-3629 (Fig. 95).

(8) Insert remover tool in bushing and drive bush-

ing straight out of clutch retainer.

Fig. 92 Front Clutch Components

1 - INNER PISTON SEAL

7 - CLUTCH DISCS

2 - CLUTCH PISTON

8 - RETAINER SNAP-RING

3 - CLUTCH PISTON SPRING RETAINER

9 - CLUTCH PISTON SPRINGS (9)

4 - CLUTCH PLATES

10 - OUTER PISTON SEAL

5 - CLUTCH PACK SNAP-RING (WAVED)

11 - FRONT CLUTCH RETAINER

6 - REACTION PLATE

Fig. 93 Removing Front Clutch Spring Retainer

Snap-Ring

1 - SPECIAL TOOL C-3863-A
2 - SNAP-RING

AN

AUTOMATIC TRANSMISSION - 46RE

21 - 329

FRONT CLUTCH (Continued)

INSPECTION

Inspect the front clutch components. Replace the

clutch discs if warped, worn, scored, burned or
charred, the lugs are damaged, or if the facing is
flaking off. Replace the steel plates and reaction
plate if heavily scored, warped, or broken. Be sure
the driving lugs on the discs and plate are also in
good condition. The lugs must not be bent, cracked or
damaged in any way.

Replace the piston springs and spring retainer if

either are distorted, warped or broken.

Check the lug grooves in the clutch piston retainer.

The steel plates should slide freely in the slots.

Replace the piston retainer if the grooves are worn or
damaged. Also check action of the check ball in the
piston retainer. The ball must move freely and not
stick.

Replace the retainer bushing if worn, scored, or

there is any doubt about bushing condition.

Inspect the piston and retainer seal surfaces for

nicks or scratches. Minor scratches can be removed
with crocus cloth. However, replace the piston and/or
retainer if the seal surfaces are seriously scored.

Check the clutch piston check ball. The ball should

be securely in place. Replace the piston if the ball is
missing, or seized in place.

Fig. 94 Front Clutch Components

1 - INNER PISTON SEAL

7 - CLUTCH DISCS

2 - CLUTCH PISTON

8 - RETAINER SNAP-RING

3 - CLUTCH PISTON SPRING RETAINER

9 - CLUTCH PISTON SPRINGS (9)

4 - CLUTCH PLATES

10 - OUTER PISTON SEAL

5 - CLUTCH PACK SNAP-RING (WAVED)

11 - FRONT CLUTCH RETAINER

6 - REACTION PLATE

21 - 330

AUTOMATIC TRANSMISSION - 46RE

AN

FRONT CLUTCH (Continued)

ASSEMBLY

NOTE: The 46RE transmission uses three plates
and discs for the front clutch.

(1) Mount Bushing Installer SP-5511 on tool han-

dle (Fig. 96).

(2) Slide new bushing onto installer tool and start

bushing into retainer.

(3) Tap new bushing into place until installer tool

bottoms against clutch retainer.

(4) Remove installer tools and clean retainer thor-

oughly.

(5) Soak clutch discs in transmission fluid.
(6) Install new inner piston seal onto the outer

diameter of the clutch retainer inner hub.

(7) Install new outer seal onto the clutch piston.

Be sure seal lips of both seals face the interior of the
retainer.

(8) Lubricate new inner and outer piston seals

with Ru-Glyde™, or Mopar

t Door Ease.

(9) Install clutch piston in retainer. Use twisting

motion to seat piston in bottom of retainer. A thin
strip of plastic (about 0.015 - 0.020 in. thick), can be
used to guide seals into place if necessary.

CAUTION: Never push the clutch piston straight in.
This will fold the seals over causing leakage and
clutch slip. In addition, never use any type of metal
tool to help ease the piston seals into place. Metal
tools will cut, shave, or score the seals.

(10) Install and position nine clutch piston springs

(Fig. 97).

(11) Install

spring

retainer

on

top

of

piston

springs.

Fig. 95 Front Clutch Retainer

Bushing Replacement Tools

1 - SPECIAL TOOL C-4171
2 - SPECIAL TOOL SP-3629
3 - SPECIAL TOOL SP-5511
4 - SPECIAL TOOL C-4171
5 - FRONT CLUTCH RETAINER

Fig. 96 Front Clutch Retainer

Bushing Replacement Tools

1 - SPECIAL TOOL C-4171
2 - SPECIAL TOOL SP-3629
3 - SPECIAL TOOL SP-5511
4 - SPECIAL TOOL C-4171
5 - FRONT CLUTCH RETAINER

Fig. 97 Front Clutch Spring Position

1 - 9 SPRING CLUTCH

AN

AUTOMATIC TRANSMISSION - 46RE

21 - 331

FRONT CLUTCH (Continued)


Content   ..  669  670  671  672   ..