Dodge Dakota (R1). Manual - part 670


  Index      Dodge     Dodge Dakota (R1) - service repair manual 2000 year


Search            


Content   ..  668  669  670  671   ..


Dodge Dakota (R1). Manual - part 670


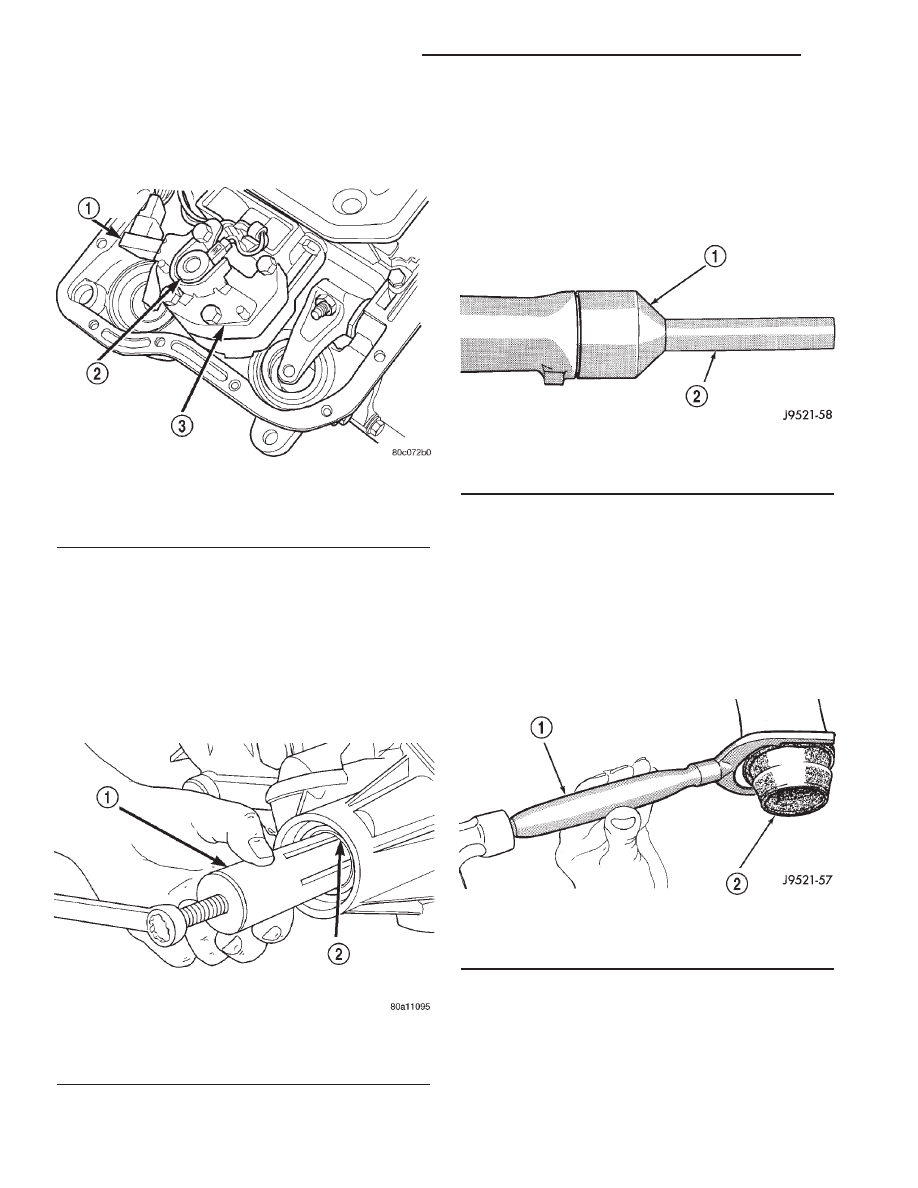
(12) Engage wire connectors into pressure sensor

and solenoid (Fig. 83).

(13) Install transmission fluid pan and (new) filter.
(14) Lower vehicle and road test to verify repair.

EXTENSION HOUSING
BUSHING

REMOVAL

(1) Remove extension housing yoke seal.
(2) Insert Remover 6957 into the extension hous-

ing. Tighten tool to bushing and remove bushing
(Fig. 84).

INSTALLATION

(1) Align bushing oil hole with oil slot in extension

housing.

(2) Tap bushing into place with Installer 6951 and

Handle C-4171.

(3) Install new oil seal in housing using Seal

Installer C-3995-A (Fig. 85).

EXTENSION HOUSING SEAL

REMOVAL

(1) Raise vehicle.
(2) Mark propeller shaft and axle yoke for align-

ment reference.

(3) Disconnect and remove propeller shaft.
(4) Remove old seal with Seal Remover C-3985-B

(Fig. 86) from overdrive housing.

Fig. 83 Governor Solenoid And Pressure Sensor

1 - PRESSURE SENSOR
2 - PRESSURE SOLENOID
3 - GOVERNOR

Fig. 84 Bushing Removal - Typical

1 - REMOVER
2 - EXTENSION HOUSING BUSHING

Fig. 85 Extension Housing Seal Installation

1 - SPECIAL TOOL C-3995-A OR C-3972-A
2 - SPECIAL TOOL C-4471

Fig. 86 Removing Transmission Housing Yoke Seal

1 - REMOVER
2 - SEAL

21 - 324

AUTOMATIC TRANSMISSION - 46RE

AN

ELECTRONIC GOVERNOR (Continued)

INSTALLATION

(1) Place seal in position on overdrive housing.
(2) Drive seal into overdrive housing with Seal

Installer C-3995-A (Fig. 87).

(3) Carefully guide propeller shaft slip yoke into

housing and onto output shaft splines. Align marks
made at removal and connect propeller shaft to rear
axle pinion yoke.

FLUID AND FILTER

DIAGNOSIS AND TESTING - EFFECTS OF
INCORRECT FLUID LEVEL

A low fluid level allows the pump to take in air

along with the fluid. Air in the fluid will cause fluid
pressures to be low and develop slower than normal.
If the transmission is overfilled, the gears churn the
fluid into foam. This aerates the fluid and causing
the same conditions occurring with a low level. In
either case, air bubbles cause fluid overheating, oxi-
dation and varnish buildup which interferes with
valve and clutch operation. Foaming also causes fluid
expansion which can result in fluid overflow from the
transmission vent or fill tube. Fluid overflow can eas-
ily be mistaken for a leak if inspection is not careful.

DIAGNOSIS AND TESTING - CAUSES OF
BURNT FLUID

Burnt, discolored fluid is a result of overheating

which has two primary causes.

(1) A result of restricted fluid flow through the

main and/or auxiliary cooler. This condition is usu-
ally the result of a faulty or improperly installed
drainback valve, a damaged main cooler, or severe

restrictions in the coolers and lines caused by debris
or kinked lines.

(2) Heavy duty operation with a vehicle not prop-

erly equipped for this type of operation. Trailer tow-
ing or similar high load operation will overheat the
transmission

fluid

if

the

vehicle

is

improperly

equipped. Such vehicles should have an auxiliary
transmission fluid cooler, a heavy duty cooling sys-
tem, and the engine/axle ratio combination needed to
handle heavy loads.

DIAGNOSIS AND TESTING - FLUID
CONTAMINATION

Transmission fluid contamination is generally a

result of:

• adding incorrect fluid

• failure to clean dipstick and fill tube when

checking level

• engine coolant entering the fluid

• internal failure that generates debris

• overheat that generates sludge (fluid break-

down)

• failure to reverse flush cooler and lines after

repair

• failure to replace contaminated converter after

repair

The use of non-recommended fluids can result in

transmission failure. The usual results are erratic
shifts, slippage, abnormal wear and eventual failure
due to fluid breakdown and sludge formation. Avoid
this condition by using recommended fluids only.

The dipstick cap and fill tube should be wiped

clean before checking fluid level. Dirt, grease and
other foreign material on the cap and tube could fall
into the tube if not removed beforehand. Take the
time to wipe the cap and tube clean before withdraw-
ing the dipstick.

Engine coolant in the transmission fluid is gener-

ally caused by a cooler malfunction. The only remedy
is to replace the radiator as the cooler in the radiator
is not a serviceable part. If coolant has circulated
through the transmission, an overhaul is necessary.

The transmission cooler and lines should be

reverse flushed whenever a malfunction generates
sludge and/or debris. The torque converter should
also be replaced at the same time.

Failure to flush the cooler and lines will result in

recontamination. Flushing applies to auxiliary cool-
ers as well. The torque converter should also be
replaced whenever a failure generates sludge and
debris. This is necessary because normal converter
flushing procedures will not remove all contami-
nants.

Fig. 87 Installing Overdrive Housing Seal

1 - SPECIAL TOOL C-3995-A OR C-3972-A
2 - SPECIAL TOOL C-4471

AN

AUTOMATIC TRANSMISSION - 46RE

21 - 325

EXTENSION HOUSING SEAL (Continued)

STANDARD PROCEDURE - FLUID LEVEL
CHECK

Low fluid level can cause a variety of conditions

because it allows the pump to take in air along with
the fluid. As in any hydraulic system, air bubbles
make the fluid spongy, therefore, pressures will be
low and build up slowly.

Improper filling can also raise the fluid level too

high. When the transmssion has too much fluid, the
geartrain churns up foam and cause the same condi-
tions which occur with a low fluid level.

In either case, air bubbles can cause overheating

and/or fluid oxidation, and varnishing. This can
interfere with normal valve, clutch, and accumulator
operation. Foaming can also result in fluid escaping
from the transmission vent where it may be mis-
taken for a leak.

Along with fluid level, it is important to check the

condition of the fluid. When the fluid smells burned,
and is contaminated with metal or friction material
particles, a complete transmission recondition is
needed. Be sure to examine the fluid on the dipstick
closely. If there is any doubt about its condition,
drain out a sample for a double check.

After the fluid has been checked, seat the dipstick

fully to seal out water and dirt.

The transmission has a dipstick to check oil level.

It is located on the right side of the engine. Be sure
to wipe all dirt from dipstick handle before removing.

Fluid level is checked with the engine running at

curb idle speed, the transmission in NEUTRAL and
the transmission fluid at normal operating tempera-
ture. The engine should be running at idle
speed for at least one minute, with the vehicle
on level ground.

The transmission fluid level can be checked two

ways.

PROCEDURE ONE

(1) Transmission fluid must be at normal operat-

ing temperature for accurate fluid level check. Drive
vehicle if necessary to bring fluid temperature up to
normal hot operating temperature of 82°C (180°F).

(2) Position vehicle on level surface.
(3) Start and run engine at curb idle speed.
(4) Apply parking brakes.
(5) Shift transmission momentarily into all gear

ranges. Then shift transmission back to NEUTRAL.

(6) Clean top of filler tube and dipstick to keep

dirt from entering tube.

(7) Remove dipstick (Fig. 88) and check fluid level

as follows:

(a) Correct acceptable level is in crosshatch area.
(b) Correct maximum level is to MAX arrow

mark.

(c) Incorrect level is at or below MIN line.
(d) If fluid is low, add only enough Mopar

t ATF

+4, type 9602, to restore correct level. Do not over-
fill.

PROCEDURE TWO

(1) Start engine and apply parking brake.
(2) Shift the transmission into DRIVE for approxi-

mately 2 seconds.

(3) Shift the transmission into REVERSE for

approximately 2 seconds.

(4) Shift the transmission into PARK.
(5) Hook up DRB

t scan tool and select engine.

(6) Select sensors.
(7) Read the transmission temperature value.
(8) Compare the fluid temperature value with the

figure (Fig. 89).

(9) Adjust transmission fluid level shown on the

dipstick according to the figure.

NOTE: After adding any fluid to the transmission,
wait a minimum of 2 minutes for the oil to fully
drain from the fill tube into the transmission before
rechecking the fluid level.

(10) Check transmission for leaks.

Fig. 88 Dipstick Fluid Level Marks - Typical

1 - DIPSTICK
2 - MAXIMUM CORRECT FLUID LEVEL
3 - ACCEPTABLE FLUID LEVEL

21 - 326

AUTOMATIC TRANSMISSION - 46RE

AN

FLUID AND FILTER (Continued)

STANDARD PROCEDURE - FLUID AND FILTER
REPLACEMENT

For proper service intervals (Refer to LUBRICA-

TION & MAINTENANCE/MAINTENANCE SCHED-
ULES - DESCRIPTION). The service fluid fill after a
filter change is approximately 3.8 liters (4.0 quarts).

(1) Hoist and support vehicle on safety stands.
(2) Place a large diameter shallow drain pan

beneath the transmission pan.

(3) Remove bolts holding front and sides of pan to

transmission (Fig. 90).

(4) Loosen bolts holding rear of pan to transmis-

sion.

(5) Slowly separate front of pan away from trans-

mission allowing the fluid to drain into drain pan.

(6) Hold up pan and remove remaining bolt hold-

ing pan to transmission.

(7) While holding pan level, lower pan away from

transmission.

(8) Pour remaining fluid in pan into drain pan.
(9) Remove screws holding filter to valve body

(Fig. 91).

(10) Separate filter from valve body and pour fluid

in filter into drain pan.

(11) Dispose of used trans fluid and filter properly.

Fig. 89 46RE Fluid Fill Graph

Fig. 90 Transmission Pan

1 - TRANSMISSION
2 - GASKET
3 - PAN

AN

AUTOMATIC TRANSMISSION - 46RE

21 - 327

FLUID AND FILTER (Continued)


Content   ..  668  669  670  671   ..