Dodge Dakota (R1). Manual - part 337


  Index      Dodge     Dodge Dakota (R1) - service repair manual 2000 year


Search            


Content   ..  335  336  337  338   ..


Dodge Dakota (R1). Manual - part 337


(9) Contact the roof panel with the plastic coated

tip of the degaussing tool. Be sure that the template
is in place to avoid scratching the roof panel. Using a
slow, back-and-forth sweeping motion, and allowing
13 millimeters (0.50 inch) between passes, move the
tool at least 11 centimeters (4 inches) to each side of
the roof center line, and 28 centimeters (11 inches)
back from the windshield header.

(10) With the degaussing tool still energized,

slowly back it away from the roof panel. When the
tip of the tool is at least 61 centimeters (2 feet) from
the roof panel, disconnect the tool.

(11) Calibrate the compass and adjust the compass

variance. Refer to Compass Variation Adjustment
and Compass Calibration in the Service Proce-
dures section of this group for the procedures.

REMOVAL - OVERHEAD CONSOLE

(1) Disconnect and isolate the battery negative

cable.

(2) Remove the screw that secures the front of the

overhead console to the front of the overhead console
bracket (Fig. 3).

(3) Insert the fingertips of both hands between the

headliner and the sides of the overhead console hous-
ing in the area between the garage door opener stor-
age bin and the sunglasses storage bin.

(4) Pull downward on the sides of the overhead

console housing firmly and evenly to disengage the
two snap clips that secure the rear of the unit from
their receptacles in the overhead console bracket.

(5) Lower the overhead console from the headliner

far enough to access the wire harness connector.

(6) Disconnect the roof wire harness connector

from the overhead console wire harness connector.

(7) Remove the overhead console from the head-

liner.

REMOVAL - OVERHEAD CONSOLE BRACKET

(1) Disconnect and isolate the battery negative

cable.

(2) Remove the overhead console from the over-

head console bracket. Refer to Overhead Console in
the Removal and Installation section of this group for
the procedures.

(3) Remove the headliner from the roof panel.

Refer to Headliner in the Removal and Installation
section of Body for the procedures.

(4) Remove the two screws that secure the front of

the overhead console bracket to the roof front header
(Fig. 4).

(5) Using a sharp utility knife, cut through the

double-faced tape that secures the rear flange of the
overhead console bracket to the roof panel.

(6) Remove the overhead console bracket from the

roof panel.

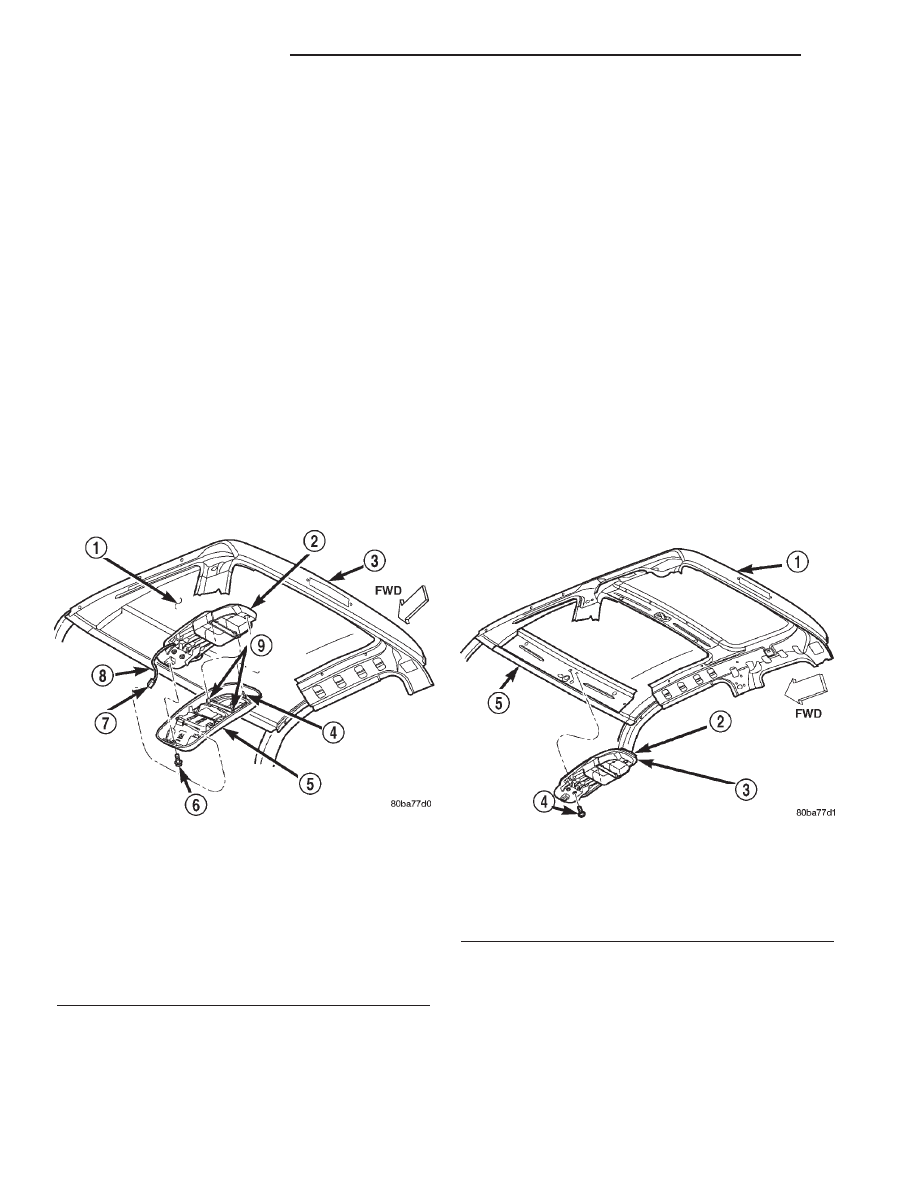
Fig. 3 Overhead Console Remove/Install

1 - HEADLINER
2 - BRACKET
3 - ROOF PANEL
4 - LOCATING PIN
5 - OVERHEAD CONSOLE
6 - SCREW
7 - ROOF WIRE HARNESS CONNECTOR
8 - FRONT HEADER
9 - SNAP CLIP (2)

Fig. 4 Overhead Console Bracket Remove/Install

1 - ROOF PANEL
2 - DOUBLE-FACED TAPE
3 - OVERHEAD CONSOLE BRACKET
4 - SCREW (2)
5 - FRONT HEADER

8M - 4

MESSAGE SYSTEMS

AN

OVERHEAD CONSOLE (Continued)

OVERHEAD CONSOLE DISASSEMBLY

SUNGLASS STORAGE BIN

(1) Remove the reading and courtesy lamp housing

from the overhead console. Refer to Overhead Con-
sole Reading and Courtesy Lamp Housing 
in
Lamps for the procedure.

(2) Unlatch and remove the sunglasses storage bin

from the overhead console housing.

PAPERCLIP

(1) Remove the overhead console from the head-

liner. Refer to Overhead Console in the Removal
and Installation section of this group for the proce-
dures.

(2) Remove the four screws that secure the paper-

clip to the overhead console housing.

(3) Pull the paperclip away from the overhead con-

sole far enough to access the wire harness connec-
tors.

(4) Disengage the overhead console wire harness

connector from the mount on the paperclip by push-
ing the connector firmly toward the left side of the
overhead console housing.

(5) Remove the paperclip from the overhead con-

sole housing.

OVERHEAD CONSOLE ASSEMBLY

SUNGLASS STORAGE BIN

(1) Position the sunglasses storage bin into the

overhead console housing.

(2) Engage the latch of the sunglasses storage bin

with the latch striker on the rear of the storage bin
opening in the overhead console housing.

(3) Be certain that the sunglasses storage bin pivot

shaft is located in the two pivot receptacles just
behind the reading and courtesy lamp lenses in the
overhead console housing.

(4) Be certain that the sunglasses storage bin

damper spring is installed on the pivot shaft with the
two end tabs of the spring engaged with the flats on
the rear of the shaft, and the center tab engaged over
the front of the shaft.

(5) Install the reading and courtesy lamp housing

onto the overhead console. Refer to Overhead Con-
sole Reading and Courtesy Lamp Housing 
in
Lamps for the procedure.

PAPERCLIP

(1) Position the paperclip onto the overhead con-

sole housing.

(2) Engage the overhead console wire harness con-

nector onto the mount on the paperclip by aligning
the channels on the connector with the tab on the

mount and pushing the connector firmly toward the
right side of the overhead console housing.

(3) Install and tighten the four screws that secure

the paperclip to the overhead console housing.
Tighten the screws to 2.2 N·m (20 in. lbs.).

(4) Install the overhead console onto the headliner.

Refer to Overhead Console in the Removal and
Installation section of this group for the procedures.

INSTALLATION - OVERHEAD CONSOLE

(1) Position the overhead console near the mount-

ing location on the headliner.

(2) Reconnect the roof wire harness connector to

the overhead console wire harness connector.

(3) Align the locating pin on the rear of the over-

head console housing with the receptacle in the rear
of the overhead console bracket.

(4) Align the two snap clips on the overhead con-

sole housing with their receptacles in the overhead
console bracket.

(5) Push upward firmly and evenly on the sides of

the overhead console housing over both of the snap
clip locations until each of the two snap clips is fully
engaged with its receptacle in the overhead console
bracket.

(6) Install and tighten the screw that secures the

front of the overhead console housing to the overhead
console bracket. Tighten the screw to 1.9 N·m (17 in.
lbs.).

(7) Reconnect the battery negative cable.

INSTALLATION - OVERHEAD CONSOLE
BRACKET

(1) Remove any remnants of the old double-faced

tape from the roof panel and the rear flange of the
overhead console bracket and clean these areas with
a suitable solvent to remove any traces of grease, oil
or adhesive residue. When installing the overhead
console bracket, always apply a new piece of double-
faced tape to the rear flange of the bracket.

(2) Align the two locating pins on the front of the

overhead console bracket with the receptacles in the
roof front header.

(3) Lower the rear flange of the overhead console

bracket from the roof panel far enough to access and
remove the release paper from the double-faced tape.

(4) Push upward firmly and evenly on the rear

flange of the overhead console bracket over the dou-
ble-faced tape to ensure complete adhesion to the
roof panel.

(5) Install and tighten the two screws that secure

the front of the overhead console bracket to the roof
front header. Tighten the screws to 1.9 N·m (17 in.
lbs.).

AN

MESSAGE SYSTEMS

8M - 5

OVERHEAD CONSOLE (Continued)

(6) Install the headliner onto the roof panel. Refer

to Headliner in the Removal and Installation sec-
tion of Body for the procedures.

(7) Install the overhead console onto the overhead

console bracket. Refer to Overhead Console in the
Removal and Installation section of this group for the
procedures.

(8) Reconnect the battery negative cable.

SPECIAL TOOLS

OVERHEAD CONSOLE SYSTEMS

COMPASS/MINI-TRIP
COMPUTER

DESCRIPTION

The compass mini-trip computer is located in the

overhead console on models equipped with this
option. The compass mini-trip computer units include
the electronic control module, a Vacuum-Fluorescent
Display (VFD), a compass sensor unit and two push
button function switches.

The compass mini-trip computer module contains a

central processing unit and interfaces with other
electronic modules in the vehicle on the Programma-
ble Communication Interface (J1850) data bus net-
work. The J1850 data bus network allows the
sharing of sensor information. This helps to reduce
wire harness complexity, reduce internal controller
hardware, and reduce component sensor current
loads. At the same time, this system provides
increased

reliability,

enhanced

diagnostics,

and

allows the addition of many new feature capabilities.

The compass mini-trip computer provides several

electronic functions and features. Some of the func-
tions and features that the compass mini-trip com-
puter module supports and/or controls, include the
following display options:

• Compass and temperature - provides the out-

side temperature and one of eight compass readings
to indicate the direction the vehicle is facing.

• Trip odometer (TRIP ODO) - shows the dis-

tance travelled since the last trip computer reset.

• Average fuel economy (AVG ECO) - shows

the average fuel economy since the last trip computer
reset.

• Instant fuel economy (ECO) - shows the

present fuel economy based upon the current vehicle
distance and fuel used information.

• Distance to empty (DTE) - shows the esti-

mated distance that can be travelled with the fuel
remaining in the fuel tank. This estimated distance
is computed using the average miles-per-gallon from
the last 30 gallons of fuel used.

• Elapsed time (ET) - shows the accumulated

ignition-on time since the last trip computer reset.

• Blank screen - the compass mini-trip VFD is

turned off.

The ambient temperature sensor is hard wired to

the HVAC control head. Data input for all other com-
pass mini-trip computer functions, including VFD
dimming level, is received through J1850 data bus
messages. The compass mini-trip computer uses its
internal programming and all of these inputs to cal-
culate and display the requested data. If the data
displayed is incorrect, perform the self-diagnostic
tests as described in this group. If these tests prove
inconclusive, the use of a DRB scan tool and the
proper Diagnostic Procedures manual are recom-
mended for further testing of the compass mini-trip
computer module and the J1850 data bus.

The compass mini-trip computer module cannot be

repaired, and is available for service only as a unit.
This unit includes the push button switches and the
plastic module and display lens. If any of these com-
ponents is faulty or damaged, the complete compass
mini-trip computer module must be replaced.

COMPASS

While in the compass/temperature mode, the com-

pass will display the direction in which the vehicle is
pointed using the eight major compass headings
(Examples: north is N, northeast is NE). The self-cal-
ibrating compass unit requires no adjusting in nor-
mal use. The only calibration that may prove
necessary is to drive the vehicle in three complete
circles, on level ground, in not less than forty-eight
seconds. This will reorient the compass unit to its
vehicle.

The compass unit also will compensate for magne-

tism the body of the vehicle may acquire during nor-
mal use. However, avoid placing anything magnetic
directly on the roof of the vehicle. Magnetic mounts
for an antenna, a repair order hat, or a funeral pro-
cession flag can exceed the compensating ability of
the compass unit if placed on the roof panel. Mag-
netic bit drivers used on the fasteners that hold the
overhead console assembly to the roof header can
also affect compass operation. If the vehicle roof

Degaussing Tool 6029

8M - 6

MESSAGE SYSTEMS

AN

OVERHEAD CONSOLE (Continued)

should become magnetized, the demagnetizing and
calibration procedures found in this group may be
required to restore proper compass operation.

THERMOMETER

The thermometer displays the outside ambient

temperature in whole degrees. The temperature dis-
play can be changed from Fahrenheit to Celsius
using the U.S./Metric push button. The displayed
temperature is not an instant reading of conditions,
but an average temperature. It may take the ther-
mometer display several minutes to respond to a
major temperature change, such as driving out of a
heated garage into winter temperatures.

When the ignition switch is turned to the Off posi-

tion, the last displayed temperature reading stays in
the thermometer unit memory. When the ignition
switch is turned to the On position again, the ther-
mometer will display the memory temperature if the
engine coolant temperature is above about 52° C
(125° F). If the engine coolant temperature is below
about 52° C (125° F), the thermometer will display
the actual temperature sensed by the ambient tem-
perature sensor. The thermometer temperature dis-
play update interval varies with the vehicle speed.

The thermometer function is supported by an

ambient temperature sensor. The sensor is mounted
outside the passenger compartment near the front
and center of the vehicle, and is hard wired to the
HVAC control head which sends temperature on
J1850 data bus circuit. The ambient temperature
sensor is available as a separate service item.

NOTE: The compass mini-trip computer will display
“OC” for temperatures below -40° C and “SC” for
temperatures above 55°C.

OPERATION

The compass mini-trip computer only operates with

the ignition switch in the On position. When the igni-
tion switch is turned to the On position, all of the
segments in the compass mini-trip computer VFD
will be turned off for one second, then the display
will return to the last function being displayed before
the ignition was turned to the Off position. With the
ignition switch in the On position, momentarily
depressing and releasing the Step push button switch
will cause the compass-mini-trip computer to change
its mode of operation, and momentarily depressing
and releasing the U.S./Metric push button will cause
the unit to toggle between U.S. and Metric measure-
ments.

This compass mini-trip computer features several

functions that can be reset. If both the Step and U.S./
Metric push buttons are depressed at the same time
for more than one second with the ignition switch in

the On position, the trip computer information that
can be reset is reset. However, the reset will only
occur if the function currently displayed is a function
that can be reset. The functions that can be reset
are: TRIP ODO, AVG ECO, and ET.

For more information on the features and control

functions of the compass mini-trip computer, see the
owner’s manual in the vehicle glove box.

DIAGNOSIS & TESTING - COMPASS MINI-TRIP
COMPUTER

If the problem with the compass mini-trip com-

puter module is an “OC” or “SC” in the compass/ther-
mometer display, refer to Ambient Temperature
Sensor 
in the Diagnosis and Testing section of this
group. If the problem with the compass mini-trip
computer module is an inaccurate or scrambled dis-
play, refer to Self-Diagnostic Test in the Diagnosis
and Testing section of this group. If the problem with
the compass mini-trip computer module is incorrect
Vacuum Fluorescent Display (VFD) dimming levels,
use a DRB scan tool and the proper Diagnostic Pro-
cedures manual to test for the correct dimming mes-
sage inputs being received from the instrument
cluster over the J1850 data bus. If the problem is a
no-display condition, use the following procedures.
For complete circuit diagrams, refer to Overhead
Console 
in the Contents of Wiring Diagrams.

(1) Check the fused ignition switch output (run/

start) fuse in the junction block. If OK, go to Step 2.
If not OK, repair the shorted circuit or component as
required and replace the faulty fuse.

(2) Turn the ignition switch to the On position.

Check for battery voltage at the fused ignition switch
output (run/start) fuse in the junction block. If OK,
go to Step 3. If not OK, repair the open fused ignition
switch output (run/start) circuit to the ignition switch
as required.

(3) Turn the ignition switch to the Off position.

Disconnect and isolate the battery negative cable.
Remove the overhead console. Check for continuity
between the ground circuit cavities of the roof wire
harness connector for the overhead console and a
good ground. There should be continuity. If OK, go to
Step 4. If not OK, repair the open ground circuit to
ground as required.

(4) Connect the battery negative cable. Turn the

ignition switch to the On position. Check for battery
voltage at the fused ignition switch output (run/start)
circuit cavity of the roof wire harness connector for
the overhead console. If OK, refer to Self-Diagnos-
tic Test 
in the Diagnosis and Testing section of this
group for further diagnosis of the compass mini-trip
computer module and the J1850 data bus. If not OK,
repair the open fused ignition switch output (run/
start) circuit to the junction block fuse as required.

AN

MESSAGE SYSTEMS

8M - 7

COMPASS/MINI-TRIP COMPUTER (Continued)


Content   ..  335  336  337  338   ..