Daewoo Matiz (2003 year). Manual - part 253


  Index      Daewoo     Daewoo Matiz - service repair manual 2003 year


Search            


Content   ..  251  252  253  254   ..


Daewoo Matiz (2003 year). Manual - part 253


9G – 8  INTERIOR TRIM

D109E547

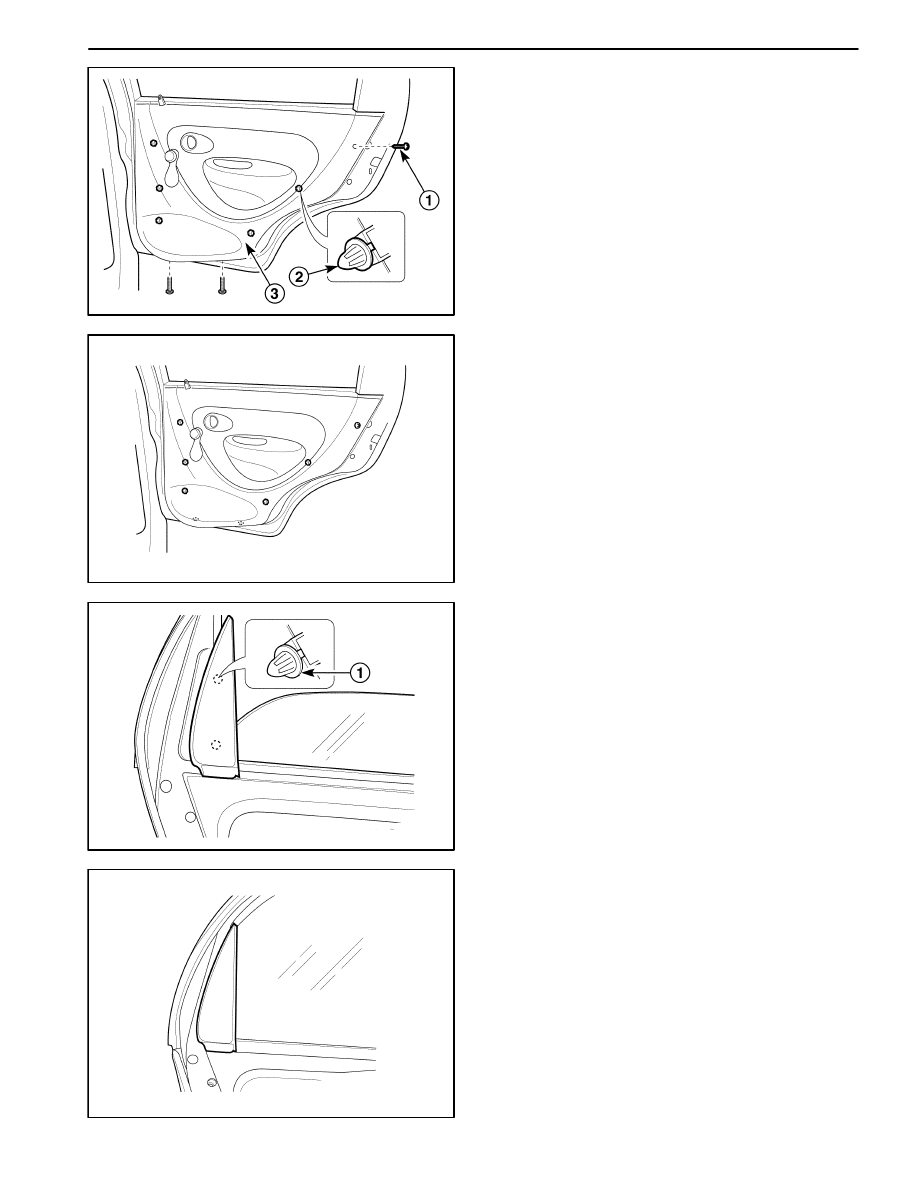
4. Remove the trim panel.

D

Remove the screws (1).

D

Remove the clips (2).

D

Remove the trim panel (3).

5. Remove the inside channel weatherstrip. Refer to

Section 9P, Doors.

D109E548

Installation Procedure

1. Install the inside channel weatherstrip. Refer to Sec-

tion 9P, Doors.

2. Install the trim panel with the screws and the clips.

3. Install the door pull with the screw.

4. Install the window regulator handle. Refer to Section

9P, Doors.

5. Install the inside door handle. Refer to Section 9P,

Doors.

D109E549

REAR DOOR INTERIOR GARNISH
MOLDING

Removal Procedure

1. Pry off interior garnish molding.

D

Pry off the garnish molding caps (1).

D109E550

Installation Procedure

1. Install the interior garnish molding.

INTERIOR TRIM  9G – 9

D109E551

REAR DOOR EXTERIOR GARNISH
MOLDING

Removal Procedure

1. Pry off the interior garnish molding. Refer to “Rear

Door Interior Garnish Molding” in this section.

2. Pry off the exterior garnish molding.

D

Remove the screw (1).

D

Pry off exterior garnish molding (2).

D109E552

Installation Procedure

1. Install the exterior garnish molding with the screw.

2. Install the interior garnish molding. Refer to “Rear

Door Interior Garnish Molding” in this section.

D19E553A

TAILGATE TRIM PANEL

Removal Procedure

1. Open the tailgate.

2. Remove the trim from the tailgate.

D

Remove the clips by pushing the center of the clip
(1).

D

Remove the trim (2).

D19E554A

Installation Procedure

1. Install the trim to the tailgate.

Notice: In case of the loose clips, replace the clips with
the new ones.

9G – 10  INTERIOR TRIM

D109E555

A–PILLAR TRIM PANEL

Removal Procedure

1. Pry off the A–pillar trim panel (1).

D109E556

Installation Procedure

1. Install the A–pillar trim panel.

D109E557

UPPER B–PILLAR TRIM PANEL

Removal Procedure

1. Remove the bolt on the upper B–pillar trim panel. Re-

fer to Section 8A, Seat Belts.

2. Pry off the upper B–pillar trim panel.

D

Pry off the upper B–pillar trim panel by hands (1).

D109E558

Installation Procedure

1. Install the upper B–pillar trim panel.

2. Install the bolt on the upper B–pillar trim panel. Refer

to Section 8A, Seat Belts.

INTERIOR TRIM  9G – 11

D110A501

LOWER B–PILLAR TRIM PANEL

Removal Procedure

1. Remove the bolt on the lower B–pillar trim panel.

D

Remove the bolt (1).

D

Remove the spacer and the spring washer (2).

D

Remove the plastic protector from the seat belt an-
chor.

D109E559

2. Pry off the lower B–pillar trim panel.

D109E560

Installation Procedure

1. Install the lower B–pillar trim panel.

2. Install the bolt on the lower B–piller trim panel. Refer

to Section 8A, Seat Belts.

D109E561

C–PILLAR TRIM PANEL

Removal Procedure

1. Disconnect the negative battery cable.

2. Open the tailgate.

3. Disconnect the rear speaker electrical connector.


Content   ..  251  252  253  254   ..