DAF LF45, LF55 Series. Manual - part 138


  Index      DAF     DAF LF45, LF55 Series - service repair manual


Search            


Content   ..  136  137  138  139   ..


DAF LF45, LF55 Series. Manual - part 138


1

LF45/55 series

Removal and installation

SEATS

4-5

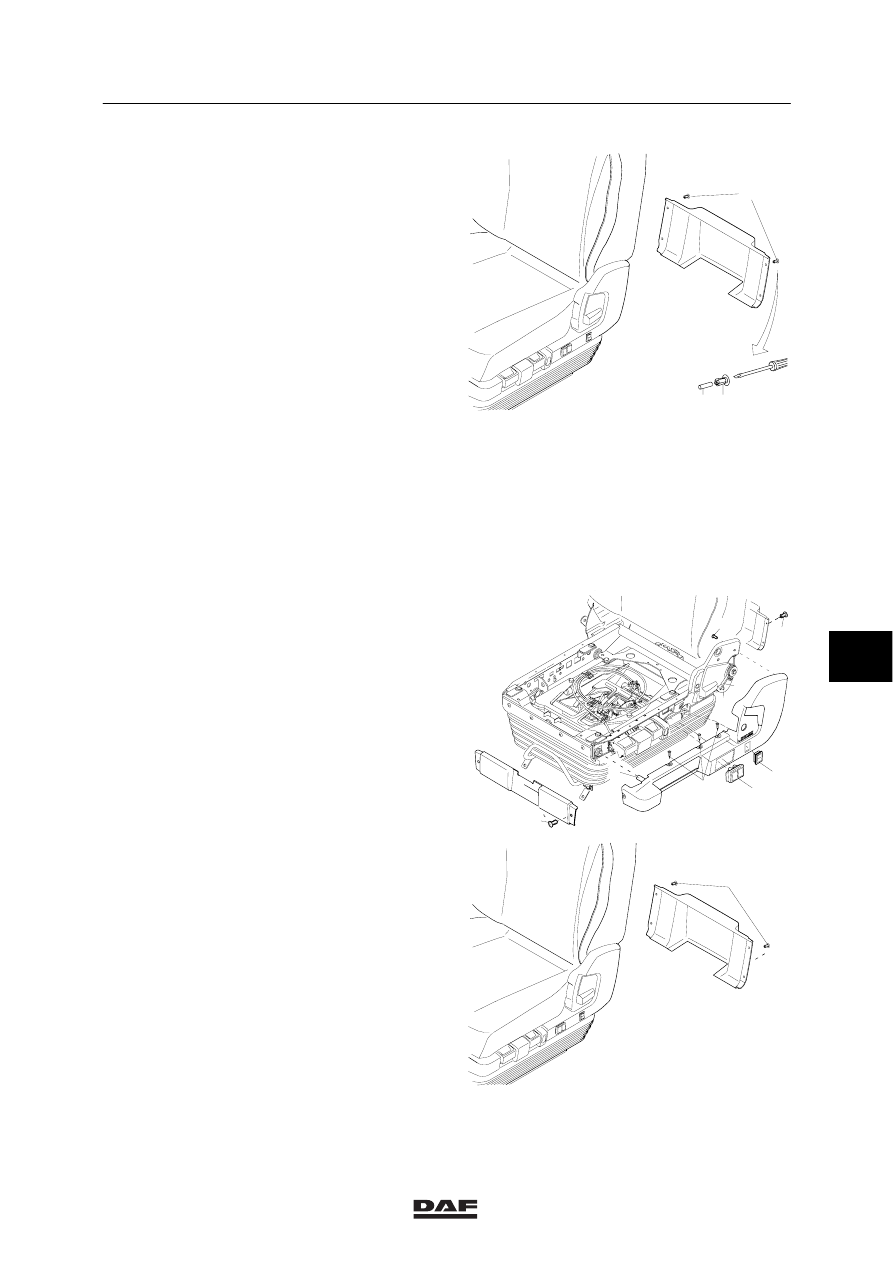
Installing rear cover panel
1.

Fit the rear cover panel to the side panels
using the attachment plugs (1).

2.

Secure the attachment plugs (1) by fitting
the pins (2).

1

1

2

K1 01 383

4.8 REMOVAL AND INSTALLATION, COVER PANEL ON CONTROL SIDE

Removing cover panel on control side
1.

Remove the seat assembly.

2.

Remove the seat squab.

3.

Remove the front cover panel (5).

4.

Remove the rear cover panel (1).

5.

Fold the backrest forwards.

6.

Remove the attachment screw (3) on the
inside of the backrest hinge bracket.

7.

Fold the backrest back.

8.

Remove the attachment screws (2) on the
seat frame.

9.

Disconnect the air pipes on the switches of
the lumbar support adjustment (8). You may
mark the sequence of connection.

10. Disconnect the connector on the seat

heating switch (9).

11. Disconnect the cover panel of the seat

frame and tilt the cover panel over the
backrest adjuster lever (7).

1

5

2

3

4

7

6

9

8

1

K1 01 384

7

ǹ 0210

1

SEATS

Removal and installation

LF45/55 series

4-6

Installing cover panel on control side
1.

Tilt the cover panel into mounting position
over the backrest adjuster lever (7). Check
that the reset spring (6) is still on the cam of
the backrest adjuster lever (7).

2.

Fit the air pipes of the lumbar support
adjuster (8).

3.

Fit the connector of the seat heating
switch (9).

4.

Fit the cover panel to the seat frame using
the centring pin (4) and the attachment
screws (2).

5.

Fit the cover panel to the backrest hinge
bracket using the attachment screw (3).

6.

Fit the front cover panel (5), rear cover
panel (1) and the seat squab.

7.

Install the seat assembly.

1

5

2

3

4

7

6

9

8

1

K1 01 384

7

ǹ 0210

1

LF45/55 series

Removal and installation

SEATS

4-7

4.9 REMOVAL AND INSTALLATION, COVER PANEL ON NON-CONTROL SIDE

Removing cover panel on non-control side
1.

Remove the seat assembly.

2.

Remove the seat squab.

3.

Remove the front cover panel.

4.

Remove the rear cover panel.

5.

Remove the attachment screw on the inside
of the backrest hinge bracket.

6.

Remove the attachment screws on the seat
frame.

7.

Remove the attachment screw of the seat
belt lock.

8.

Remove the seat belt lock.

9.

Remove the cover panel.

Installing cover panel on non-control side
1.

Fit the cover panel to the seat frame and
the backrest hinge bracket using the
attachment screws.

2.

Fit the seat belt lock using the attachment
screw.

3.

Fit the front cover panel using the
attachment screws.

4.

Fit the rear cover panel using the
attachment plugs.

5.

Fit the seat squab.

6.

Install the seat assembly.

7

ǹ 0210

1

SEATS

Removal and installation

LF45/55 series

4-8

4.10 REMOVAL AND INSTALLATION, DUST BOOT

Removing dust boot
1.

Remove the seat assembly.

2.

Remove the seat squab.

3.

Remove all cover panels.

4.

Remove the air pipe to the quick-release
coupling on the connector block at the seat
rear.

5.

Disconnect the attachment caps and the
clamps on the seat frame.

6.

Pull the rubber dust boot at the front over
the operating lever of the horizontal seat
adjusting mechanism and the guide slides.

7.

Remove the rubber dust boot completely
from the seat.

Installing dust boot
1.

Fit the rubber dust boot to the seat over the
guide slides.

2.

Fasten the rubber dust boot to the seat
frame (all round) using the fastening caps.
Press the attachment caps of the rubber
dust boot into the attachment holes with a
driving tool.

3.

Fasten the dust boot with the clamps.

4.

Fit the air pipe to the quick-release coupling
on the connector block.

5.

Fit all cover panels.

6.

Fit the seat squab.

7.

Install the seat assembly.

7

ǹ 0210


Content   ..  136  137  138  139   ..