Chery Fora (Elara A520). Manual - part 19


  Index      Chery     Chery Fora (Elara A520) - service repair manual


Search            


Content   ..  17  18  19  20   ..


Chery Fora (Elara A520). Manual - part 19


Chery Service Manual for A520                  Body Dimension and Accessories


15 


II.  DISASSEMBLING THE TAIL LIGHT 

ASSEMBLY 

1.  Remove  the  luggage  compartment  wheel 

house trim assembly and the floor mat; 

Assembly  requirements:  The  contact  part  of 
the  carpet  circumference  and  the  luggage 
compartment  weather  strip  should  be 
wrapped into the lip of the weather strip with 
good matching. The contact part of the carpet 
circumference  and  the  C  pillar  upper  cover 
sheet should be placed inside the cover sheet. 
All  parts  should  be  installed  in  place  and  in 
perfect  joint  with  the  body.  The  luggage 
compartment  carpet  clip  should  be  just 
placed into the room of the rear trim panel of 
the  luggage  compartment.  The  two  sides  of 
the carpet should be tightly stuck to the folds 
of  the  left/right  trim  of  the  luggage 
compartment  wheel  house  and  should  be  in 
perfect  joint  with  the  rear  floor  of  the  body 
after fitting.


Figure 35


Figure 36


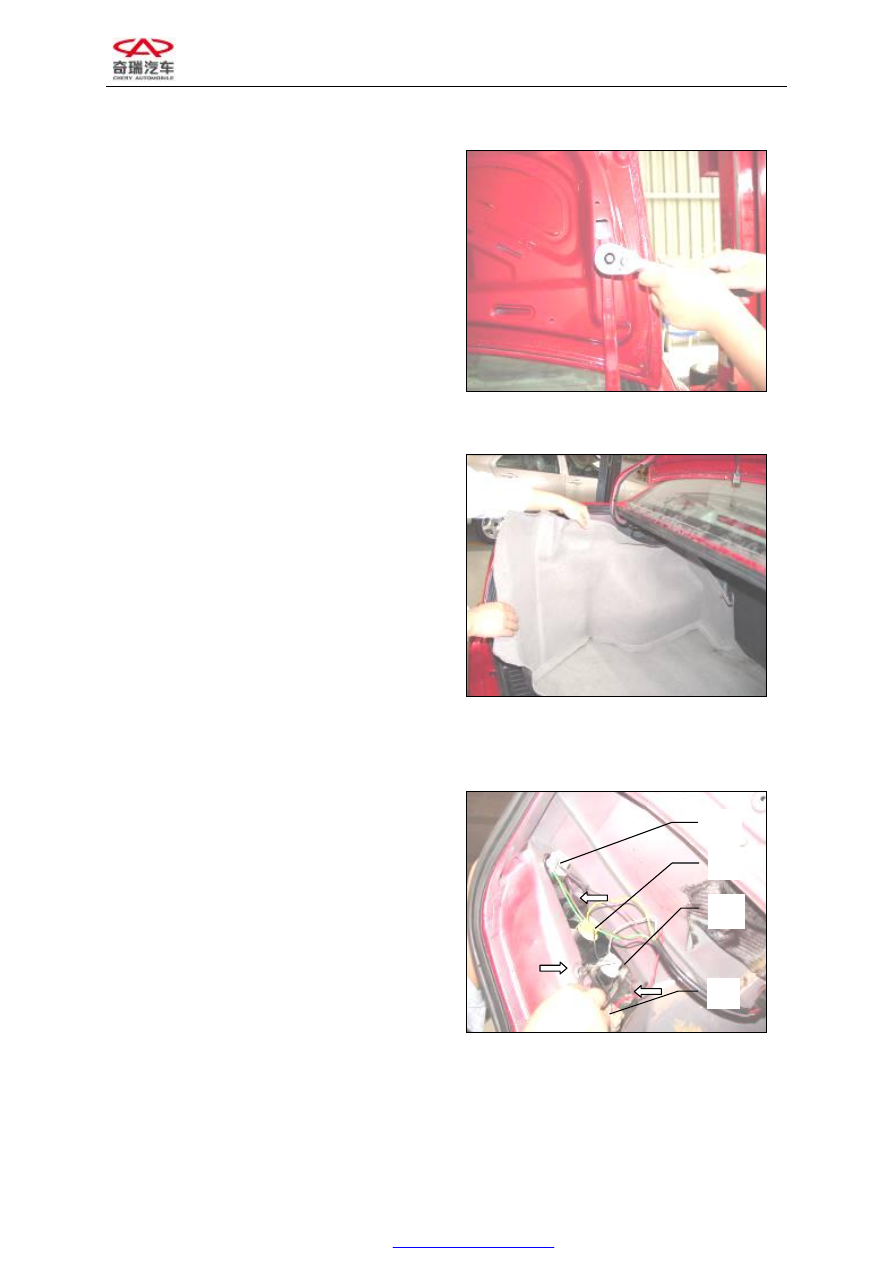
2.  Remove the tail light fixing bolts, pull out 

the harness, and then detach the tail light; 

A  Brake  Lamp/Side  Light  Bulbs:  12V  21W/ 
5W 

B  Turn,  C  Reversing,  D  Rear  Fog  Light 
Bulbs: 12V 21W 


Figure 37


Chery Service Manual for A520                  Body Dimension and Accessories


16 


III.  DISASSEMBLING 

THE 

REAR 

BUMPER 

1. 

Remove  the  three  fastening  screws  to 
remove the rear cover of the trim panel;


Figure 38 

2. 

Remove rear bump fastening screws and 
bolts  to  remove  the  rear  cover  of  the 
trim panel;


Figure 39


Figure 40


Chery Service Manual for A520                  Body Dimension and Accessories


17 

 
3. 

Remove  the  harness  connector  of  the 
reversing radar to remove the rear bump. 


Figure 41 

IV.  DISASSEMBLING  THE  WEATHER 

STRIP  OF  THE  REAR  LUGGAGE 
COMPARTMENT: 

1. 

Disassemble the weather strip of the rear 
luggage  compartment  as  shown  in  the 
right figure. 

2. 

Note  that  the  joint  of  the  luggage 
compartment  weather  strip  should  be 
placed  at  the  place  where  the  luggage 
compartment  lock  locates.  Every  corner 
should be fitted in place and no folds are 
allowed.  The  hardness  of  the  weather 
strip  should  be  proper  without  great 
variation as the temperature changes. 


Figure 42 

V.  REMOVING THE SPARE TIRE: 

Lift the luggage compartment floor mat up to 
take out the spare tire; 


Figure 43 


Chery Service Manual for A520                  Body Dimension and Accessories


18 


Content   ..  17  18  19  20   ..