BMW 3 (E46). Manual - part 291


  Index      BMW     BMW 3 (E46) - service repair manual 2006 year


Search            


Content   ..  289  290  291  292   ..


BMW 3 (E46). Manual - part 291


 -

Recharge system following
equipment manufacturer's
instructions. See 


Table e

 for A/C

system fluid specifications.

Table e. A/C system fluid
specifications

Fluid

Quantity

R-134a refrigerant

740 ± 25 g
(2 lb ± 1 oz.)

Refrigerant oil

PAG oil


A/C condenser, replacing

The A/C condenser is located in front of
the radiator.

 -

Following manufacturer's
instructions, connect an approved
refrigerant recovery/recycling
/recharging unit to A/C system and
discharge system.

WARNING!

Do not discharge/charge the A/C
system without proper equipment and
training. Damage to the vehicle and
personal injury may result.

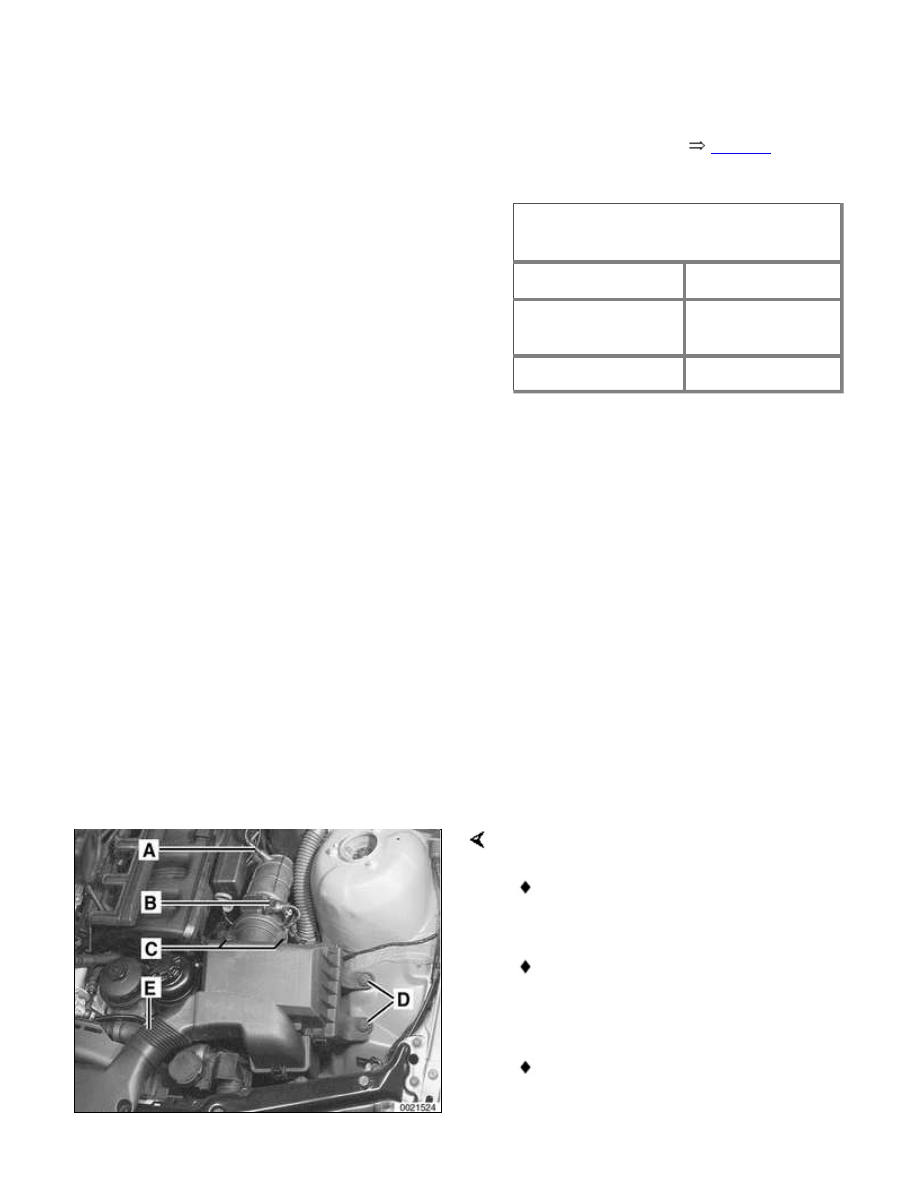
Remove complete air filter housing:

Detach vacuum line at intake boot
(A).

Disconnect electrical harness
connector on mass air flow sensor
(B).

Release mass air flow sensor clips
(C).

Remove filter housing mounting
screws (D).

Detach air duct connections (E) and
lift complete air filter housing out of
engine compartment, pulling it
forward away from mass air flow
sensor.

 -

Remove intake hood, cooling fan
and shroud, and radiator, as
described in 


170 Radiator and

Cooling System

.

Detach A/C lines from upper right corner
of condenser. Plug lines immediately.

 -

Remove fastener (expansion rivet)
from top left corner of condenser.

 -

Remove Torx screw from top right
corner of condenser, just below
refrigerant line flange.

 -

Lift up condenser to disengage from
plastic bracket and remove from
above.

 -

Installation is reverse of removal.

CAUTION!

Always replace O-rings when
reconnecting refrigerant lines.

When installing a new condenser
always replace receiver/drier unit.

 -

Recharge system following
equipment manufacturer's
instructions.

A/C system fluid specifications

Fluid

Quantity

R-134a refrigerant

740 ± 25 g
(2 lb ± 1 oz.)

Refrigerant oil

PAG oil


A/C receiver/drier, replacing

The receiver/drier is mounted in the front
right corner of the engine compartment
behind and below the headlight
assembly.

 -

Following manufacturer's
instructions, connect an approved
refrigerant recovery/recycling
/recharging unit to A/C system and
discharge system.

CAUTION!

The receiver/drier must be replaced
when

There is dirt in the A/C system

The compressor has seized or
has been replaced for any reason

The condenser or evaporator are
replaced for any reason

The A/C system is leaking and
there is no more refrigerant

The A/C system was open for 24
hours or more.

 -

Remove right headlight assembly.
See 


630 Lights

.

Remove refrigerant pressure line
mounting bolts (A) from receiver/drier.

Plug lines immediately.

Disconnect high pressure switch
harness connector (B).

 -

Working beneath right front of car,
remove splash shield retaining
screws. Remove splash shield.

 -

Loosen receiver/drier mounting
strap bolts and slide receiver/dryer
down and out.

 -

Installation is reverse of removal.

CAUTION!

Always replace O-rings when
reconnecting refrigerant lines.

 -

Recharge system following
equipment manufacturer's
instructions.

A/C system fluid specifications

Fluid

Quantity

R-134a refrigerant

740 ± 25 g
(2 lb ± 1 oz.)

Refrigerant oil

PAG oil


A/C expansion valve, removing
and installing

 -

Following manufacturer's
instructions, connect an approved
refrigerant recovery/recycling
/recharging unit to A/C system and
discharge system.


Content   ..  289  290  291  292   ..