BMW 3 (E46). Manual - part 289


  Index      BMW     BMW 3 (E46) - service repair manual 2006 year


Search            


Content   ..  287  288  289  290   ..


BMW 3 (E46). Manual - part 289


motor vehicle air conditioner
must, by law, be properly
trained and certified, and use
approved refrigerant recycling
equipment. Technicians must
complete an EPA-approved
recycling course to be certified

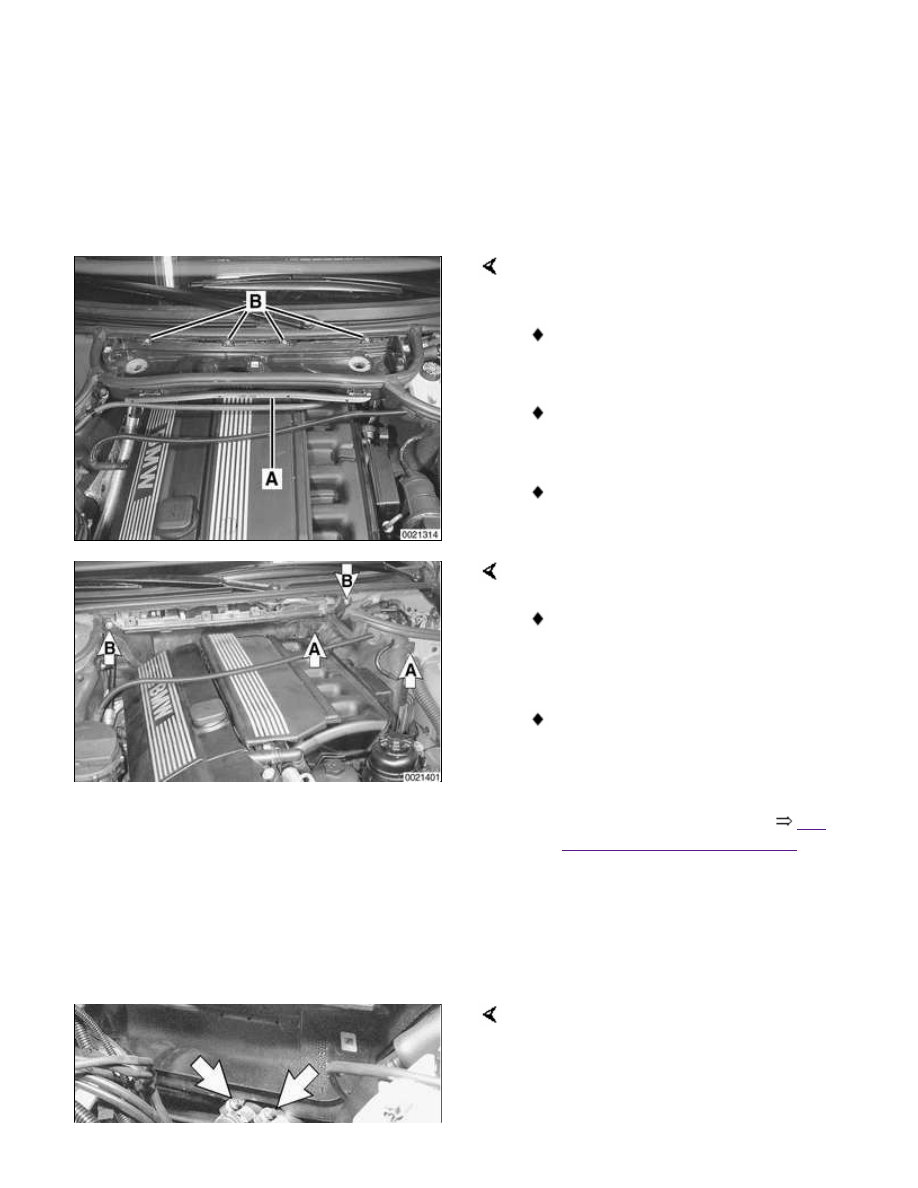
Remove housing for interior ventilation
microfilter.

Remove upper cover and
microfilter.

Open wiring harness loom (A) and
remove wires.

Unfasten screws (B) and remove
lower housing.

Remove heater bulkhead cover:

Remove engine compartment side
trim panel. Turn locking clips (A)
and slide trim panel up.

Remove heater bulkhead cover
mounting screws (B) and lift cover
off bulkhead.

 -

Drain engine coolant. See 


170

Radiator and Cooling System

.

WARNING!

Allow the cooling system to cool
before opening or draining the
cooling system.

Working at rear engine compartment
bulkhead, loosen hose clamps
(arrows) and detach heater hoses.

 -

Blow out excess coolant from
heater core using compressed air
at coolant lines.

 -

Following manufacturer's
instructions, connect approved
refrigerant recovery/recycling
/recharging unit to A/C system
and discharge system.

Working in right rear of engine
compartment, detach A/C lines:

Remove A/C recharging port
bracket mounting nut (A).

Remove allen bolts (B) at
bulkhead.

Using BMW special tool 64 5 102
or equivalent, detach and plug
A/C lines.

Working inside right side of cowl, pull
up on lever (arrow) and detach right air
intake flap from blower housing.

 -

Working in right front of IHKA
housing, detach double pipe (A/C
line) from expansion valve.

Lay double pipe aside.

Plug up open A/C ports.

Remove IHKA housing mounting nuts
(arrows) at bulkhead.

 -

Remove center console and
dashboard. See 

513 Interior

Trim

.

 -

Working inside passenger
compartment below steering
column, drill out steering column
shear bolt. See 


320 Steering

and Wheel Alignment

.

Remove steering column
mounting bolts.

Lower column.

Under dash attachments

1 - Bulkhead

2 - Left A-pillar

3 - Head protection airbag

4 - Steering column

5 - Dashboard mounts

6 - Center tunnel

7 - Relay panel

8 - Right A-pillar

Remove dashboard reinforcement
fasteners:

Detach bulkhead brace (1).

Detach left and right A-pillar
braces (2 and 8).

Detach head protection airbag (3).

Remove center tunnel mounting
bolts (6).

 -

Detach heater housing electrical
harness connectors.

Working at right side of dash:

Cut wire tie (A) at dashboard
reinforcement support for relay
panel.

Turn fuse panel lock tabs (B) 90°
and swing fuse panel down.

Detach fuse panel pivots (C) from
dashboard reinforcement.

 -

Lift off dashboard reinforcement,
making sure all electrical
harnesses and hoses are free.

 -

Remove IHKA housing, making
sure all electrical harnesses and
hoses are free.

 -

Installation is reverse of removal.
Note the following:

Make sure A/C condensate drain
is routed correctly.

Replace wire ties, sealing O-rings
and hose clamps.

Use new shear bolt at steering
column mounting. Tighten bolt
until head shears off.

Evacuate and recharge A/C
system using specialized
equipment.

Fill and bleed cooling system.
See 


170 Radiator and Cooling

System

.

CAUTION!


Content   ..  287  288  289  290   ..