BMW 3 (E46). Manual - part 195


  Index      BMW     BMW 3 (E46) - service repair manual 2006 year


Search            


Content   ..  193  194  195  196   ..


BMW 3 (E46). Manual - part 195


Clearance of the rear window is
adjusted by adding or removing
shims between hinge bracket and
rear window (maximum of three
shims).

Adjust spoiler gap to body last.
Height of spoiler is set by
alignment of the rear hatch. Gap
of spoiler to body is set by
adjusting spoiler attachment bolts.

Seam clearance specification

Rear spoiler to roof
(A)

4.25 - 5 mm

(0.167 - 0.197

in.)

Max. deviation
from parallel

0.5 mm (0.019

in.)

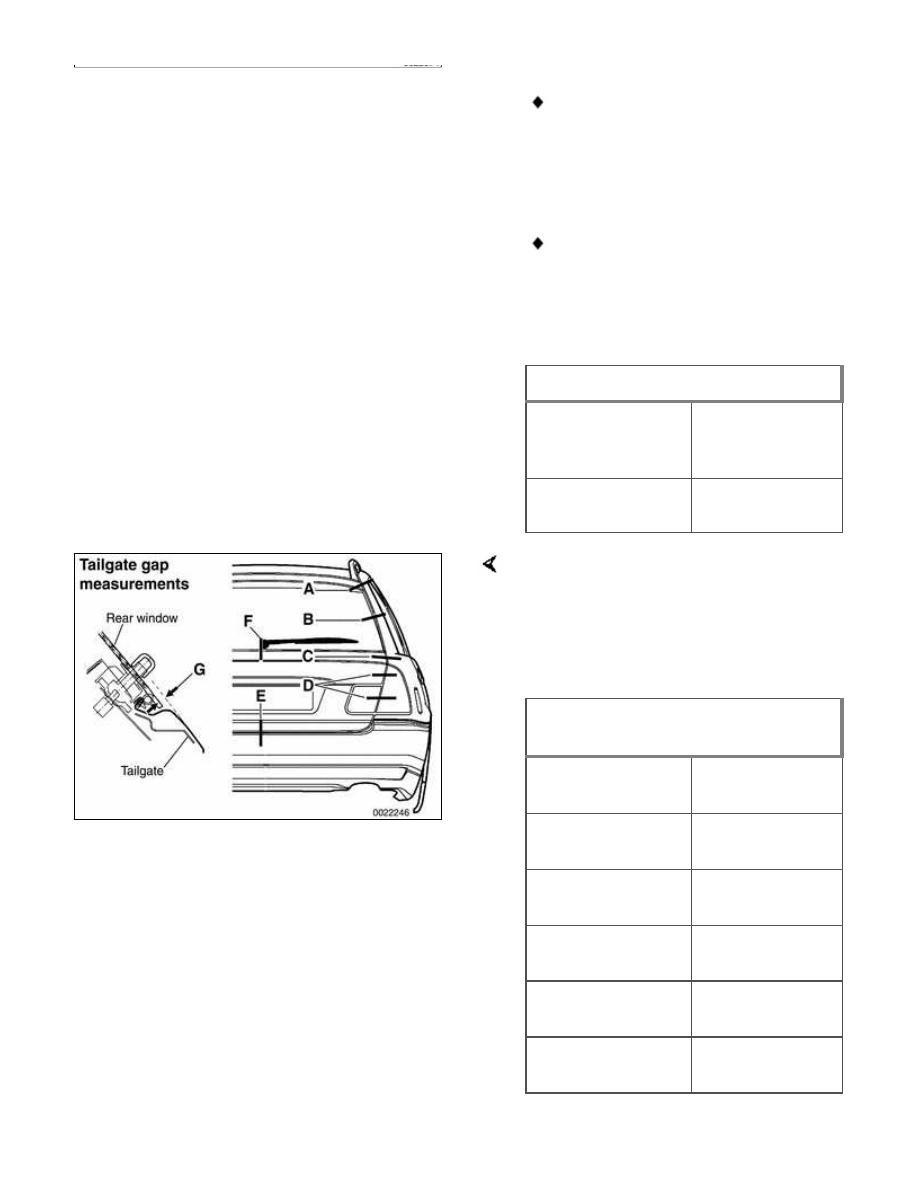
Lateral and vertical alignment is
adjusted using hinge bolts for window
and tailgate. Fine adjustment of the
tailgate to the body is made using
rubber stop buffers and latch
assembly.

Tailgate and rear window position
gap adjustment

Rear spoiler / side
panel (A)

3.75 ± 1.3 mm

(0.15 ± 0.05 in.)

Rear window / side
panel (B)

3.5 ± 1.4 mm

(0.14 ± 0.06 in.)

Tailgate / side
panel (C)

3.6 ± 0.75 mm

(0.14 ± 0.03 in.)

Tailgate / side
panel (height) (D)

flush to 2 mm

(0.08 in.) lower

Tailgate light /
corner light (D)

4.25 ± 0.75 mm

(0.17 ± 0.03 in.)

Tailgate / rear
bumper (E)

5 ± 1 mm

(0.2 ± 0.04 in.)

Tailgate and rear window position
gap adjustment

Rear window /
tailgate (F)

4 ± 1 mm

(0.16 ± 0.04 in.)

Rear window /
tailgate (G)

5.4 ± 1 mm

(0.21 ± 0.04 in.)

To adjust fit of tailgate to body:

Close tailgate and open rear
window.

Tailgate hinge bolts (A, behind
trim) should be centered both
vertically and horizontally within
their adjustment range. When
centered, tighten bolts.

Loosen screws (B) on left and
right to adjust horizontal location
(gap on left and right). When gap
is correct, tighten screws.

To prevent damage or poor
operation adjustments must be
made to the rear window f the
vertical adjustment of the tailgate
is changed.

Window hinge must be parallel to
the tailgate hinge.

Stop buffers (arrows) are adjustable
and set height between tailgate and
body at sides.

To adjust buffers, remove inner
trim panel and loosen lock nut.

Initially adjust buffers to just
contact tailgate when closed, then
tighten buffers one turn. Tighten
lock nut.

Tightening torques

Lock nut for stop
buffer (M8)

15 Nm (11 ft-lb)

Loosen screws (arrows) and reposition
rear latch to further adjust gap
between tailgate and body at sides,
and to assure smooth operation.

 -

To adjust striker position:

Close tailgate slowly, allowing
striker to center itself on lock.

Striker must not touch lock
housing.

Tighten striker mounting bolts,
then check tailgate to body gaps
as shown below.

Note:

Do not lubricate lock or lock striker with
grease.

Inspect plastic guides (arrows) on lock
assembly for damage or wear, and
replace if necessary. Trim panel is
removed for clarity.

The rear window lock striker height is
adjusted by loosening lock nut A, then
turning striker in or out.

Retighten lock nut when window
latch operates smoothly.

To adjust rear window lock position,
initially loosen lock mounting bolts
(arrows).

Close window slowly, allowing
lock to center itself on striker.

Tighten mounting bolts, then
check rear window to body gaps
as shown above.


Content   ..  193  194  195  196   ..