BMW 3 (E46). Manual - part 71


  Index      BMW     BMW 3 (E46) - service repair manual 2006 year


Search            


Content   ..  69  70  71  72   ..


BMW 3 (E46). Manual - part 71


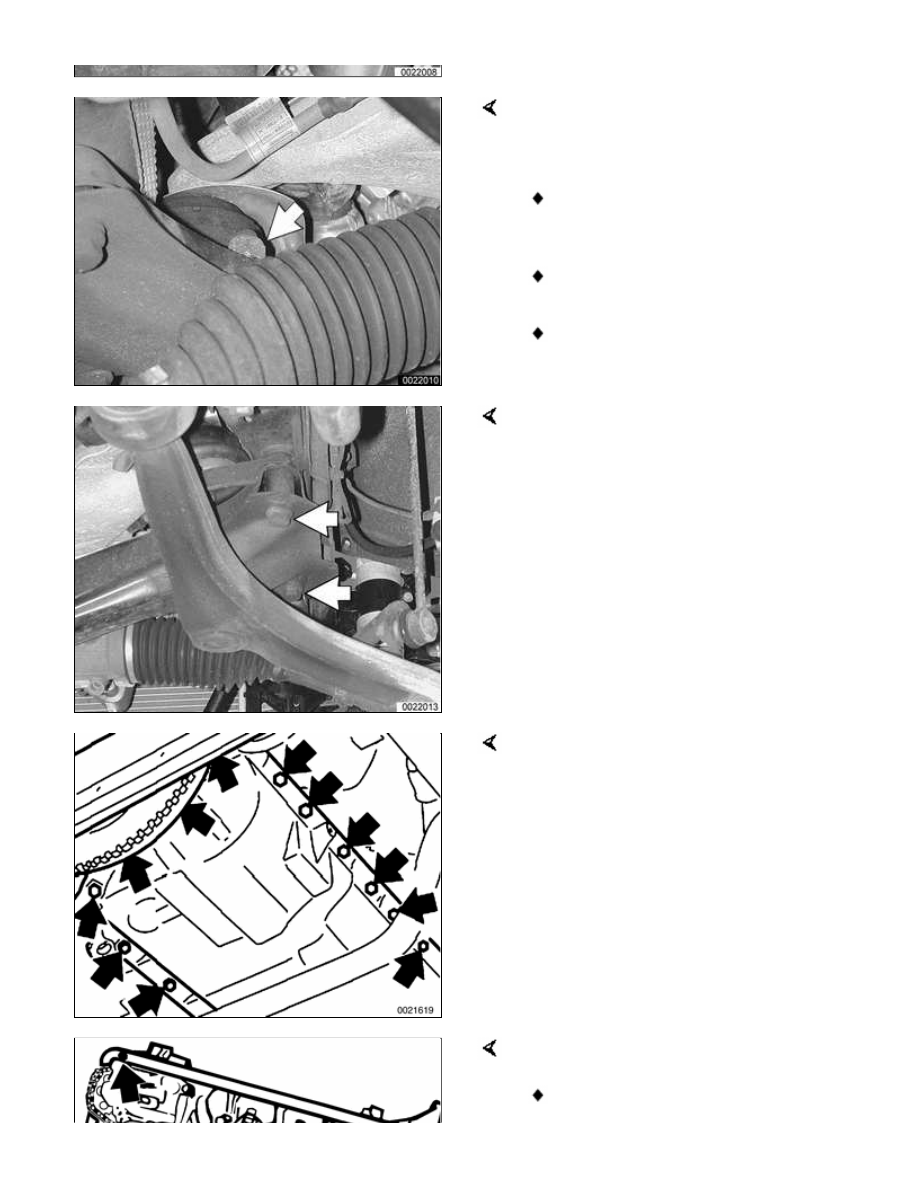
Remove left control arm ball joint
mounting nut (arrow) at front
suspension subframe.

Drive ball joint out from subframe
using soft hammer.

Push control arm aside.

Repeat for left side.

Support suspension subframe from
below using appropriate jacking
equipment. Remove subframe
mounting bolts (arrows) and lower
subframe as far as possible.

Note:

Right side is shown in photo. Left is
similar.

Remove oil pan screws (arrows) at
cylinder block and transmission
bellhousing. Lower oil pan forward to
remove.

CAUTION!

If the oil pan does not separate
easily from the engine cylinder
block, a few taps with a rubber
mallet should break it free. Do not
pry the oil pan loose.

When installing oil pan:

Thoroughly clean all old gasket

material from mating surfaces and
use a new gasket.

Apply a small amount of
non-hardening sealer (3-Bond
1209® or equivalent) to oil pan
gasket directly below joints
(arrows) for end cover and front
timing case cover. Apply a bead 3
mm wide by 2 mm high.

Tighten oil pan bolts to cylinder
block evenly all around.

Tighten transmission bellhousing
bolts last.

Tightening torque

Oil drain plug to
oil pan (M12)

25 Nm (18 ft-lb)

Oil pan to engine block

M6, 8.8 grade

10 Nm (89 in-lb)

M6, 10.9 grade

12 Nm (106 in-lb)

Transmission bellhousing to oil pan

M8 Allen

24 Nm (17 ft-lb)

M8 Torx

21 Nm (15 ft-lb)

 -

Remainder of installation is
reverse of removal.

Replace self-locking nuts when
reinstalling front suspension
components.

Match up key ways while installing
steering column shaft. See 


320

Steering and Wheel Alignment

 for

more specific procedures.

Use new oil dipstick tube sealing
O-ring.

Fill engine with oil as described in 

020 Maintenance

.

After adding engine oil, start and
run engine. Raise engine speed to
2,500 rpm until oil pressure
warning lamp goes out (about 5
seconds).

Note:

BMW does not recommend a front end
alignment following this procedure.

Tightening torques

Control arm ball
joint to suspension
subframe

90 Nm (66 ft-lb)

Front subframe to frame rails (M12,
use new bolts)

8.8 grade

77 Nm (57 ft-lb)

10.9 grade

110 Nm (81

ft-lb)

12.9 grade

105 Nm (77

ft-lb)

Front end reinforcement to frame rails
or suspension subframe (M10, use
new bolts)

Initial torque

59 Nm (44 ft-lb)

Torque angle

90° + 30°

Stabilizer bar to
frame rail (M8 nut)

22 Nm (16 ft-lb)

Steering column
universal joint
clamping screw
(M8 bolt, use new
bolt)

22 Nm (16 ft-lb)


Oil pan, removing and
installing (all wheel drive
models)

 -

Raise car and place securely on
jack stands.

WARNING!

Make sure the car is stable and well
supported at all times. Use a
professional automotive lift or jack
stands designed for the purpose. A
floor jack is not adequate support.

 -

Remove splash shield from under
engine.

 -

Drain engine oil as described in 
 

020 Maintenance

 -

Remove air filter housing complete
with mass air flow sensor.

Install engine lifting equipment at front
engine lifting point and raise
approximately 5 mm ( inch) until engine
weight is supported.

 -

Remove fuel line clamping
brackets from oil pan.

 -

On cars with automatic
transmission, remove ATF cooler
line brackets from oil pan and
from transmission.

Note:

Place drain pan under lines to catch
ATF drips.

Remove oil dipstick guide tube:


Content   ..  69  70  71  72   ..