Acura RL (1996-2004 year). Manual - part 572


  Index      Acura     Acura RL 1996-2004 year - service repair manual


Search            


Content   ..  570  571  572  573   ..


Acura RL (1996-2004 year). Manual - part 572


Interior

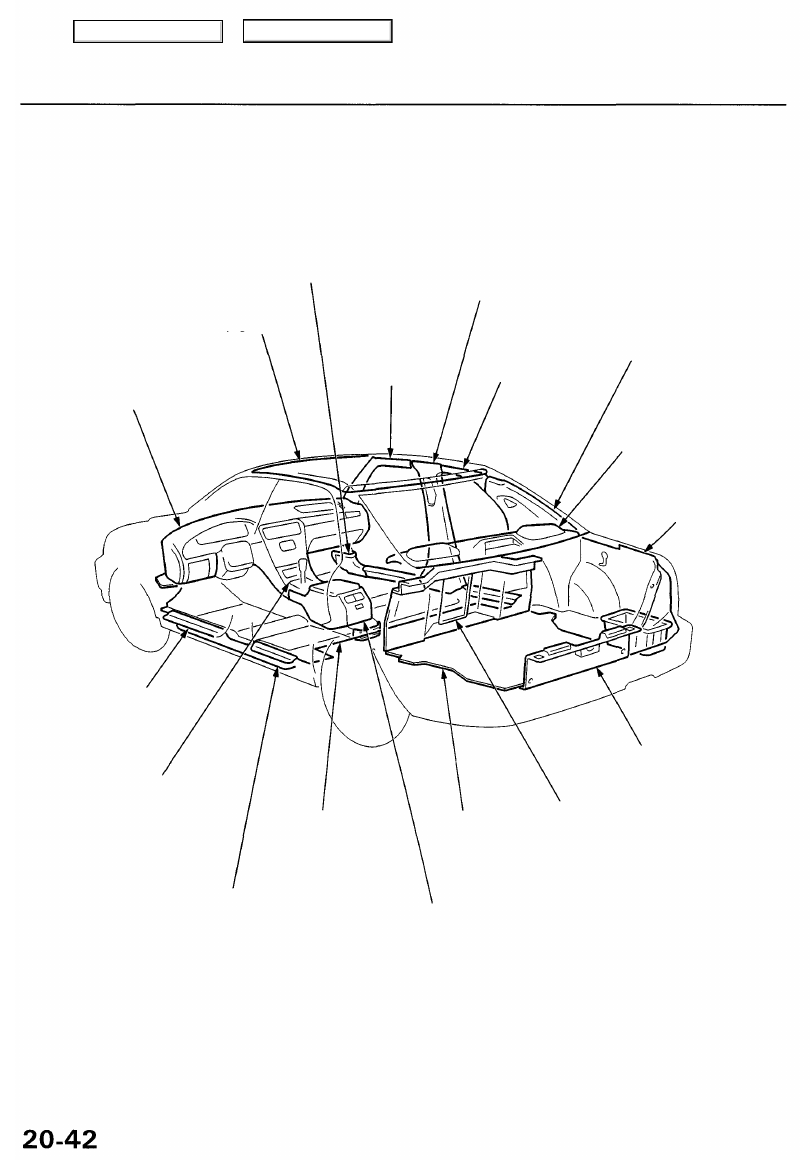
Component Location Index

SRS components are located in the areas marked with an asterisk (*). Review the SRS component locations, precautions,

and procedures in the Restraints (

section 24

) before performing repairs or service.

*

DASHBOARD

Component Removal/Installation,
page 

20-50

Removal, page 

20-54

REAR SHELF
(see page 

20-43

)

TRUNK SIDE
TRIM
(see page 

20-44

)

FRONT SIDE
TRIM
(see page 

20-43

)

CONSOLE PANEL
Removal, page 

20-48

REAR TRIM PANEL
(see page 

20-44

)

REAR SIDE

TRIM
(see page 

20-43

)

TRUNK FRONT
TRIM
(see page 

20-44

)

REAR CONSOLE
Removal — '96 - 98 Models, page 

20-48

Removal — '99 - 01 Models, page 

20-49

*CARPET

Removal, page 

20-46

SPARE TIRE

LID

REAR PILLAR
TRIM
(see page 

20-43

)

ROOF SIDE
TRIM

(see page 

20-43

)

CENTER PILLAR
TRIM
(see page 

20-43

)

FRONT PILLAR
TRIM
(see page 

20-43

)

KICK PANEL
(see page 

20-43

)

HEADLINER
Removal,
page 

20-45

Main Menu

Table of Contents

Interior Trim

Removal

CAUTION:

Put on gloves to protect your hands.

When prying with a flat-tip screwdriver, wrap it with protective tape to prevent damage.

NOTE: Take care not to bend or scratch the trim and panels.

: Clip, hook locations

ROOF SIDE TRIM

FRONT DOOR Remove the grab handle

HOOKS

FRONT PILLAR TRIM


TRIM

Remove the grab handle
(passenger's, see page

20-45

).

(see pag

20-45

).

REAR PILLAR TRIM
Remove the rear seat cushion
and rear seat-back (see page

20-67

).

HOOK

RIGHT KICK
PANEL

LEFT KICK
PANEL

FRONT SEAT BELT
LOWER ANCHOR
(see 

section 24

) 

REAR CENTER SEAT BELT
LOWER ANCHOR
('98-01 models,
see 

section 24

)

REAR SHELF
Remove the rear seat
cushion and rear seat-back
(see page 

20-65

).

'98 - 01 models:
Remove the center seat belt lower
anchor bolt (see 

section 24

).

'00 - 01 models:
Remove the child seat tether anchors
(see 

section 24

).

SLIDER

SHOULDER
ANCHOR
ADJUSTER

Installation is the reverse of the removal procedure.

NOTE:

If necessary, replace any damaged clips.

Before installing the center pillar trim, lower the

shoulder anchor adjuster and the slider of the

center pillar trim fully.

Before installing the anchor bolts and rear pillar

trim, make sure there are no twists or kinks in

the seat belts.

'00 - 01 models: Make sure the child seat tether

anchors are installed securely.

REAR SEAT BELT
LOWER ANCHOR
(see 

section 24

)

CENTER PILLAR
TRIM

FRONT SIDE
TRIM

REAR SIDE
TRIM

SLIDER

REAR DOOR
TRIM

Main Menu

Table of Contents

Trunk Trim

Removal

CAUTION:

Put on gloves to protect your hands.
When prying with a flat-tip screwdriver, wrap it with protective tape to prevent damage.

NOTE: Take care not to bend or scratch the trim and panels.

Clip locations

Screw locations, 2

TRUNK SIDE

BOX

TRUNK

HOOK

RIGHT TRUNK
SIDE TRIM

NOTE: Do not push the
inner clip in too far.

CLIP

REAR TRIM
PANEL

CD CHANGER
COVER
(for some models)

LEFT TRUNK
SIDE TRIM

TRUNK FRONT
TRIM

Installation is the reverse of the removal procedure.

NOTE:

If necessary, replace any damaged clips.

To install the F clips, pull the inner clip up, install
the clip, then push the inner clip until it's flush.

SPARE TIRE

LID

UPPER
TRIM

Main Menu

Table of Contents

Headliner

Removal

CAUTION: When prying with a flat-tip screwdriver,
wrap it with protective tape to prevent damage.

NOTE:

Take care not to bend and scratch the headliner.

Be careful not to damage the dashboard and other
interior trim.

1. Remove the grab handles.

Bolt locations, 2

ACCESS
COVER

6 x 1.0 mm

9.8 N-m (1.0 kgf-m,
7.2 Ibf-ft)

ACCESS
COVER

Remove:
• Rear seat cushion and rear seat-back (see page

20-65

)

Front and rear side trim (see page 

20-43

)

Front and rear door trim (see page 

20-43

)

Center pillar trim (see page 

20-43

)

Front pillar trim (see page 

20-43

)

Rear pillar trim (see page 

20-43

)

Roof side trim (see page 

20-43

)

Ceiling lights (see 

section 23

)

Window antenna terminal cover (see page 

20-27

)

Moonroof switch (see 

section 23

)

3. Remove the sunvisor and holder from each side.

Disconnect both positive terminals or 2P connector
(with Homelink, remove the control panel).

Screw locations

POSITIVE

TERMINAL

SUNVISOR

4. Remove the sunglasses holder.

Screw locations, 2

SUNGLASSES
HOLDER

HOOKS

HOLDER

GRAB

HANDLE

HOOKS

ACCESS
COVER

Main Menu

Table of Contents


Content   ..  570  571  572  573   ..