Snowmobile Ski Doo REV SERIES (2004 year). Manual - part 82


  Index      Snowmobiles / ATV     Snowmobile Ski Doo REV SERIES - service manual 2004 year


Search            


Content   ..  80  81  82  83   ..


Snowmobile Ski Doo REV SERIES (2004 year). Manual - part 82


Section 09 STEERING/FRONT SUSPENSION

Subsection 01 (STEERING SYSTEM)

DISASSEMBLY AND ASSEMBLY

Grip

NOTE: These models feature an integrated heat-
ing element in the plastic sleeve of the grip no. 13.

CAUTION: Removing grip from handlebar
might damage the heating element. Do not
remove needlessly.

NOTE: If heating grip does not work and needs to
be replaced, the grip can be cut with a knife for
removal.

Throttle Side:

Unfasten windshield.

NOTE: Throttle lever housing no. 21 must come
off handlebar along with grip.

Remove cap no. 3 or steering padding no. 23 ac-
cording to model. Unplug RH harness on top of
steering column. Cut locking ties retaining RH har-
ness to handlebar.

Remove throttle lever housing cover no. 19.

1

A33G09A

1. Throttle lever housing cover

Remove circlip no. 24 from throttle cable housing.
Unfasten throttle cable from throttle lever, then
pull out throttle cable housing from throttle lever
housing no. 21.

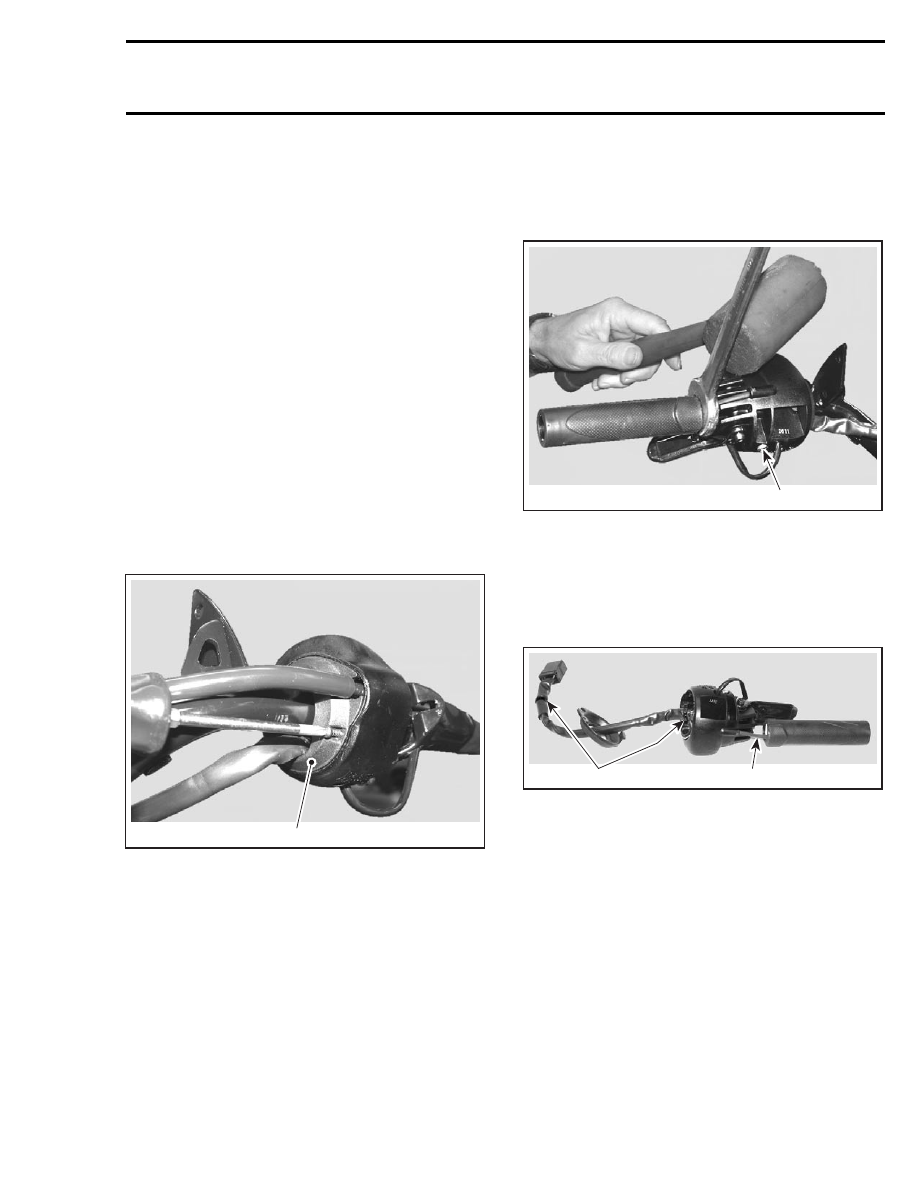
Unscrew screws no. 10 and remove J-hook no. 12
from end of grip on so equipped models.

Loosen screw no. 20 retaining throttle lever hous-
ing to handlebar. See photo below.

Insert the open side of a 23 mm (7/8 in) wrench
against the inner end of grip.

CAUTION: Pay attention not to damage wires
with the wrench.

Using a plastic hammer, tap on the side of the
wrench end to make the grip slide out.

1

A33G0AA

1. Screw retaining throttle lever housing

Cut locking ties on harness.

Using the mul-

tilock-terminal

housing

extraction

tool

AMP

(P/N 755430-2), push the 3 wires of the heat-
ing grip harness out of connector housing. Note
the position of the wires for reinstallation.

2

A33G0BA

1

1. Locking ties
2. Heating grip harness

Pull heating grip harness out of throttle lever hous-
ing.

For installation refer to grip installation below.

Brake Side:

Unclip windshield.

Unplug connectors from brake light switch located
on master cylinder no. 22.

mmr2004-Rev

323

Section 09 STEERING/FRONT SUSPENSION
Subsection 01 (STEERING SYSTEM)

1

A33G0FA

1. Connectors unplugged

Unplug LH harness on top of steering column.
Cut locking ties retaining brake light switch/heat-
ing grip harness to handlebar.

Using the multilock-terminal housing extraction
tool AMP (P/N 755430-2), push the 3 wires of the
heating grip harness out of connector housing.
Note the position of the wires for reinstallation.

Pull heating grip wires out of brake light switch/
heating grip harness.

Insert the open side of a 23 mm (7/8 in) wrench
against the inner end of grip.

CAUTION: Pay attention not to damage wires
with the wrench.

Using a plastic hammer, tap on the side of the
wrench end to make the grip sliding out.

Grip Installation:

Installation is the opposite procedure of the re-
moval but pay attention to the following.

Clean handlebar ends and inside of heating grip
with isopropyl alcohol. Let dry before installation.

WARNING

Handlebar end and inside of heating grip
must be clean and dry before installing heat-
ing grip to ensure proper adhesion.

Position grip on handlebar with its harness aligned
with windshield bracket. See next photo.

Use the appropriate insertion tool to properly in-
stall grip.

MODEL

TOOL PART NUMBER

Models with straight
grips

529 035 897

Models with J-hooks

529 035 936

A32G2BA

CAUTION: Installing grip without the insertion
tool is likely to damage its heating element.

Position the insertion tool at the outside end of
grip.

Using a plastic hammer, tap on tool to push grip
on. Continue to tap until grip bottoms.

1

A33G0CA

2

1. Harness
2. Windshield bracket

Properly route harness then reinstall removed
parts.

324

mmr2004-Rev

Section 09 STEERING/FRONT SUSPENSION

Subsection 01 (STEERING SYSTEM)

Reinstall terminals and replug connectors. Test
grips to ensure they heat properly.

Steering Column

Unfasten windshield. Remove cap no. 3 or steer-
ing padding no. 23 according to model.

Remove console. Refer to STEERING COLUMN
POSITION ADJUSTMENT below.

Cut locking ties retaining harnesses to steering
column no. 1.

Unbolt handlebar ass’y and move it aside.

Remove tuned pipe.

Detach the short tie rod no. 8 from the steering
column. Note that a hardened flat washer no. 7
goes on each side of steering column lever.

Disengage carriage bolts no. 6 from steering
column support no. 15. Remove lower plastic
U-clamps from steering column.

Disengage carriage bolts no. 5 from steering sup-
port. Remove upper plastic U-clamps from steer-
ing column.

Pull steering column from top.

If, for any reason, the master cylinder has been
removed from handlebar note that its clamp
no. 27 must be installed with the embossed
arrow pointing downward. Torque screws to 8
N•m (71 lbf•in) beginning with the bottom screw.

1

A33D0ZA

2

1. Arrow on clamp pointing downward
2. Tighten bottom screw first

Refer to HANDLEBAR POSITION ADJUSTMENT
for handlebar reinstallation.

RH and LH Swivel Arm

At assembly respect UP mention.

Grease fitting no. 16 of swivel arms no. 14 must
face toward center of vehicle.

1

2

A33G0DB

1

3

1. UP mention
2. Grease fittings
3. Small tie rod

Ball Joint (left hand and right
hand threads)

The maximum external threaded length not en-
gaged in the tie rod must not exceed 20 mm
(25/32 in).

A02G0SA

A

A

TYPICAL
A. 20 mm (25/32 in) max.

The ball joint no. 17 and no. 18 should be re-
strained when tightening the tie rod end lock nut.
Align it so the tie rod end is parallel to the steering
arm when assembled on the vehicle, refer to the
following illustration.

For proper torque specifications refer to the spe-
cific exploded view for the vehicle being serviced.

mmr2004-Rev

325

Section 09 STEERING/FRONT SUSPENSION
Subsection 01 (STEERING SYSTEM)

A02G0IA

1

2

TYPICAL
1. Parallel with steering arm
2. Steering arm

WARNING

The cut off section of the ball joint must run
parallel with the swivel bar no. 9. When tight-
ening lock nuts, restrain ball joint with appro-
priate size wrench. The maximum external
threaded length not engaged in the tie rod
must not exceed 20 mm (25/32 in).

Hardened Washer

Install a hardened washer no. 7 on each side of
the ski leg and each side of the steering column
lever.

1

1

A33G0EA

TYPICAL
1. Hardened washers

INSPECTION

Check skis and runners for wear. Replace as nec-
essary. Refer to FRONT SUSPENSION.

Check the general condition of the steering sys-
tem components for wear. Replace if necessary.

Heating Grip Element

Refer to TESTING PROCEDURE for checking
heating element no. 13 of grip.

Ball Joint (left hand and right
hand threads)

Inspect ball joint ends no. 17 and no. 18 and small
tie rod ends for wear or looseness, if excessive,
replace them.

ADJUSTMENT

Steering Column Position Adjustment

Some Models

WARNING

Do not drill additional holes to customize
steering column position.

Steering column position is adjustable. Proceed
as follows.

There are 2 positions.

NOTE: Following procedure describes how to
change steering column position from rearward
to forward position.

Unscrew 4 bolts retaining windshield assembly to
handlebar. Remove windshield assembly.

A33H12A

1

ONE SIDE SHOWN — REARWARD POSITION
1. Bolts retaining windshield assembly

Remove cap no. 3 or steering padding no. 23 ac-
cording to model and remove console cap.

326

mmr2004-Rev


Content   ..  80  81  82  83   ..