Snowmobile Ski Doo REV SERIES (2004 year). Manual - part 53


  Index      Snowmobiles / ATV     Snowmobile Ski Doo REV SERIES - service manual 2004 year


Search            


Content   ..  51  52  53  54   ..


Snowmobile Ski Doo REV SERIES (2004 year). Manual - part 53


Section 05 2–TEC ENGINE MANAGEMENT
Subsection 02 (COMPONENT INSPECTION AND ADJUSTMENT)

3

A32CA5A

2

1

Install tether cord cap on the DESS post and push
the START/RER button momentarily to activate
the ECM.

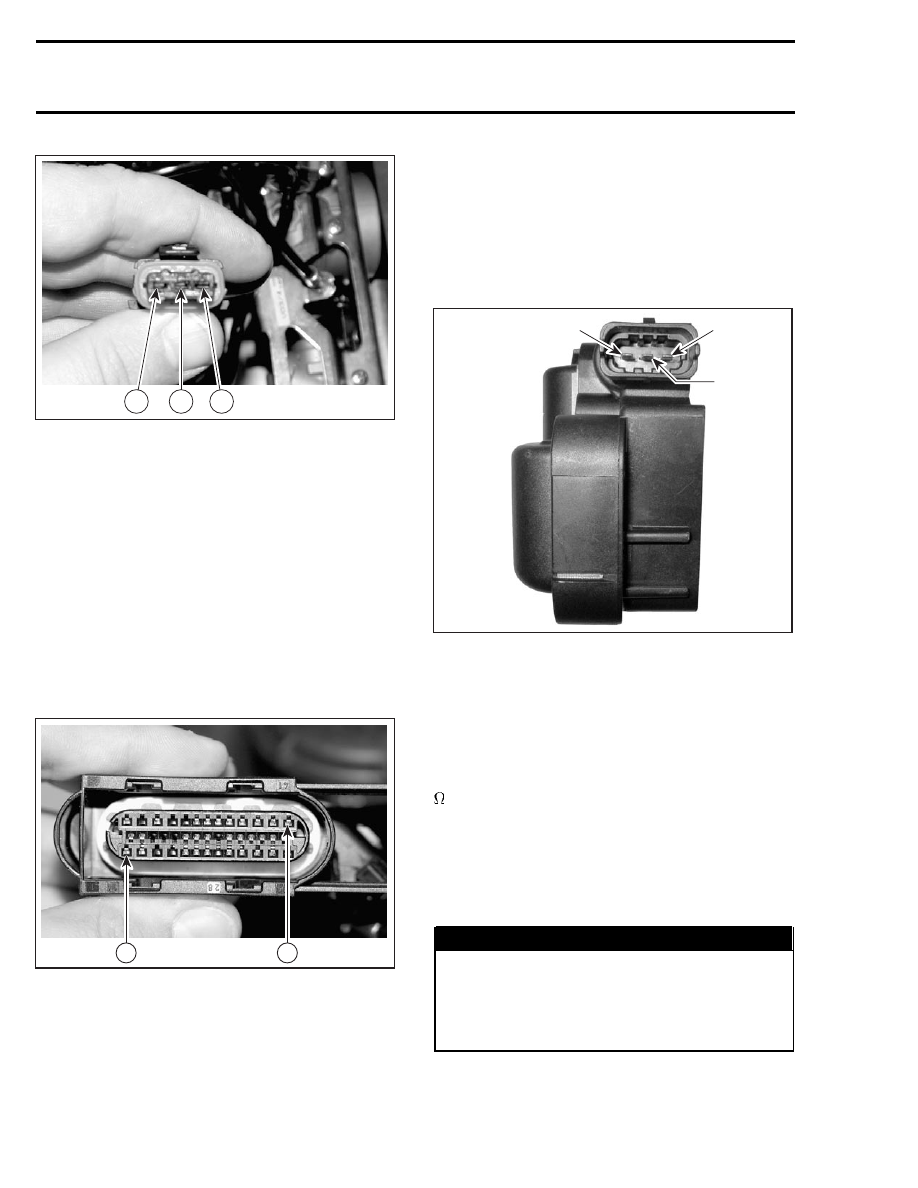
Check voltage between terminal 2 of ignition
coil connector on the wiring harness and battery
ground.

Battery voltage should be present (approx. 12 V).

If 12 V is NOT read, check continuity between ter-
minal 2 of ignition coil and the corresponding fuse.
Otherwise repair wiring harness.

If 12 V is read, disconnect the connector A from
the ECM and check the continuity of appropriate
circuit 41 (cylinder 1) or 1 (cylinder 2) and of ignition
coil connector, pin 3 and pin 1 respectively.

A32C9NC

41

1

ECM CONNECTOR

If wiring harness is defective, repair the connector
or replace the wiring harness between ECM con-
nector and the ignition coil.

If wiring harness is good, test resistance of pri-
mary winding of ignition coil.

Resistance Test

Remove spark plug cables from ignition coil.

Using a multimeter, check the resistance of pri-
mary winding.

NOTE: The secondary winding can not be mea-
sured with an ohmmeter. Try a new double igni-
tion coil if necessary.

A32CCRA

3

2

1

1. Terminal 1a
2. Terminal 15
3. Terminal 1b

For primary winding, check the resistance be-
tween terminal 15 and terminal 1a (cylinder 1)
of the ignition coil and between terminal 15 and
terminal 1b (cylinder 2) respectively.

The resistance should be between 0.40 and 1.15

at 20°C (68°F).

If the resistance of one of both windings is not
good, replace the ignition coil.

If the windings test good, try a new ECM.

NOTE: Check if wiring harness shows any signs
of scoring prior to replace the ECM.

WARNING

Always reconnect ignition coil cables at the
same spark plugs where they come from.
Otherwise, severe backfire may occur with
possible damage to exhaust system compo-
nents.

198

mmr2004-Rev

Section 05 2–TEC ENGINE MANAGEMENT

Subsection 02 (COMPONENT INSPECTION AND ADJUSTMENT)

TDC SETTING
(TOP DEAD CENTER)

Refer to IGNITION TIMING section.

CAPACITOR

WARNING

Capacitor may be charged. Once discharged,
a transient recovery voltage may be gener-
ated in the capacitor after a while. Always
discharge capacitor before servicing.

Removal

Remove the 30 A fuse.

Connect a test light to capacitor terminals during
a complete minute to discharge capacitor.

WARNING

Do not short–circuit both capacitor terminals.

Disconnect capacitor terminals and unfasten ca-
pacitor.

Inspection

Visual Inspection

Check for pin holes in the pressure relief valve on
top of capacitor. If any pin hole is present, discard
capacitor.

Charge Hold Test

Connect a 12 V test lamp to capacitor terminals
during a complete minute to discharge capacitor.

Connect a switch (in OFF position) between a 12
V battery positive post and the capacitor positive
post. Connect the battery negative post to the ca-
pacitor negative post. Turn on the switch for 2
seconds. Disconnect the capacitor from the bat-
tery.

Note battery voltage.

WARNING

Always respect the polarity when connecting
the capacitor.

Wait 5 minutes, then measure capacitor voltage.
It must be within 1 V maximum of battery voltage.

If in doubt, proceed with the following residual
voltage test.

Residual Voltage Test

Connect a 12 V test lamp to capacitor terminals
during a complete minute to discharge capacitor.

Connect a switch (in OFF position) between a 12
V battery positive post and the capacitor positive
post. Connect the battery negative post to the ca-
pacitor negative post. Turn on the switch for 2
seconds. Disconnect the capacitor from the bat-
tery. Note battery voltage.

WARNING

Always respect the polarity when connecting
the capacitor.

Connect a switch (in OFF position) and a 300
5 W resistor to the capacitor. Turn on the switch
for 12 seconds ± 1 second of discharge.

Residual voltage after 12 seconds ± 1 second of
discharge must be above 5 volts.

Installation

Connect a 12 V test lamp to capacitor terminals
during a complete minute to discharge capacitor.

Make sure 30 A fuse is removed.

Install the capacitor.

Make sure to connect BLACK wire to negative ter-
minal and RED/WHITE to positive terminal.

WARNING

Always respect the polarity when connecting
the capacitor.

Install the 30 A fuse.

mmr2004-Rev

199

Section 05 2–TEC ENGINE MANAGEMENT
Subsection 02 (COMPONENT INSPECTION AND ADJUSTMENT)

ENGINE START/RER BUTTON
VERIFICATION

A quick operation test can be done using the ve-
hicle communication kit (VCK) with the B.U.D.S.
software, using the Monitoring section. Press
the START/RER button and look at the START/RER
button LED. It should turn on, indicating the start-
ing system is working on the input side of the
starting system (START/RER button, ECM and
wiring). You know now the problem is on the
output side of the starting system (ECM output
signal to starting solenoid, wiring harness going to
the solenoid and starter motor. Refer to START-
ING SYSTEM for testing procedures). Otherwise,
check the input side as follows.

Disconnect the two connectors of the steering
harness.

Measure the resistance of the two wires on the
small connector ( BEIGE and BLACK) for 0

. De-

press start button and the reading should change
from 0

to infinitely high.

Release the start button and measure the resis-
tance between pin 2 (BEIGE wire) of the small
connector and pin 6 (RED/BROWN wire) on the
big connector for infinitely high resistance to 0
while the start button is depressed.

WARNING

Always respect the wire position when con-
necting the switch. Refer to the wiring dia-
gram.

Test continuity of circuit DB-19. If it is good, try a
new ECM. Otherwise, repair harness/connectors.

DESS SWITCH VERIFICATION

If 2 short beeps are not heard when starting the
engine, refer to DIAGNOSTIC PROCEDURES.

The following continuity tests can also be per-
formed using an ohmmeter.

Disconnect switch wires.

Tether Cord Cap Removed

Connect test probes to switch BLACK/GREEN and
BLACK/WHITE wires. Measure resistance, there
should be NO continuity (open circuit).

Connect one test probe to the WHITE/GREY wire
and the other test probe to the switch top termi-
nal. Measure resistance, it must be close to 0
ohm.

Connect one test probe to the BLACK/GREEN
wire and the other test probe to the switch ring.
Measure resistance, it must be close to 0 ohm.

Tether Cord Cap on DESS Post

Connect test probes to switch BLACK/GREEN
and BLACK/WHITE wires. Measure resistance, it
must be close to 0 ohm.

SPARK PLUGS

Disassembly

Disconnect the spark plug cable from the spark
plug.

First unscrew the spark plug one turn.

Clean the spark plug and cylinder head with pres-
surize air then completely unscrew.

Spark Plug Installation

Prior to installation make sure that contact sur-
faces of the cylinder head and spark plug are free
of grime.

1) Using a wire feeler gauge, set electrode gap

according to the following chart.

2) Apply anti-seize lubricant over the spark plug

threads to prevent possible seizure.

3) Hand screw spark plug into cylinder head.

Then, tighten the spark plug clockwise an
additional 1/4 turn with a proper socket.

200

mmr2004-Rev

Section 05 2–TEC ENGINE MANAGEMENT

Subsection 02 (COMPONENT INSPECTION AND ADJUSTMENT)

A00E0BA

2

1

1. Proper socket
2. Improper socket

ENGINE

SPARK

PLUG

TORQUE

GAP

mm (in)

593 SDI

2-TEC

NGK

BR 9 ECS

Hand tighten

+ 1/4 turn

with a socket

0.8

(.031)

CRANKING SYSTEM

See above for start/stop switch and the DESS post
testing. Refer to STARTING SYSTEM section for
other tests.

mmr2004-Rev

201


Content   ..  51  52  53  54   ..