Snowmobile Arctic Cat (2008 year). Manual - part 103


  Index      Snowmobiles / ATV     Snowmobile Arctic Cat - service manual 2008 year


Search            


Content   ..  101  102  103  104   ..


Snowmobile Arctic Cat (2008 year). Manual - part 103


6-56

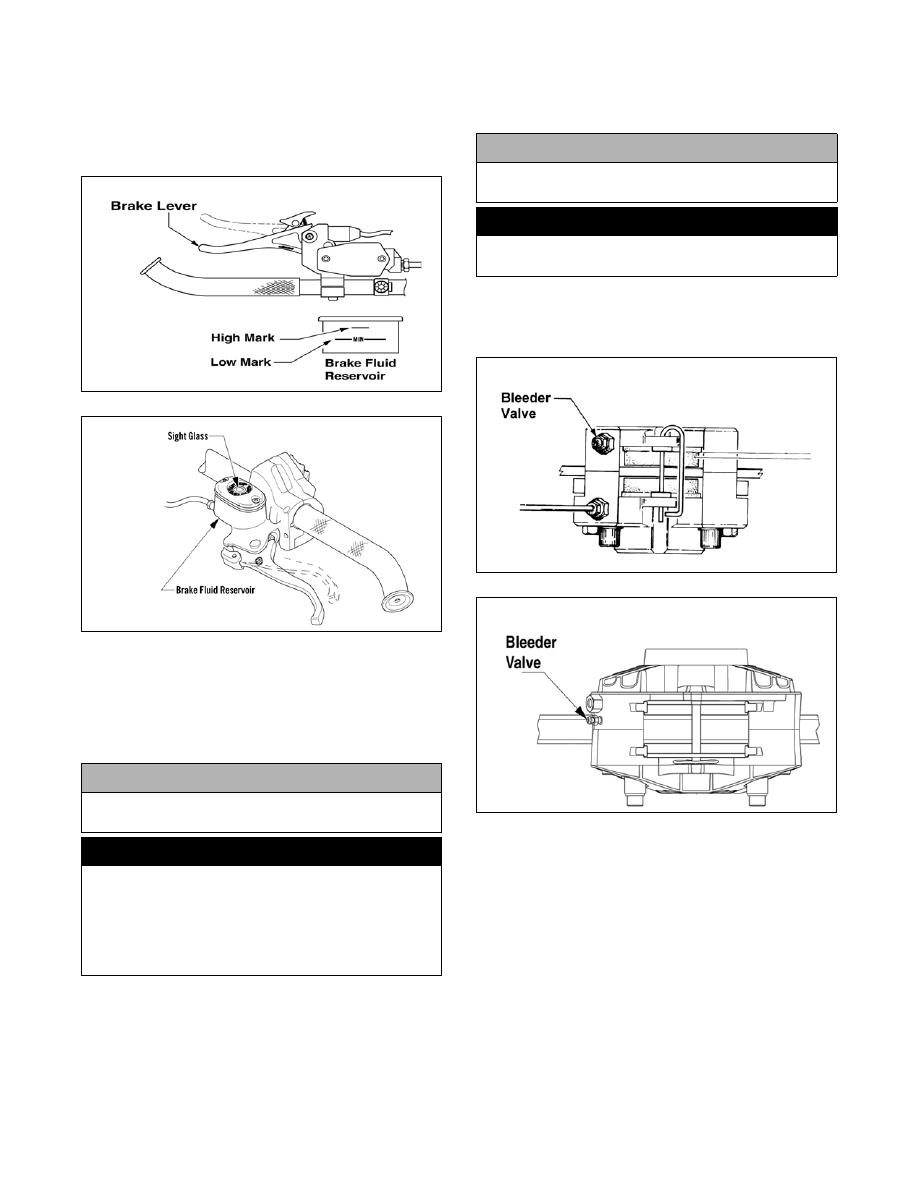
CHECKING AND ADDING BRAKE 
FLUID

1. With the master cylinder in a level position, check

fluid level in the reservoir. The brake fluid level

must be just below the high mark.

740-159A

741-328D

2. If the brake fluid level is below the low mark,

remove the reservoir cover and add approved

brake fluid until the fluid level is just below the

high mark. Install and secure the reservoir cover.

DO NOT allow moisture to contaminate the brake

system.

CHANGING BRAKE FLUID

The brake fluid must be changed on a regular basis

and/or whenever the brake fluid has been overheated

or contaminated. The brake fluid should be changed

every 1000 miles or at the end of the snowmobiling

season, whichever occurs first.

Arctic Cat recommends the removal and disassembly

of the brake caliper assembly when changing the brake

fluid (see Removing/Installing Caliper in this sub-sec-

tion).

1. Slide a piece of flexible tubing over the ball of the

bleeder valve and direct the other end into a con-

tainer.

730-434H

739-269B

2. Slowly compress the brake lever and hold. Open

the bleeder valve to release the fluid; then com-

press the brake lever repeatedly until all brake

fluid is expelled. Close the bleeder valve.

3. Add new approved brake fluid to the reservoir;

then compress the brake lever and hold. Open the

bleeder valve. Repeat the compression until brake

fluid flows free of air bubbles and appears clean.

„NOTE: It may be necessary to refill the reservoir
a number of times to eliminate all air bubbles in
the system.

! CAUTION

Brake fluid is highly corrosive. Do not spill brake
fluid on any surface of the snowmobile.

! WARNING

Do not overfill the master cylinder reservoir. Overfill-
ing the reservoir may cause the brake system to
hydraulically lock. Use only approved brake fluid.
Never substitute or mix different types or grades of
brake fluid. Brake loss may occur. Brake loss can
result in severe injury or even death.

! CAUTION

Brake fluid is highly corrosive. Do not spill brake
fluid on any surface of the snowmobile.

! WARNING

Use only Arctic Cat approved brake fluid. Any sub-
stitute may result in a loss of brakes.

STD

ACT

6-57

6

4. When the brake fluid is free of all air and the brake

lever feels firm when compressed, fill the reser-

voir to a level just below the high mark; then

install and secure the cover. Remove the tube from

the bleeder valve.

5. Proceed to bleed the brake system (see Bleeding

Brake System in this sub-section).

BLEEDING BRAKE SYSTEM

If the brake lever feels spongy when applied, the brake

system may need to be bled. To bleed the brake sys-

tem, use the following procedure.

1. Remove the master cylinder reservoir cover and

fill the reservoir to the high mark with approved

brake fluid.

2. Slide a piece of flexible tubing over the ball of the

bleeder valve and direct the other end into a con-

tainer.

730-434H

739-269B

3. Slowly compress the brake lever and hold. Open

the bleeder valve to release the fluid and air. When

the fluid stops flowing, close the bleeder valve;

then release the brake lever.

4. Repeat step 3 until the brake fluid flows free of air

bubbles.

„NOTE: It may be necessary to refill the reservoir
during the bleeding process.

5. When the brake fluid is free of all air and the brake

lever feels firm when compressed, fill the reser-

voir to a level just below the high mark; then

install and secure the cover. Remove the tube from

the bleeder valve.

CHECKING AND REPLACING 
BRAKE PADS (STD)

To check and replace the brake pads, use the following

procedure.

1. Measure the thickness of both brake pads. The

brake pad thickness must be greater than 3.2 mm

(0.125 in.). If the brake pad thickness is less than

specified, replacement of both pads is necessary.

0730-434

2. Remove the retaining pin securing the brake pads

to the caliper assembly.

3. Pull both brake pads out of the caliper assembly.

! CAUTION

Brake fluid is highly corrosive. Do not spill brake
fluid on any surface of the snowmobile.

! WARNING

Use only approved brake fluid. Any substitute may
result in a loss of brakes.

! WARNING

Do not use brake fluid from a container that has
been opened for a long period of time. Unsealed
brake fluid containers will absorb moisture and can
contaminate the fluid inside.

STD

ACT

6-58

AF255D

4. Using a large screwdriver, slowly push both brake

pistons into the caliper.

5. Position the new brake pads into the caliper and

secure with the retaining pin.

„NOTE: When installing new brake pads, always
install them as a set. Never install just one pad or
use brake pads which have been used in another
snowmobile.

AF255D

6. Compress the brake lever repeatedly to ensure cor-

rect positioning of the brake pads; then release.

„NOTE: When new brake pads are installed, a bur-
nishing process is required. Drive the snowmobile
slowly and compress the brake lever repeatedly
until the pads just start to heat up; then allow them
to cool down. This process stabilizes the pad
material and extends the life of the pads.

REMOVING CALIPER (STD)

1. Slide a piece of flexible tubing over the ball of the

bleeder valve and direct the other end into a con-

tainer.

0730-434

2. Open the bleeder valve and compress the brake

lever several times to drain the reservoir of fluid.

3. Remove the brake hose from the caliper. Use an

absorbent towel to collect any remaining brake

fluid.

AF262D

4. Remove the retaining pin securing the brake pads

to the caliper assembly; then remove the brake

pads.

AF255D

! CAUTION

Care must be taken not to pry against the brake disc
when pushing on the pistons or severe damage may
occur.

! CAUTION

Brake fluid is highly corrosive. Do not spill brake
fluid on any surface of the snowmobile.

6-59

6

5. Loosen the upper cap screws securing the caliper

halves; then remove the two cap screws, lock

washers, and flat washers securing the brake cali-

per to the chain case.

AF261D

6. Remove the caliper assembly from the engine

compartment.

Disassembling

1. Position a piece of wood between the pistons.

Using low-pressure compressed air, blow into the

caliper brake hose fitting to remove the brake pis-

tons.

AF248

2. Remove the two cap screws securing the caliper

halves. Account for the small O-ring.

3. Remove the piston O-rings and discard.

AF264

Cleaing and Inspecting

„NOTE: Whenever a part is worn excessively,
cracked, or damaged in any way, replacement is
necessary.

1. Inspect the brake pistons for gouges, cracks, pit-

ting, scuffing, or corrosion. If any of these condi-

tions exist, replace the piston.

2. Clean the piston outer surface by using a Scotch-

Brite pad and clean brake fluid as a cleaner.

AF230

3. Inspect the brake caliper for gouges, cracks, pit-

ting, scuffing, or corrosion. If any of these condi-

tions exist, replace the caliper.

4. Clean the caliper inner wall surface using a soft

Scotch-Brite pad and clean brake fluid. Wipe cali-

per wall clean with a clean rag and brake fluid.

! CAUTION

Never use an impact driver on models with compos-
ite chain case. Damage to the chain case will occur.

! WARNING

Always wear safety glasses when using compressed
air.

! CAUTION

Do not use any sharp cleaning tool on the piston
surface as it may cause damage. Parts-cleaning sol-
vent must not be used as it can damage the piston
O-ring.


Content   ..  101  102  103  104   ..