содержание .. 1 2 3 4 5 6 7 ..
Aprilia scooter (manual) - part 3
-
-
ELECTRICAL PARTS

-
ELECTRICAL PARTS Carefully read 1.2.1.
-
-
-
Position the vehicle on the stand.

-
Make sure that all lighting devices are working properly.

-
Make sure that headlamp is properly adjusted,
8.13.1. and 8.13.2.
-
Make sure that all connectors are well fitted.

-
Make sure that all switches are correctly fitted and operational:
- 8.4.1.
- 8.10.1.
-
Check for speedometer and air sensor correct fitting and operation.
 WARNING
The sensors sensitive area must be always
clean. Any mud, dirt or other deposit could alter the readings and the following data transmission.
-
SPARK PLUGS
-
SPARK PLUGS TIGHTENING TORQUE SETTINGS
-
Spark plug: 20 Nm (2.0 kgm).
Check the spark plug after the first 1000 km (621 mi) and then every 6000 km (3728 mi), change it every 12000 km (7456 mi).
-
-
Periodically remove the spark plug and clean it carefully, removing carbon deposits; change it if necessary.
To reach the spark plug, proceed as follows:
 DANGER
Let the engine cool down until it reaches room


temperature.
-
Remove seat right front lock, 7.1.3. For the removal and cleaning, proceed as follows:
 DANGER
Do not disconnect the spark plug cap with the
engine running. The starting system could generate a strong discharge.
-
Remove the spark plug (2) cap (1).
-
Remove any trace of dirt from the spark plug base.
-
Fit the special spanner provided in the tool kit on the spark plug.
-
Unscrew the spark plug and extract it from its seat, taking care to prevent dust or other substances from getting inside the cylinder.

-
Make sure that there are neither carbon deposits nor corrosion marks on the electrodes and on the insulating material; if necessary, clean them with the special spark plugs cleaners and/or a metal brush.
-
If the spark plug has crackings on the insulating material, corroded electrodes, excessive deposits on the rounded tip of the central electrode (3), it must be changed.
 WARNING
When changing the spark plug, check the
thread pitch and length.
If the threaded part is too short, the carbon deposits will accumulate on the thread seat, and therefore the engine may be damaged during the installation of the right spark plug.

Use the recommended type of spark plugs only, in order not to compromise the life and performance of the engine.
To check the spark plug gap, use a wire feeler gauge to avoid damaging the platinum covering.
-
Check the spark plug gap with a wire feeler gauge.
-
The gap must be 0.6 - 0.7 mm. If not, adjust it by bending the earth electrode with extreme care.
-
Make sure that the washer is in good conditions. With the washer on, screw the spark plug by hand in order not to damage the thread.
-
Tighten the spark plug by means of the spanner you will find in the tool kit, giving it half a turn to compress the washer.

 WARNING
The spark plug must be well tightened,
otherwise the engine may overheat and be seriously damaged.
Use the recommended type of spark plugs only, in order not to compromise the life and performance of the engine.
-
Position the spark plug (2) cap (1) properly, so that it does not come off due to the vibrations of the engine.
 DANGER
Make sure that the spark plug (2) cap (1) is
correctly positioned on the spark plug itself.

-
AIR CLEANER
-
AIR CLEANER
-
Clean the air cleaner every 6000 km (3728 mi) or 8 months.
-
-
It is possible to clean the air cleaner partially after riding the vehicle on this kind of roads.
 WARNING
The partial cleaning of the filter does not
exclude or postpone the replacement of the filter itself.
Do not start the engine if the air cleaner has been removed.
Do not clean the filtering element with petrol or solvents, since they may cause a fire in the fuel supply system, with serious danger for the persons in the vicinity and for the vehicle.

CLEANING
-
Remove the air cleaner, see 4.2.2.
-
Wash the filtering element with clean, not inflammable solvents or with solvents having a high volatility point and let it dry with extreme care.
-
Apply filter oil or a thick oil (SAE 80W - 90) on the whole surface, then wring it to remove the oil in excess.
 WARNING
When cleaning the filtering element, make sure
that there are no tears.
Otherwise, change the filtering element.
NOTE The filtering element must be wet but not dripping.
-
Clean the outer part of the air cleaner with a clean cloth.
-
Clean the inside of the filter box with a clean cloth.
-
Clean the intake funnels. CHANGING
 WARNING
Do not use filters that have already been used.
-
Change the air cleaner with a new one of the same type.
-
TUBES

-
TUBES Carefully read 1.2.1.
-
FUEL
Check fuel lines every 6000 km (3728 mi) or 8 months. Change them every two years.
 WARNING
In case of wear, cracking or other damage,
change the fuel lines.
For further information, see section 4 (FUEL SYSTEM). BRAKES
 WARNING
In case of wear, cracking or other damage,
change the brake lines.
COOLING SYSTEM
 WARNING
In case of wear, cracking or other damage,
change the cooling system tubes.
-
COOLANT
-
CHECKING AND TOPPING UP THE COOLANT LEVEL


Carefully read 1.2.1. and 1.3.1.
-
-
-
Check the coolant level before starting and change it every two years.
 WARNING
Check the coolant level and top up the
expansion reservoir with cold engine.
-
Stop the engine and wait until it has cooled down.
NOTE Place the vehicle on a firm and flat surface.

-
Raise the seat.
-
Undo and remove screw (1).
-
Remove protection.

-
Keep the vehicle in vertical position, with the two wheels resting on the ground.
-
Make sure that the coolant contained in the expansion reservoir is included between the “MIN” and “MAX” marks (see figure).
If not, proceed as follows:
-
Unscrew and remove the filling cap (2).
 DANGER
The coolant is toxic: do not swallow it; if the
coolant gets in contact with the skin or the eyes, it can cause serious irritations.
Do not use your fingers or any other object to check if there is enough coolant.
 WARNING
Do not put additives or other substances into
the fluid.
If you use a funnel or other similar items, make sure that they are perfectly clean.

-
Top up the expansion reservoir by adding coolant, see
1.8.1., until this almost reaches the "MAX" level.
-
Do not exceed this level, otherwise the fluid will flow out while the engine is running.
-
Put back the filling cap (2).
 WARNING
In case of excessive consumption of coolant
and in case the expansion reservoir (1) remains empty, make sure that there are no leaks in the circuit.
-
CLEANING THE RADIATOR
NOTE The radiator can be cleaned without being removed from vehicle.
-
-
Wash with a pressurized water jet aimed from behind the rear wheel air inlets.
-
Blow from below with compressed air.
-
BRAKE FLUID
-
CHECKING AND TOPPING UP THE BRAKE FLUID


Carefully read 1.2.1. and 1.3.1..
Check the brake fluid after the first 1000 km (621 mi) and then every 6000 km (3728 mi) or 8 months, change it every two years.
NOTE These operations apply to both front and rear brakes.
 WARNING
In case of excessive stroke of the brake lever,

excessive elasticity or air bubbles, bleed the air out of the circuit, see 2.10.4..
When using the brake fluid, take care not to
spill it on the plastic or painted parts, since it can damage them.
Before starting, check that the brake lines are neither twisted nor worn out and that the connectors are not leaking.
Do not use or mix different types of silicone or oil fluids.
Do not use neither old brake fluid nor fluid taken from containers opened for a long time. Prevent water or dust from accidentally getting into the circuit.
CHECK
NOTE Place the vehicle on a firm and flat surface.
-
-
-
Position the vehicle on the center stand.
-
Make sure that the fluid level exceeds the “MIN” mark.
-
If the fluid does not reach at least the "MIN" mark, proceed as follows:
 WARNING
When the disc pads wear out, the level of the

fluid decreases progressively to compensate for their wear.
-
Check the brake pad wear, see 2.10.3..
-
If the pads and/or the disc do not need replacing, provide for topping up.

TOPPING UP
 WARNING
The brake fluid may flow out of the tank. Do not
operate the front brake lever if the screws (1) are loose or, most important, if the brake fluid reservoir cover has been removed. Use a cloth under the brake fluid reservoir.
-
Undo and remove the four screws (1).
 WARNING
Avoid any prolonged exposure of the brake
fluid to the air.
The brake fluid is hygroscopic and when in contact with the air it absorbs its humidity.
Leave the brake fluid tank open ONLY for the time necessary for topping up.

-
Raise and remove cover (2).
-
Remove gasket (3).
NOTE In order not to spill the brake fluid while topping up, do not shake the vehicle.

-
Top up tank with brake fluid, see 1.8.1., to correct level.
 WARNING
Do not exceed the "MAX" level while topping
up.
It is advisable to top up until reaching the "MAX" level only with new pads.
When the disc pads wear out, the level of the fluid decreases progressively to compensate for their wear.
Do not reach the "MAX" level with worn out pads, since this will cause a fluid outflow when the pads are changed.
-
To refit components, follow the disassembly procedure in reverse order.


-
CHANGING THE BRAKE FLUID Carefully read 1.2.1. and 1.3.1.
-
-
Brake fluid must be changed every two years.
NOTE These operations apply to both front and rear brakes.
 WARNING
When using the fluid, take care not to spill it on
the plastic and painted parts, since it damages them.
-
Remove the rubber cap.
-
Insert one end of a transparent plastic tubing inside the calliper bleed valve (1-2) and the other end in a container for collection.

-
Loosen the bleed valve (1-2) of about one turn.

NOTE While carrying out this operation, check that some fluid is always present inside the tank. If this is not the case, once the operation is over, the air must be bled out, 2.10.4.

-
Check that the fluid is flowing on the tank and, before emptying, tighten the bleed valve (1-2).
Top up, see 2.10.1.
-
Loosen again the bleed valve (1-2) by about half of a turn.
-
Check that the fluid comes out of the plastic tubing and, as soon as the fluid color changes (from a darker to a lighter color) tighten the bleed valve (1-2) and remove the tubing.

-
Refit the rubber cap.
-
Top up fluid inside tank, see 2.10.1.


-
CHECKING THE BRAKE PAD WEAR Carefully read 1.2.1. , 1.3.1. and 2.1.2. NOTE The following instructions apply to both brakes.
Check the brake pad wear after the first 1000 km (621 mi) and successively every 2000 km (1242 mi).
The wear of the disc brake pads depends on the use, on the kind of drive and on the road.
 WARNING
Check the wear of the brake pads, especially
before every trip.

To carry out a rapid check of the wear of the pads, proceed as follows:
-
-
Position the vehicle on the center stand.
-
Carry out a visual check between the caliper and the pads, proceeding:
from below, on the front part, for the front brake calipers (1);
from below, on the rear part, for the rear brake calipers (2).
 WARNING
The excessive wear of the friction material
would cause the contact of the pad metal support with the disc, with consequent metallic noise and production of sparks from the caliper; braking efficiency, safety and soundness of the disc would thus be negatively affected.

-
If the thickness of the friction material (even of a single pad) has reduced to about 1.5 mm (0.05 in), have both pads changed.
Front brake pad (3).

Rear brake pad (4).


-
BLEEDING THE BRAKING SYSTEMS Carefully read 1.2.1. and 1.3.1..

For maintenance operations schedule, see 2.1.2.
The air, if any, present inside the hydraulic circuit will serve as “pad” by absorbing most of the pressure coming from the brake master cylinder and thus reducing the callipers efficiency during braking.
If some air is present inside the circuit, the brake control is “spongy” and the braking efficiency is reduced.
 DANGER
Safety critical operation. In order to avoid any
damage to both rider and vehicle, after brake reassembly and after having restored the braking system standard operation, make sure that all air is bled out of the hydraulic circuit.
If the brake fluid gets in contact with the skin or the eyes, it can cause serious irritations.
Carefully wash the parts of your body that get in contact with the fluid. Consult a doctor or an eye specialist if the fluid gets in contact with your eyes.
 WARNING
Handle the brake fluid with extreme care: it may
damage the vehicle paintwork and the plastic, rubber and other parts.
In case maintenance operations are to be performed on the hydraulic circuit, it is advisable to use latex gloves.

When using the brake fluid, take care not to spill it on the plastic or painted parts, since it can damage them.
NOTE This vehicle is equipped with a braking system consisting of:
-
a front disc brake;
-
a rear disc brake;
-
a delay valve under the instrument panel.
Through the brake line (1), the action on the right (front) brake lever exerts a pressure on front brake calliper pistons A and C.
Through the delay valve, the action on the left (rear) brake lever exerts a pressure on the front brake calliper piston B and on the rear brake calliper.
NOTE To bleed air out of the circuit, proceed in the following order: delay valve, front brake calliper and rear brake calliper.

DELAY VALVE

-
-
Remove the instrument panel, 7.2.6.
-
Remove the rubber cap (1) from the bleed valve (2).
-
Insert one end of a transparent plastic tubing inside the bleed valve (2) of the delay valve, and the other end in a container for collection.
-
Operate the rear brake lever repeatedly, then keep it fully pulled.
-
Loosen the bleed valve by ¼ of a turn so that the brake fluid can flow inside the container. The tension on the brake lever will thus be eliminated and you will be able to take it to the end of stroke.
-
Repeat this last procedure until no air bubbles can be seen inside the fluid flowing inside the container.
NOTE When bleeding the hydraulic circuit, fill the reservoir with the suitable quantity of brake fluid. Make sure that during this procedure some brake fluid is always present inside the reservoir.

-
Tighten the bleed valve and remove the plastic tubing.
-
Top up to the correct brake fluid level, see 2.10.1.
-
Refit the rubber cap.

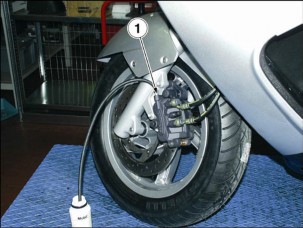
FRONT BRAKE
-
Remove the rubber cap from the bleed valve (3).
-
Insert one end of a transparent plastic tubing inside the front brake calliper bleed valve (3) and the other end in a container for collection.
-
Operate the brake lever repeatedly, then keep it fully pulled.
-
Loosen the bleed valve by ¼ of a turn so that the brake fluid can flow inside the container. The tension on the brake lever will thus be eliminated and you will be able to take it to the end of stroke.
-
Repeat this last procedure until no air bubbles can be seen inside the fluid flowing inside the container.
NOTE When bleeding the hydraulic circuit, fill the reservoir with the suitable quantity of brake fluid. Make sure that during this procedure some brake fluid is always present inside the reservoir.

-
Tighten the bleed valve and remove the plastic tubing.
-
Top up to the correct brake fluid level, see 2.10.1.
-
Refit the rubber cap.

REAR BRAKE

-
Remove the rear brake calliper, but leave it connected to the tubes, 7.7.5.
-
Position the rear brake calliper as high as possible, to
make air bleeding easier.
-
Remove the rubber cap from the bleed valve (4).
-
Insert one end of a transparent plastic tubing inside the rear brake calliper bleed valve (4) and the other end in a container for collection.
-
Operate the brake lever repeatedly, then keep it fully pulled.
-
Loosen the bleed valve by ¼ of a turn so that the brake fluid can flow inside the container. The tension on the brake lever will thus be eliminated and you will be able to take it to the end of stroke.
-
Repeat this last procedure until no air bubbles can be seen inside the fluid flowing inside the container.
NOTE When bleeding the hydraulic circuit, fill the reservoir with the suitable quantity of brake fluid. Make sure that during this procedure some brake fluid is always present inside the reservoir.

-
Tighten the bleed valve and remove the plastic tubing.
-
Top up to the correct brake fluid level, see 2.10.1.
-
Refit the rubber cap.

-
ENGINE OIL
-
CHECKING THE ENGINE OIL LEVEL AND TOPPING UP


Carefully read 1.2.1. and 1.3.1.
Change engine oil after the first 1000 km (621 mi), namely after running-in, and then check it every 3000 km (1864 mi). Change oil every 6000 km (3728 mi).

NOTE Use recommended oil only, 1.8.1.
When topping up, never exceed the “MAX” mark.
CHECK
-
-
-
Position the vehicle on a flat and firm surface.
-
Position the vehicle on the centre stand.

 WARNING
Wait a few minutes to allow engine and exhaust
system to cool down.
-
Stop the engine and let it cool down to let oil flow into the casing and cool down.
NOTE Failure to comply with the above recommendations may lead to improper oil level reading.
-
Undo and take out the plug-measuring stick (1).
-
Use a clean cloth to clean the surface in contact with oil.
-
Screw the plug-measuring rod (2) all the way down into the filler hole (2).
-
Take the plug-measuring stick (1) out again and take a reading of the oil level on the stick:
MAX = max. level;
MIN = min. level.
-
The difference between "MAX" and "MIN" amounts to approximately: – 240 cc (14.6 cu.in).
-
The level is correct when the oil almost reaches the "MAX" mark.
 DANGER
Never exceed the "MAX" mark, nor leave the oil
below the "MIN" mark, in order to avoid serious damage to the engine.
-
If necessary, top up the engine oil. TOPPING UP
-
Pour a small amount of oil into the filler hole (2) and wait for about one minute to let oil flow into the casing.
-
Check oil level and top up, if necessary.
-
Top up with small quantities of oil, until reaching the recommended level.
-
Once finished, screw and tighten the plug/measuring stick (1).
NOTE Do not ride the vehicle if poorly lubricated and do not use polluted or unsuitable lubricants, otherwise moving parts might be subject to early wear and vehicle might damage.
-
CHANGING THE ENGINE OIL AND THE OIL FILTER


Carefully read 1.2.1. and 1.3.1.
Change the engine oil filter after the first 1000 km (621 mi), namely after running-in, and the every 6000 km (3728 mi).
-
-
Position the vehicle on a flat and firm ground.
-
Position the vehicle on the center stand.
 WARNING
Wait a few minutes to allow engine and exhaust
system to cool down.

-
Stop the engine and let it cool down to let oil flow into the casing and cool down.
NOTE Failure to comply with the above recommendations may lead to improper oil level reading.
-
Undo and take out the plug-measuring stick (1).

-
Position a container for collection under the engine oil filter.
-
Undo and remove the cartridge engine oil filter (2).
 WARNING
Exhausted oil contains pollutants. Dispose of
used oil according to the prevailing environmental regulations.
-
Unscrew and remove the drain plug (3) and let the engine oil completely flow out.
-
Fit a new cartridge oil filter (2). Make sure to lubricate filter OR-seals with oil.
-
Screw and tighten the engine oil drain plug (3).
-
Fill the circuit through the engine oil filler hole with about 1000 cu.cm (61 cu.in).
-
Screw and tighten the plug-measuring stick (1).

-
Start the vehicle and let it running for a few minutes. Switch engine off and let it cool down.
-
Check engine oil level, 2.11.1.
-
TRANSMISSION OIL
-
CHECKING AND TOPPING UP THE TRANSMISSION OIL


Carefully read 1.2.1. and 1.3.1.

Change transmission oil after the first 1000 km (621 mi), namely after running-in, and then check it every 6000 km (3728 mi) or 8 months. Change oil every 24000 km (14913 mi), 2.12.2.

NOTE Use recommended oil only, 1.8.1.
-
-
-
Run a few miles until reaching standard operating temperature, then stop the engine.

CHECKING
-
Position the vehicle on a flat and firm surface.
-
Position the vehicle on the center stand.
 WARNING
Wait a few minutes to allow engine and exhaust
system to cool down.
-
Undo and take out the plug-measuring stick (1).
-
Use a clean cloth to clean the surface in contact with oil.
-
Screw the plug-measuring rod (2) all the way down into the filler hole (2).
-
Take the plug-measuring stick (1) out again and take a reading of the oil level on the stick:
MAX = max level;
MIN = min level.

-
The level is correct when the oil almost reaches the "MAX" mark.
 DANGER
Never exceed the "MAX" mark, nor leave the oil
below the "MIN" mark, in order to avoid serious damage to the engine.
-
If necessary, top up.
TOPPING UP
-
Pour a small amount of oil into the filler hole (2) and wait for about one minute to let oil flow into the casing.
-
Check oil level and top up, if necessary.
-
Top up with small quantities of oil, until reaching the recommended level.
-
Once finished, screw and tighten the plug/measuring stick (1).
NOTE Do not ride the vehicle if poorly lubricated and do not use polluted or unsuitable lubricants, otherwise moving parts might be subject to early wear and vehicle might damage.


-
CHANGING THE TRANSMISSION OIL Carefully read 1.2.1. and 1.3.1.
Change transmission oil after the first 1000 km (621 mi), namely after running-in, and then check it every 6000 km (3728 mi) or 8 months. Change oil every 24000 km (14913 mi).
-
-
Position the vehicle on a flat and firm surface.
-
Position the vehicle on the center stand.
 WARNING
Wait a few minutes to allow engine and exhaust
system to cool down.

-
Stop the engine and let it cool down to let oil flow into the casing and cool down.
NOTE Failure to comply with the above recommendations may lead to improper oil level reading.
-
Undo and take out the plug-measuring stick (1).

-
Put a container for collection with a capacity above 300 cu.cm (18.3 cu.in) under the drain screw (2).
-
Undo and remove the drain screw (2).
 WARNING
Exhausted oil contains pollutants. Dispose of
used oil according to the prevailing environmental regulations
-
Screw and tighten drain screw (2).
-
Fill the circuit through the transmission oil filler hole with about 250 cu.cm (15.2 cu.in).
-
Screw and tighten the plug-measuring stick (1).

-
Start the vehicle and let it running for a few minutes. Switch engine off and let it cool down.
-
Check transmission oil level, 2.12.1.
содержание .. 1 2 3 4 5 6 7 ..