Volvo V90 Twin Engine (2018 year). Instruction - part 23


  Index      Volvo     Volvo V90 Twin Engine - instruction 2018 year in english


Search            


Content   ..  21  22  23  24   ..


Volvo V90 Twin Engine (2018 year). Instruction - part 23


DRIVER SUPPORT

* Option/accessory.

395

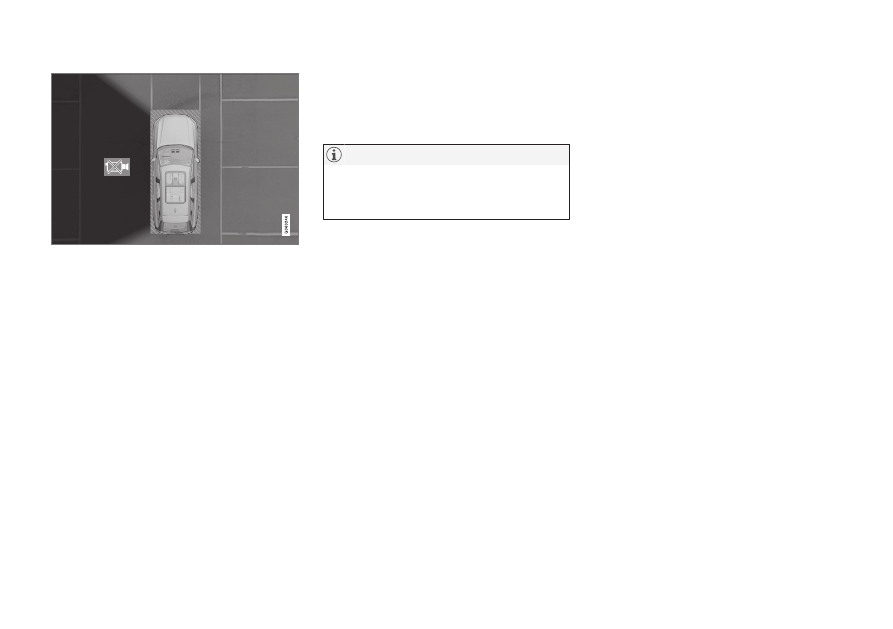
The car's left-hand camera is out of order.

Black camera sector

A black camera sector is also shown in the fol-
lowing instances, but then without the symbol for
defective camera:

open door

open tailgate

folded-in door mirror.

Light conditions

The camera image is adjusted automatically
according to prevailing light conditions. Because
of this, the image may vary slightly in brightness
and quality. Poor light conditions can result in
reduced image quality.

Maintenance

Clean camera lenses regularly with lukewarm
water and car shampoo - be careful not to
scratch the lenses.

NOTE

Keep the camera lens clear of dirt, snow and
ice to ensure optimum function. This is partic-
ularly important in poor light.

Related information

Park assist camera

* (p. 389)

Park assist lines and fields for the park assist
camera

* (p. 391)

Starting the Park assist camera

* (p. 393)

Symbols and messages for Park assist cam-
era

* (p. 396)

DRIVER SUPPORT

* Option/accessory.

396

Symbols and messages for Park

assist camera

*

Symbols and messages for Park assist camera
can be shown in the driver display and/or the
centre display.

The following table shows examples.

Symbol

Message

Specification

The rearward parking assistance sensors are deactivated, so there are no acoustic warnings and
field marks for obstacles/objects.

The camera is disengaged.

DRIVER SUPPORT

* Option/accessory.

397

Symbol

Message

Specification

Park Assist System

Sensors blocked, cleaning
needed

One or more of the function's sensors are blocked - check and correct as soon as possible.

Park Assist System

Unavailable Service required

The system does not function as it should. A workshop should be contacted - an authorised Volvo
workshop is recommended.

A text message can be cleared by briefly press-
ing the 

 button, located in the centre of the

steering wheel's right-hand keypad.

If a message remains: Contact a workshop – an
authorised Volvo workshop is recommended.

Related information

Park Assist

* (p. 383)

Activating/deactivating Park Assist Pilot

*

(p. 385)

Limitations of Park Assist Pilot

* (p. 386)

DRIVER SUPPORT

* Option/accessory.

398

Park Assist Pilot

* 

Park Assist Pilot (PAP

92

) helps the driver to park

in or leave a parking space.

PAP checks first if a space is sufficiently big and
thereafter helps the driver to turn the steering
wheel and manoeuvre the car into the space.

The centre display indicates with symbols, graph-
ics and text the various operations to be carried
out and when to do so.

WARNING

The PAP function is supplementary driver
support intended to facilitate driving and
make it safer – it cannot handle all situa-
tions in all traffic, weather and road condi-
tions.

Be particularly aware of people and ani-
mals near the car.

PAP is not a substitute for the driver's
attention and judgement. The driver is
always responsible for ensuring the car is
driven in a safe manner, at the appropri-
ate speed, with an appropriate distance to
other vehicles, and in accordance with
current traffic rules and regulations.

NOTE

The PAP function measures the space and
steers the car - the driver's task is to:

keep a close watch around the car

follow the instructions in the centre dis-
play

select gear (reverse/forward) - a "ping"
sound indicates when the driver should
change gear

control and maintain a safe speed

brake and stop.

Types of parking situations

PAP can be used for the following different park-
ing situations.

Parallel parking

The principal of parallel parking.

The PAP function parks the car using the follow-
ing steps:

1. A parking space is identified and measured.
2. The car is reversed into the space.
3. The car is positioned in the space by means

of driving forward/backward.

Using the 

Park Out

 function, a parallel-parked

car can also be assisted by PAP to leave the
parking space - see the heading "Leaving a park-
ing space" in the section "Parking with Park
Assist Pilot".

92

Park Assist Pilot

DRIVER SUPPORT

}}

* Option/accessory.

399

Perpendicular parking

Principle for perpendicular parking.

The PAP function parks the car using the follow-
ing steps:

1. A parking space is identified and measured.
2. The car is reversed into the space and then

positioned in the space by means of driving
forward/backward.

NOTE

A perpendicular-parked car cannot be assis-
ted by the PAP 

Park Out

 function to leave a

parking space - the function must only be
used for a parallel-parked car.

Related information

Parking with Park Assist Pilot

* (p. 399)

Limitations of Park Assist Pilot

* (p. 402)

Messages for Park Assist Pilot

* (p. 405)

Parking with Park Assist Pilot

* 

Park Assist Pilot (PAP

93

) helps the driver park

via three steps. The function can also help the
driver to leave a parking space.

NOTE

The PAP function measures the space and
steers the car - the driver's task is to:

keep a close watch around the car

follow the instructions in the centre dis-
play

select gear (reverse/forward) - a "ping"
sound indicates when the driver should
change gear

control and maintain a safe speed

brake and stop.

Symbols, graphics and/or text appear on the cen-
tre display's screen when the different steps are
to be performed.

PAP can be activated if the following criteria are
met once the engine has been started:

No trailer is attached to the car

Speed must be lower than 30 km/h
(20 mph).

||

DRIVER SUPPORT

400

NOTE

The distance between the car and parking
spaces should be 0.5-1.5 metres (1.6-5.0 ft)
while PAP is searching for a parking space.

Parking

PAP parks the car using the following steps:

1. A parking space is identified and measured.
2. The car is reversed into the space.
3. The car is positioned into the space - the

system may then request that the driver
changes gear.

Finding and measuring parking spaces

The function can be activated
in the centre display's function
view.

It can also be accessed from
the camera views.

Principle for parallel parking.

Principle for perpendicular parking.

Proceed as follows:

1. Drive no faster than 30 km/h (20 mph) for

parallel parking or 20 km/h (12 mph) for
perpendicular parking.

2. Tap on the 

Park In

 button in function view.

> PAP searches for a parking space and

checks whether it is big enough.

3. Be prepared to stop the car when the

graphic and message on the centre display
state that a suitable parking space has been
found.
> A pop-up window is shown.

4. Select 

Parallel parking

 or 

Perpendicular

parking

 and select reverse gear.

NOTE

PAP searches the area for parking, displays
instructions and guides the car in on its pas-
senger side. But if required the car can also
be parked on the driver's side of the street:

Activate the direction indicator to the
driver's side - then the system searches
for a parking space on that side of the
car instead.

93

Park Assist Pilot

DRIVER SUPPORT

}}

401

Reversing in to the parking space

Parallel.

Perpendicular.

Perform the following to reverse the car into the
parking space:

1. Check that the area behind the car is clear,

then engage reverse gear.

2. Reverse slowly and carefully without touching

the steering wheel - and no faster than
7 km/h (4 mph).

3. Be prepared to stop the car when instructed

by the graphic and message on the centre
display.

NOTE

Keep your hands away from the steering
wheel when the PAP function is acti-
vated.

Make sure that the steering wheel is not
hindered in any way and can rotate freely.

To achieve optimum results - wait until
the steering wheel is fully turned before
starting to drive backward/forward.

Positioning the car in the parking space

Parallel.

Perpendicular.

Proceed as follows:

1. Move the gear selector into the D position,

wait until the steering wheel has been turned
and drive slowly forward

||

DRIVER SUPPORT

* Option/accessory.

402

2. Be prepared to stop the car when instructed

by the graphic and message on the centre
display.

3. Select reverse gear and drive slowly back-

wards.

4. Be prepared to stop the car when instructed

by the graphic and message on the centre
display.

The function is deactivated automatically and the
graphics and message show that parking is com-
plete. It may be necessary for the driver to correct
the car’s position. Only the driver can determine
whether the car is properly parked.

IMPORTANT

The warning distance is shorter when the
sensors are used by PAP compared with
when Park Assist uses the sensors.

Leaving a parking space

NOTE

When leaving a parking space, the 

Park Out

function must only be used for a parallel-
parked car - it does not work for a perpendic-
ular-parked car.

The 

Park Out

 function is acti-

vated in the centre display's
function view.

Proceed as follows:

1. Tap on the 

Park Out

 button in function view.

2. Use the direction indicator to select the

direction in which the car should leave the
parking space.

3. Be prepared to stop the car when instructed

by the graphic and message on the centre
display - follow the instructions in the same
way as for the parking procedure.

Note the steering wheel can "spring" back when
the function is completed - the driver may then
need to turn the steering wheel back to the maxi-
mum steering angle in order to leave the parking
space.

If PAP considers that the driver can leave the
parking space without any extra manoeuvring
then the function will be stopped, even if the
driver may consider that the car is still in the
parking space.

Related information

Park Assist Pilot

* (p. 398)

Limitations of Park Assist Pilot

* (p. 402)

Messages for Park Assist Pilot

* (p. 405)

Limitations of Park Assist Pilot

* 

The Park Assist Pilot (PAP

94

) function cannot

detect everything in all situations and may there-
fore have limited functionality.

WARNING

The PAP function is supplementary driver
support intended to facilitate driving – it
cannot handle all situations in all traffic,
weather and road conditions.

Be particularly aware of people and ani-
mals near the car.

Bear in mind that the front of the car may
swing out towards oncoming traffic dur-
ing the parking manoeuvre.

Objects situated higher than the sensor
detection area are not included when cal-
culating the parking manoeuvre, which
could cause PAP to swing into the park-
ing space too early – such parking
spaces should be avoided for this reason.

PAP is not a substitute for the driver's
attention and judgement. The driver is
always responsible for ensuring the car is
driven in a safe manner, at the appropri-
ate speed, with an appropriate distance to
other vehicles, and in accordance with
current traffic rules and regulations.

DRIVER SUPPORT

}}

403

A driver should be aware about the following
examples of Park Assist Pilot limitations:

Parking is discontinued

A parking sequence will be discontinued:

if the driver moves the steering wheel

if the car is driven too quickly - above 7 km/h
(4 mph)

if the driver presses 

Cancel

 in the centre

display

when the anti-lock brakes or the Electronic
stability control are engaged - e.g. when a
wheel loses grip on a slippery road.

Where applicable, a message in the centre dis-
play states the reason for a parking sequence
being discontinued.

IMPORTANT

Under certain circumstances, PAP is unable
to find parking spaces - one reason for this
may be the fact that there is interference with
the sensors from external sound sources
which emit the same ultrasound frequencies
as those with which the system works.

Examples of such sources include horns, wet
tyres on asphalt, pneumatic brakes and
exhaust noises from motorcycles etc.

NOTE

Dirt, ice and snow covering the sensors will
reduce their function and may prevent meas-
urement.

Driver responsibility

The driver should bear in mind that the PAP is an
aid – not an infallible, fully-automatic function.
The driver must therefore be prepared to inter-
rupt a parking step.

There are also a few details to bear in mind while
parking, e.g.:

PAP bases itself on the locations of vehicles
already parked nearby - if they are inap-
propriately parked, your own car's tyres and
wheel rims may be damaged by contact with
the kerb.

PAP is designed for parking on straight
streets - not sharp curves or bends. For this
reason, make sure the car is parallel to the
parking space when PAP measures the
space.

Parking spaces on narrow streets are not
always feasible, since the space required for
manoeuvring may not be sufficient.

The driver is responsible for determining
whether the space selected by PAP is suita-
ble for parking.

Use approved tyres

95

 with the correct tyre

pressure - this affects the ability of PAP to
park the car.

Heavy rain or snow may cause the system to
measure the parking space incorrectly.

Do not use PAP if snow chains or a spare
wheel are fitted.

Do not use PAP if cargo items are protruding
from the car.

Perpendicular parking spaces may be missed
or offered unnecessarily if one parked car is
protruding more than other parked cars.

IMPORTANT

Changing to another approved wheel rim
and/or tyre dimension may involve a changed
tyre circumference, which means that the
PAP system's parameters may then need to
be updated. Consult a workshop - an author-
ised Volvo workshop is recommended.

94

Park Assist Pilot

95

"Approved tyres" refers to tyres of the same type and make as those fitted new on delivery from the factory.

||

DRIVER SUPPORT

* Option/accessory.

404

Maintenance

PAP sensor locations

96

.

For the PAP function to work correctly, its sen-
sors must be cleaned regularly with water and car
shampoo.

Related information

Park Assist Pilot

* (p. 398)

Parking with Park Assist Pilot

* (p. 399)

Messages for Park Assist Pilot

* (p. 405)

96

NOTE: The illustration is schematic - details may vary depending on car model.

DRIVER SUPPORT

* Option/accessory.

405

Messages for Park Assist Pilot

*

Messages for Park Assist Pilot (PAP

97

) can be

shown in the driver display and/or the centre dis-
play.

The following table shows examples.

Message

Specification

Park Assist System

Sensors blocked, cleaning needed

One or more of the function's sensors are blocked - check and correct as soon as possible.

Park Assist System

Unavailable Service required

The system does not function as it should. A workshop should be contacted - an authorised Volvo workshop is
recommended.

A text message can be cleared by briefly press-
ing the 

 button, located in the centre of the

steering wheel's right-hand keypad.

If a message remains: Contact a workshop – an
authorised Volvo workshop is recommended.

Related information

Park Assist Pilot

* (p. 398)

Parking with Park Assist Pilot

* (p. 399)

Limitations of Park Assist Pilot

* (p. 402)

97

Park Assist Pilot

STARTING AND DRIVING

* Option/accessory.

408

Alcohol lock

*

The function of the alcohol lock is to prevent the
car from being driven by individuals under the
influence of alcohol. Before the engine can be
started the driver must take a breath test that
verifies that he/she is not under the influence of
alcohol. Alcohol lock calibration takes place in
accordance with each market's limit value in
force for driving legally.

The car has an interface for the electrical con-
nection of the different makes and models of
alcohol lock recommended by Volvo. The inter-
face facilitates alcohol lock connection, and gives
the option of an integrated function including
messages related to the alcohol lock in the car's
main display. For information about a specific
alcohol lock, please refer to its owner's manual.

WARNING

The alcohol lock is an aid and does not

exempt the driver from responsibility. It is

always the responsibility of the driver to be

sober and to drive the car safely.

Bypass of the alcohol lock

*

In the event of an emergency situation or the
alcohol lock is out of order, it is possible to
bypass the alcohol lock in order to drive the car.

For deactivation via the alcohol lock, see the sep-
arate instructions for that specific lock.

Activating the bypass function (Bypass)

NOTE

All bypass activation is logged and saved in
the memory in the alcohol lock's control unit.
It is not possible to undo a bypass.

The message, 

Blow into alcolock


Bypass

instead?

, is shown in the screen:

Select Bypass by pressing once on the O
button on the steering wheel's right-hand
keypad.
> The alcohol lock is now bypassed and the

car can be started.

The number of bypasses possible before service
is required is selected during alcohol lock instal-
lation.

Related information

Before starting the engine with the alcohol
lock (p. 408)

Starting the car (p. 410)

Before starting the engine with the

alcohol lock

The alcohol lock is activated automatically and is
then ready for use when the car is opened.

To bear in mind

In order to obtain correct function and as accu-
rate a measurement result as possible:

Avoid eating or drinking approx. 5 minutes
before the breath test.

Avoid excess windscreen washing - the alco-
hol in the washer fluid may result in an incor-
rect measurement result.

NOTE

After a completed period of driving, the
engine can be restarted within 30 minutes
without a new breath test.

Related information

Bypass of the alcohol lock

* (p. 408)

Starting the car (p. 410)

STARTING AND DRIVING

}}

* Option/accessory.

409

Ignition positions

The car's electrical system can be set in different
levels/positions and in this way make the differ-
ent functions available.

In order to facilitate the use of a limited number
of functions with the engine switched off, the
car's electrical system can be set in 3 different
levels - 0, I and II. These levels are described
with the denomination "ignition position"
throughout the owner's manual.

The following table shows the functions available
in each ignition position/level:

Level

Functions

0

Odometer, clock and temperature
gauge are illuminated.

The power seats

* can be adjusted.

The power windows can be used.

The centre display is started and
can be used.

The infotainment system can be
used.

The functions are time-controlled in
this ignition position and are switched
off automatically after a period of time.

I

Panorama roof, power windows,
12V socket in the passenger com-
partment, Bluetooth, navigation,
phone, ventilation fan and wind-
screen wipers can be used.

Power seats can be adjusted.

12 V sockets in the cargo area
can be used.

The infotainment system is started
automatically if it was running
when the car was left.

Power is taken from the battery in
this ignition position.

Level

Functions

II

The headlamps come on.

Warning/indicator lamps illuminate
for 5 seconds.

Several other systems are acti-
vated. However, heating in seat
cushions and the rear window can
only be activated after the car has
been started.

This ignition position consumes a
lot of current from the battery and
should therefore be avoided!

Selecting ignition position

Start knob in the tunnel console.

Ignition position 0 - Unlock the car and
store the remote control key inside the car.

||

STARTING AND DRIVING

* Option/accessory.

410

NOTE

To reach level I or II without starting the
engine - do not depress the brake pedal, or
the clutch pedal for cars with manual gear
changing, when these ignition positions are to
be selected.

Ignition position I - Turn the start knob
clockwise and release it. The control auto-
matically returns to its starting position.

Ignition position II - Turn the start knob
clockwise and hold it in position for
approx. 4 seconds. Then release the knob,
which automatically returns to its starting
position.

Back to ignition position 0 - To return to
ignition position 0 from position I and II -
Turn the start knob clockwise and release.
The control automatically returns to its star-
ting position.

Related information

Starting the car (p. 410)

Switching off the car (p. 412)

Driver display (p. 96)

Starting the car

The car is started using the start knob in the tun-
nel console when the remote control key is in
the passenger compartment.

Start knob in the tunnel console.

WARNING

Before starting:

Fasten the seatbelt.

Adjust the seat, steering wheel and mir-
rors.

Make sure that the brake pedal can be
fully depressed.

The remote control key is not physically used
when starting the car since it is equipped with
support for keyless starting (Passive start).

To start the car:

1. The remote control key must be inside the

car. For cars with Passive Start, the key
needs to be located in the front part of the
passenger compartment. With keyless lock-
ing/unlocking of the car

*, the key can be

anywhere in the car.

2. Hold the brake pedal depressed

1

 fully. For

cars with automatic gear changing, make
sure that gear position P or N is selected.
For cars with a manual gearbox, make sure
that the gear lever is in neutral position or
that the clutch pedal is depressed.

3. Turn the start knob clockwise and release it.

The control automatically returns to its star-
ting position.

When the engine is started the starter motor
works until the engine is started or until its over-
heating protection triggers.

When starting in normal conditions, the car's
electric drive motor is prioritised - the petrol
engine remains switched off. This means that
after the start knob has been turned clockwise,
the electric motor has "started" and the car is
ready to drive. A started car is indicated by the

1

If the car is moving, the engine can be started by turning the start knob clockwise.

STARTING AND DRIVING

}}

411

driver display's indicator lamps extinguishing and
its preset theme illuminating.

However, there are situations where the petrol
engine is started instead, e.g. in the event of the
temperature being too low or if the hybrid battery
needs charging.

The car should not be started with the charging
cable connected but in the cases when it cannot
be unplugged, or the car incorrectly detects the
charging cable, it is possible to force start the
car:

1. Depress the brake pedal and turn the start

knob clockwise.

2. The text 

Charge cable


Remove before

start

 appears in the driver display.

3. Turn the start knob clockwise again.

4. The text 

Removed? Turn and hold start

knob 7s

 appears, at which point, turn the

knob clockwise and hold it for 7 seconds to
start the car.

Backup reader's location in the tunnel console.

If the message 

Car key not found

 is shown in

the driver display when starting, place the remote
control key on the backup reader in the cup
holder. Then try to start again.

NOTE

When the remote control key is placed in the
cup holder, make sure that no other car keys,
metal objects or electronic apparatus (e.g.
mobile phones, tablets, laptops or chargers)
are in the cup holder. Several car keys close
to each other in the cup holder can cause
interference with each other.

If the message 

Car start


System check, wait

 is

shown in the driver display when starting, wait
until the message disappears and then try to
start the car again.

IMPORTANT

If the engine fails to start after 3 attempts -
wait for 3 minutes before making a further
attempt. Starting capacity increases if the bat-
tery is allowed to recover.

NOTE

The car cannot be started if the hybrid battery
is discharged.

WARNING

Never remove the remote control key from

the car while driving.

WARNING

Always take the remote control key out from

the car when leaving the car and make sure

the car's electrical system is in ignition posi-

tion 0 - especially if there are children in the

car.

||

STARTING AND DRIVING

412

NOTE

The idling speed can be noticeably higher
than normal for certain engine types during
cold starting. This is done in order that the
emissions system can reach normal operating
temperature as quickly as possible, which
minimises exhaust emissions and protects the
environment.

Related information

Ignition positions (p. 409)

Switching off the car (p. 412)

Remote control key (p. 236)

Replacing the battery in the remote control
key (p. 258)

Hybrid related information in the driver dis-
play (p. 99)

Charging the hybrid battery (p. 454)

Switching off the car

The car is switched off using the start knob in
the tunnel console.

Start knob in the tunnel console.

To switch off the car:

Turn the start knob clockwise and release it -
the car is switched off. The control automati-
cally returns to its starting position.

If the gear selector for cars with an automatic
gearbox is not in position P or if the car rolls:

Turn the knob clockwise and hold it until the
car is switched off.

Related information

Starting the car (p. 410)

Ignition positions (p. 409)

Steering lock

The steering lock makes steering difficult if the
car is e.g. taken unlawfully. A mechanical noise
can be perceived when the steering lock locks
or unlocks.

Activating the steering lock

The steering lock is activated when the car is
locked from the outside and the engine is
switched off. If the car is left unlocked then the
steering lock will lock automatically after a while.

Deactivating the steering lock

The steering lock is deactivated when the car is
unlocked from outside. If the car is not locked,
the steering lock will deactivate if the remote
control key is inside the passenger compartment
and the car is started by turning the start knob
clockwise to unlock the steering lock.

Related information

Starting the car (p. 410)

Switching off the car (p. 412)

Steering wheel (p. 135)


Content   ..  21  22  23  24   ..