Volvo V90 Cross Country (2019 year). Instruction - part 27


  Index      Volvo     Volvo V90 Cross Country - instruction 2019 year in english


Search            


Content   ..  25  26  27  28   ..


Volvo V90 Cross Country (2019 year). Instruction - part 27


||

STARTING AND DRIVING

450

CAUTION

Engine damage could occur if water
enters the air cleaner.

If water enters the transmission, the lubri-
cating ability of the oils is reduced and
the service life of these systems is short-
ened.

Damage to any component, engine,
transmission, turbocharger, differential or
its internal components caused by flood-
ing, vapor lock or insufficient oil is not
covered under warranty.

If the engine stalls while the vehicle is in
water, do not attempt to restart it. Have
the vehicle towed out of the water to a
workshop. An authorized Volvo workshop
is recommended. Risk of engine failure.

CAUTION

Because it can be difficult to determine the
water depth, avoid driving through standing or
running water.

Related information

Recovery (p. 466)

Low Speed Control (p. 444)

Opening/closing the fuel filler door

The vehicle must be unlocked before the fuel
filler door can be opened

8

.

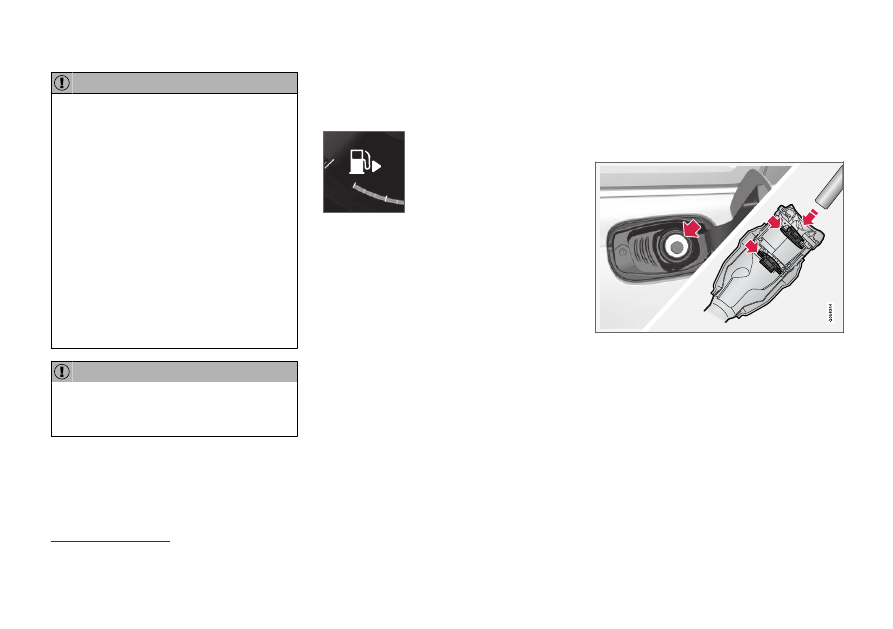
An arrow next to the fuel pump
symbol in the instrument panel
indicates the side of the vehicle
on which the fuel filler door is
located.

1. Open the fuel filler door by pressing lightly

on its rear edge.

2. After refueling, press the fuel filler door

lightly to close it.

Related information

Refueling (p. 450)

Refueling

The fuel tank is equipped with a fuel filling sys-
tem without a cover.

Refueling the vehicle at a service
station

Refueling is done as follows.

1. Turn off the engine and open the fuel filler

door.

2. Select a fuel approved for use in the vehicle.

For more information on approved fuels, see
the section on “Fuel”.

3. Insert the pump's nozzle into the fuel filler

pipe's opening. There are two flaps just
inside the fuel filler pipe and the pump's noz-
zle must push both of these flaps open
before fuel can be added.

8

Only locking and unlocking using the remote key, Passive Entry or Volvo On Call will affect the status of the fuel filler door.

STARTING AND DRIVING

}}

451

4. Avoid overfilling the tank. Do not press the

handle on the filler nozzle again after it has
initially stopped pumping.
> The fuel tank is now filled.

NOTE

An over-full tank may overflow in hot weather.

CAUTION

Avoid spilling gasoline during refueling. In
addition to causing damage to the environ-
ment, gasolines containing alcohol can cause
damage to painted surfaces, which may not
be covered under the New Vehicle Limited
Warranty.

Refueling from a fuel container

When filling from a fuel container, use the funnel
provided in a foam block under the floor hatch in
the cargo compartment.

1. Open the fuel filler door.

2. Insert the funnel into the fuel filler pipe's

opening. There are two flaps just inside the
fuel filler pipe and the tube section of the
funnel must push both of these flaps open
before fuel can be added.

WARNING

California Proposition 65

Operating, servicing and maintaining a pas-

senger vehicle can expose you to chemicals

including engine exhaust, carbon monoxide,

phthalates, and lead, which are known to the

State of California to cause cancer and birth

defects or other reproductive harm. To mini-

mize exposure, avoid breathing exhaust, do

not idle the engine except as necessary, serv-

ice your vehicle in a well ventilated area and

wear gloves or wash your hands frequently

when servicing your vehicle. For more infor-

mation go to www.P65Warnings.ca.gov/

passenger-vehicle.

Related information

Opening/closing the fuel filler door (p. 450)

Fuel (p. 451)

Fuel

Volvo recommends the use of detergent gaso-
line to control engine deposits.

Deposit control gasoline (gasoline with
detergent additives)

Detergent gasoline is effective in keeping injec-
tors and intake valves clean. Consistent use of
deposit control gasolines will help ensure good
driveability and fuel economy. If you are not sure
whether the gasoline contains deposit control
additives, check with the service station operator.

NOTE

Volvo recommends not using external fuel
injector cleaning systems, e.g. do not add
detergent additives to gasoline before or after
refueling.

Unleaded fuel

All Volvo vehicles have a three-way catalytic con-
verter and must only use unleaded gasoline. US
and Canadian regulations require that pumps
delivering unleaded gasoline are labeled
"UNLEADED". Only the nozzles of these pumps
will fit in your vehicle's fuel filler inlet. It is unlaw-
ful to dispense leaded fuel into a vehicle labeled
"unleaded gasoline only". Leaded gasoline dam-
ages the three-way catalytic converter and the
heated oxygen sensor system. Repeated use of
leaded gasoline will lessen the effectiveness of

||

STARTING AND DRIVING

452

the emission control system and could result in
loss of emission warranty coverage. State and
local vehicle inspection programs will make
detection of misfueling easier, possibly resulting
in emission test failure for misfueled vehicles.

NOTE

Some U.S. and Canadian gasolines contain an
octane enhancing additive called methyl-
cyclopentadienyl manganese tricarbonyl
(MMT). If such fuels are used, your Emission
Control System performance may be affected,
and the Check Engine Light (malfunction
indicator light) located on your instrument
panel may light. If this occurs, please return
your vehicle to a trained and qualified Volvo
service technician for service.

Gasoline containing alcohol and ethers,
"Oxygenated fuels"

Some fuel suppliers sell gasoline containing
"oxygenates" which are usually alcohols or
ethers. In some areas, state or local laws require
that the service pump be marked indicating use
of alcohols or ethers. However, there are areas in
which the pumps are unmarked. If you are not
sure whether there is alcohol or ethers in the
gasoline you buy, check with the service station
operator. To meet seasonal air quality standards,
some areas require the use of "oxygenated" fuel.

Volvo permits the use of the following "oxygen-
ated" fuels. However, the specified octane ratings
must still be met.

Alcohol - Ethanol

Fuels containing up to 10% ethanol by volume
may be used. Ethanol may also be referred to as
Ethyl alcohol, or "Gasohol".

Ethers - MTBE/ETBE: Fuels containing up to
22% MTBE/ETBE by volume may be used.

Methanol

Do not use gasolines containing methanol
(methyl alcohol, wood alcohol). This practice can
result in vehicle performance deterioration and
can damage critical parts in the fuel system. Such
damage may not be covered under the New
Vehicle Limited Warranty.

Related information

Octane rating (p. 452)

Opening/closing the fuel filler door (p. 450)

Refueling (p. 450)

Emission controls (p. 454)

Octane rating

Volvo requires premium fuel (91 octane

9

 or

higher) for all T5, T6 and T8 engines, and rec-
ommends AKI 93 for optimal performance and
fuel economy. See decal examples in illustra-
tions 1 and 2.

9

AKI (Anti Knock Index) is an average value of RON (Research Octane Number) and MON (Motor Octane Number) - (RON)+(MON)/2

STARTING AND DRIVING

}}

453

Minimum octane

Decals

Illustration 1: Sample fuel pump octane label

9

.

Illustration 2: Decal on the inside of the fuel filler flap on
vehicles that require premium fuel

10

.

TOP TIER Detergent Gasoline

Volvo endorses the use of "TOP TIER Detergent
Gasoline" where available to help maintain
engine performance and reliability. TOP TIER
Detergent Gasoline meets a new standard jointly
established by leading automotive manufactures
to meet the needs of today's advanced engines.
Qualifying gasoline retailers (stations) will, in
most cases, identify their gasoline as having met
the "TOP TIER Detergent Gasoline" standards.

NOTE

Information about TOP TIER Detergent Gaso-
line is available at www.toptiergas.com.

NOTE

When switching to higher octane fuel or
changing gasoline brands, it may be neces-
sary to fill the tank more than once before a
difference in engine operation is noticeable.

Fuel Formulations

Do not use gasoline that contains lead or manga-
nese as a knock inhibitor, and do not use lead
additives. Besides damaging the exhaust emis-
sion control systems on your vehicle, lead has
been strongly linked to certain forms of cancer.

Many fuels contain benzene as a solvent.
Unburned benzene has been strongly linked to
certain forms of cancer. If you live in an area
where you must fill your own gas tank, take pre-
cautions. These may include:

standing upwind away from the filler nozzle
while refueling

refueling only at gas stations with vapor
recovery systems that fully seal the mouth of
the filler neck during refueling

wearing neoprene gloves while handling a
fuel filler nozzle.

Use of Additives

With the exception of gas line antifreeze during
winter months, do not add solvents, thickeners, or
other store-bought additives to your vehicle's
fuel, cooling, or lubricating systems. Overuse may
damage your engine, and some of these additives
contain organically volatile chemicals. Do not
needlessly expose yourself to these chemicals.

WARNING

Never carry a cell phone that is switched on

while refueling your vehicle. If the phone rings,

this may cause a spark that could ignite gaso-

line fumes, resulting in fire and injury.

9

AKI (Anti Knock Index) is an average value of RON (Research Octane Number) and MON (Motor Octane Number) - (RON)+(MON)/2

10

For supplementary information - see the car's Service and Warranty Booklet.

||

STARTING AND DRIVING

454

WARNING

Carbon monoxide is a poisonous, colorless,

and odorless gas. It is present in all exhaust

gases. If you ever smell exhaust fumes inside

the vehicle, make sure the passenger com-

partment is ventilated, and immediately return

the vehicle to a trained and qualified Volvo

service technician for correction.

Demanding driving

In demanding driving conditions, such as when
towing a trailer or driving in hot weather or for
prolonged periods at high altitudes, it may be a
good idea to switch to a higher-octane fuel (AKI

9

91 or higher) or to switch to another brand of
gasoline in order to fully utilize the vehicle's
engine capacity and optimize traction.

Related information

Fuel (p. 451)

Emission controls (p. 454)

Emission controls

Three-way catalytic converter

Keep your engine properly tuned. Certain
engine malfunctions, particularly involving the
electrical, fuel or distributor ignition systems,
may cause unusually high three-way catalytic
converter temperatures. Do not continue to
operate your vehicle if you detect engine
misfire, noticeable loss of power or other
unusual operating conditions, such as engine
overheating or backfiring. A properly tuned
engine will help avoid malfunctions that
could damage the three-way catalytic con-
verter.

Do not park your vehicle over combustible
materials, such as grass or leaves, which can
come into contact with the hot exhaust sys-
tem and cause such materials to ignite under
certain wind and weather conditions.

Excessive starter cranking (in excess of one
minute), or an intermittently firing or flooded
engine can cause three-way catalytic con-
verter or exhaust system overheating.

Remember that tampering or unauthorized
modifications to the engine, the Engine Con-
trol Module, or the vehicle may be illegal and
can cause three-way catalytic converter or
exhaust system overheating. This includes:
altering fuel injection settings or compo-
nents, altering emission system components

or location or removing components, and/or
repeated use of leaded fuel.

NOTE

Unleaded fuel is required for vehicles with
three-way catalytic converters.

Heated oxygen sensors

The heated oxygen sensors monitor the oxygen
content of the exhaust gases. Readings are fed
into a control module that continuously monitors
engine functions and controls fuel injection. The
ratio of fuel to air into the engine is continuously
adjusted for efficient combustion to help reduce
harmful emissions.

Related information

Octane rating (p. 452)

Fuel (p. 451)

9

AKI (Anti Knock Index) is an average value of RON (Research Octane Number) and MON (Motor Octane Number) - (RON)+(MON)/2

STARTING AND DRIVING

455

Overheating of engine and

transmission

In demanding driving conditions, such as driving
in mountainous areas or hot weather, there is a
risk of the engine or transmission overheating,
especially when carrying heavy loads.

Engine power may be temporarily limited.

Remove any auxiliary lights mounted in front
of the grille when driving in hot weather.

If the temperature in the engine's cooling
system becomes too high, a warning symbol
will appear in the instrument panel along with
the message 

Engine temperature


High

temperature Stop safely

. Pull over to a

safe location and let the engine idle for a few
minutes to cool down.

If the message 

Engine temperature


High

temperature Turn off engine

 or 

Engine

coolant


Level low, turn off engine

 is dis-

played, stop the vehicle and turn off the
engine.

If the transmission begins to overheat, an
alternative gear shifting program will be
selected. An integrated protective function
will also be activated, the warning symbol will
illuminate and the message 

Transmission

warm


Reduce speed to lower

temperature

 or 

Transmission hot


Stop

safely, wait for cooling

 will be displayed in

the instrument panel. Follow the recommen-
dations given by reducing speed or stopping

the vehicle safely and letting the engine idle
for a few minutes to let the transmission
cool.

If the vehicle begins to overheat, the air con-
ditioning may be temporarily switched off.

After a prolonged period of driving in
demanding conditions, do not turn off the
engine immediately after stopping.

NOTE

It is normal for the engine's cooling fan to
operate for a short time after the engine is
switched off.

Symbols in the instrument panel

Symbol

Meaning

High engine temperature. Follow
the recommendations provided.

Low coolant level. Follow the rec-
ommendations provided.

Transmission hot/overheated/cool-
ing. Follow the recommendations
provided.

Related information

Refilling coolant (p. 603)

Driving with a trailer (p. 460)

Preparing for a long trip (p. 448)

STARTING AND DRIVING

456

Battery drain

The electrical functions in the vehicle drain the
battery to varying degrees. Avoid using ignition
mode II when the engine is switched off. Use
ignition mode I instead, as this uses less electri-
cal current.

Note that certain accessories may also drain
power from the electrical system. Do not use
functions that use a lot of electrical current when
the engine is turned off. Examples of such func-
tions are:

blower

headlights

windshield wipers

audio system (especially at high volume).

If the starter battery voltage is low, a message is
shown in the driver display. The vehicle's energy-
saving function will then turn off or reduce certain
functions, such as the blower and/or the audio
system.

Charge the battery by starting the engine
and let it run for at least 15 minutes (driving
charges the battery faster than letting the
engine idle).

Related information

Start battery (p. 612)

Ignition modes (p. 416)

Jump starting using another battery

If the start battery is discharged, current from
another battery can be used to start the vehicle.

Jumper cable connecting points.

To avoid short circuits or other damage, the fol-
lowing steps are recommended when jump star-
ting the battery using another battery:

1. Put the ignition in mode 0.

2. Make sure the auxiliary battery (the battery

used to jump start the discharged battery)
has a voltage of 12 volts.

3. If the auxiliary battery is in another vehicle,

turn off that vehicle's engine and make sure
that the vehicles are not touching each other.

4. Clamp the red jumper cable onto the auxiliary

battery's positive (+) terminal (1).

CAUTION

Connect the jump cable carefully to prevent
short circuits with other components in the
engine compartment.

5. Fold back the cover over your vehicle's posi-

tive (+) jump start terminal (2).

6. Clamp the other end of the red jumper cable

to your vehicle's positive (+) jump start termi-
nal (2).

7. Clamp the black jumper cable onto the auxili-

ary battery's negative (-) terminal (3).

8. Clamp the other end of the black jumper

cable to your vehicle's negative (-) ground
point (4).

9. Make sure the jumper cables are securely

attached to help prevent sparks while jump
starting.

10. Start the engine of the assisting vehicle and

let it run for a few minutes at a higher idling
speed than normal, about 1500 rpm.

STARTING AND DRIVING

}}

* Option/accessory.

457

11. Start the engine of the vehicle with the dead

battery.

CAUTION

Do not touch the connections between the
cable and the vehicle during the start attempt.
Risk of sparking.

12. Remove the jumper cables in the reverse

order 

‒ first the black cables and then the

red cables.

Make sure that none of the clamps of the
black jumper cables come into contact with
either vehicle's positive (+) jump start termi-
nals or either of the red jumper cable's con-
nected clamps.

WARNING

PROPOSITION 65 WARNING! Battery posts,

terminals, and related accessories contain

lead and lead compounds, chemicals known

to the state of California to cause cancer and

reproductive harm. Wash hands after han-

dling.

WARNING

Batteries generate hydrogen gas, which
is flammable and explosive.

Do not connect the jumper cable to any
part of the fuel system or to any moving
parts. Avoid touching hot manifolds.

Battery fluid contains sulfuric acid. Do not
allow battery fluid to contact eyes, skin,
fabrics or painted surfaces.

If contact occurs, flush the affected area
immediately with water. Obtain medical
help immediately if eyes are affected.

Never expose the battery to open flame
or electric spark. Do not smoke near the
battery. Failure to follow the instructions
for jump starting can lead to injury.

Related information

Starting the vehicle (p. 414)

Ignition modes (p. 416)

Adjusting the steering wheel (p. 201)

Selecting ignition mode (p. 417)

Retractable towbar*

The Volvo retractable towbar is specially
designed for the vehicle.

Overview

Weight decal

Ball cover

Safety wire attachment bracket

Trailer wiring socket

||

STARTING AND DRIVING

458

Folding out the towbar

1. Open the tailgate. There is a button for oper-

ating the towbar on the right rear side of the
cargo compartment. The indicator light in the
button must glow steadily orange for the
folding function to be active.

2. Press and release the button. Pressing too

long on the button may prevent the towbar
from folding out.
> The towbar will fold out partially and

become visible under the bumper. The
indicator light will flash orange.

NOTE

The towbar must complete the fold-out
sequence before it can be moved to the fixed
position. This sequence may take a few sec-
onds. If the towbar cannot be locked in the
fixed position, wait for a few seconds and try
again.

WARNING

Avoid standing close to the center of the rear

bumper while the towbar is folding out.

3. Pull up the towbar until it locks in the fixed

position. The indicator light in the button will
glow steadily orange. Remove the cover from
the towbar ball.
> The towbar is now ready for use.

WARNING

Be sure the towbar is securely locked in
position before attaching anything to it.

Always attach the trailer's safety wire
securely to the towbar's safety wire
attachment bracket.

STARTING AND DRIVING

459

NOTE

An energy-saving mode activates after a short
time and the indicator light will go out. Reacti-
vate the folding towbar function by closing
and then reopening the tailgate.

If the vehicle's electrical system has detected
an attached trailer, the indicator light will no
longer glow steadily.

Retracting the towbar

CAUTION

Be sure that no trailer wiring connector or
adapter is connected to the towbar's electri-
cal socket before retracting it.

1. Open the tailgate. Press the button for fold-

ing the towbar in and out on the right rear
side of the cargo compartment and release.
Pressing too long on the button may prevent
the towbar from folding in.
> The towbar will automatically fold down to

the unlocked position. The indicator light
in the button will flash orange.

WARNING

Never press the operating button if anything

is attached to the towbar.

2. Fix the towbar in the retracted position by

pushing it up under the bumper, where it will
lock in place.
> The indicator light in the button will glow

steadily orange if the towbar is correctly
locked in the retracted position.

Related information

Driving with a trailer (p. 460)

Towing capacity and tongue weight (p. 654)

STARTING AND DRIVING

460

Driving with a trailer

There are a number of things to consider when
towing a trailer, such as the towbar, the trailer
and how the load is distributed in the trailer.

Load-carrying capacity is determined by the vehi-
cle's curb weight. The total weight of all passen-
gers and any installed accessories, e.g. towbar,
reduces the vehicle's load-carrying capacity by
the corresponding amount.

Towbars used on the vehicle must be
approved for the applicable use.

Distribute the load on the trailer so that the
weight on the towbar complies with the
specified maximum towball weight. The
tongue weight is calculated as part of the
vehicle's payload.

Increase the tire pressure to the recom-
mended pressure for a full load.

The engine is subjected to more load than
usual when towing a trailer.

Towing a trailer affects the vehicle's han-
dling, durability and driving economy.

Do not drive with a heavy trailer when the
vehicle is very new. Wait until the mileage
has reached at least 1000 km (620 miles).

On long and steep downgrades, the vehicle's
brakes are subjected to much more load
than usual. When manually shifting, down-
shift and adapt speed accordingly.

Follow applicable regulations regarding per-
mitted speed and weight.

Drive slowly when towing a trailer up a long
and steep incline.

The maximum trailer weights given only apply
to altitudes up to 1000 meters (3280 feet)
above sea level. At higher altitudes, engine
power (and thus the vehicle's climbing ability)
is decreased due to the reduced air density,
and the maximum trailer weight must there-
fore be reduced. The weight of the vehicle
and trailer must be decreased by 10% for
each additional 1000 m (3280 feet) or part
thereof.

Avoid driving with a trailer on inclines of more
than 12%.

Avoid overloading and other incorrect use.

The trailer's brakes must be balanced with
the vehicle's brakes to help ensure safe
stops (follow applicable local regulations).

CAUTION

Bumper-attached trailer hitches must not
be used on Volvos, nor should safety
chains be attached to the bumper.

Trailer hitches attaching to the vehicle
rear axle must not be used.

Never connect a trailer's hydraulic brake
system directly to the vehicle brake sys-
tem, nor a trailer's lighting system directly
to the vehicle lighting system. Consult
your nearest authorized Volvo retailer for
correct installation.

When towing a trailer, the trailer's safety
chains or wire must be correctly fastened
to the attachment points provided in the
trailer hitch on the vehicle. The safety
chain or wire must never be fastened to
or wound around the towing ball.

NOTE

The optional detachable trailer hitch may not
be available in all markets or on all models.
Consult your Volvo retailer.

NOTE

Extreme weather conditions, towing a trailer,
driving at high altitudes and fuel quality are
factors that significantly increase a vehicle's
fuel consumption.

STARTING AND DRIVING

}}

* Option/accessory.

461

Trailer weights

WARNING

Please adhere to the recommendations provi-

ded for trailer weight. If the recommendations

are not followed, the vehicle and trailer may

be difficult to control during evasive maneu-

vers and braking.

NOTE

The specified maximum trailer weights are
those permitted by Volvo. National vehicle
regulations may set additional restrictions on
trailer weight and speed. The trailer hitches
may be certified for higher towing weights
than the vehicle is permitted to tow.

Self-leveling suspension*

The vehicle's self-leveling system attempts to
keep the vehicle at a constant level, regardless of
load (up to the maximum permitted weight).
When the vehicle is stationary, the rear end of the
vehicle will be slightly lowered, which is normal.

Driving in hilly terrain or hot weather

In certain conditions, there is a risk of overheat-
ing when driving with a trailer. If overheating of
the engine and drive system is detected, a warn-
ing symbol will illuminate in the instrument panel
along with a message.

The automatic transmission selects the optimal
gear for the current load and engine speed.

Steep inclines

Do not lock the automatic transmission into a
higher gear than what the engine can handle 

‒ it

is not always preferable to drive in high gears at
low rpm.

Parking on a hill

1. Depress the brake pedal.

2. Apply the parking brake.

3. Put the gear selector in P.

4. Release the brake pedal.

Put chocks behind the wheels when the vehicle
is parked on a hill with a trailer attached.

Starting on a hill

1. Depress the brake pedal.

2. Put the gear selector in D.

3. Release the parking brake.

4. Release the brake pedal and start driving.

Related information

Trailer Stability Assist* (p. 461)

Checking trailer lights (p. 462)

Towing capacity and tongue weight (p. 654)

Overheating of engine and transmission
(p. 455)

Trailer Stability Assist*

Trailer Stability Assist (TSA

11

) is a function

designed to help stabilize a vehicle that is tow-
ing a trailer when the vehicle and trailer have
begun to sway. The function is part of the Elec-
tronic Stability Control system ESC

12

.

Reasons for swaying

A vehicle towing a trailer may begin to sway for
various reasons. Normally this only occurs at high
speeds. However, if the trailer is overloaded or
unevenly distributed, e.g. too far back, there is a
risk of swaying even at low speeds.

Swaying may be caused by factors such as:

The vehicle and trailer are hit by a sudden,
strong crosswind.

The vehicle and trailer are traveling on an
uneven road or over a bump.

Sudden movements of the steering wheel.

Once swaying has begun, it can be difficult or
impossible to stop it. This makes the vehicle and
trailer difficult to control and there is a risk of
swerving into oncoming traffic or driving off the
road.

Trailer Stability Assist function

Trailer Stability Assist continuously monitors the
vehicle's movements, particularly lateral move-
ments. If swaying is detected, the brakes are

11

Trailer Stability Assist

||

STARTING AND DRIVING

462

applied individually on the front wheels, which has
a stabilizing effect on the vehicle and trailer. This
is often enough to enable the driver to regain
control of the vehicle.

If the Trailer Stability Assist function's first
attempt is not adequate to stop the swaying
motion, the brakes are applied on all wheels and
engine power is temporarily reduced. As the
swaying motion begins to decrease and the vehi-
cle and trailer have once again become stable,
TSA stops regulating the brakes/engine power
and the driver regains control of the vehicle.

NOTE

Trailer Stability Assist is deactivated if the
driver selects the sport mode by deactivating

ESC

 in the center display's menu system.

Trailer Stability Assist may not intervene if the
driver tries to compensate for the swaying motion
by moving the steering wheel rapidly, because
the system will then not be able to determine if it
is the trailer or the driver causing the swaying.

When Trailer Stability Assist is
activated, the ESC symbol is
displayed in the instrument
panel.

Related information

Driving with a trailer (p. 460)

Electronic Stability Control (p. 277)

Checking trailer lights

When connecting a trailer, make sure that all of
the lights on the trailer are functioning before
starting to drive.

Trailer turn signals and brake lights

If one or more of the turn signals or brake lights
on the trailer is not working, a symbol and mes-
sage will be displayed in the instrument panel.
The other lights on the trailer must be checked
manually by the driver before the vehicle is driven.

Symbol

Message

Trailer turn indicator


Right

turn indicator malfunction

Trailer turn indicator


Left

turn indicator malfunction

Trailer brake light


Malfunc-

tion

If any of the trailer's turn signal lights is not work-
ing, the turn signal symbol in the instrument
panel will also flash more quickly than normal.

Trailer rear fog light

When a trailer is connected, the vehicle's rear fog
light may not illuminate and rear fog light func-
tionality is instead transferred to the trailer. If this

12

Electronic Stability Control

STARTING AND DRIVING

}}

* Option/accessory.

463

is the case, check to see if the trailer is equipped
with a rear fog light before activating the vehicle's
fog lights when driving with a trailer to help
ensure safe operation.

Checking trailer lights*

Automatic check

When the trailer has been connected to the vehi-
cle's electrical system, its lights can be checked
by automatically activating them. This function
helps the driver check that the trailer's lights are
functioning correctly before starting to drive.

In order to perform this check, the engine must
be turned off.

1. When a trailer is connected to the towbar,

the message 

Automatic Trailer Lamp

Check

 will appear in the instrument panel.

2. Acknowledge the message by pressing the

O button on the right-side steering wheel
keypad.
> The light check will begin.

3. Get out of the vehicle to perform the check.

> All of the lights on the trailer will begin

flashing, and then illuminate separately
one at a time.

4. Visually check that all of the trailer's lights

are functioning correctly.

5. After a short time, all of the trailer's lights will

start flashing again.
> The light check is completed.

Disabling the automatic check

The automatic light check can be disabled in the
center display.

1. Tap 

Settings

 in the Top view.

2. Tap 

My Car

Lights and Lighting

.

3. Deselect 

Automatic Trailer Lamp Check

.

Manual check

If the automatic check has been disabled, the
check can be started manually.

1. Tap 

Settings

 in the Top view.

2. Tap 

My Car

Lights and Lighting

.

3. Select 

Manual Trailer Lamp Check

.

> The light check will begin. Get out of the

vehicle to perform the check.

Related information

Driving with a trailer (p. 460)

Towing using a towline

This section refers to one vehicle being towed
behind another using a towline.

Before towing another vehicle, check applicable
speed limit regulations.

Preparations and towing

CAUTION

Note that the vehicle must always be towed
with the wheels rolling forward.

Do not tow a vehicle with automatic
transmission at a speed greater than
80 km/h (50 mph) or for a distance
greater than 80 km (50 miles).

WARNING

Ignition mode II must be active – all air-
bags are deactivated in ignition mode I.

Always have the remote key in the vehicle
when it is towed.

WARNING

The brake and steering servos do not work

when the engine is off – it takes

about 5 times more pressure on the brake

pedal and steering requires much more effort

than normal.

||

STARTING AND DRIVING

464

1. Turn on the hazard warning flashers.

2. Attach the towline to the towing eyelet.

3. Put the vehicle in ignition mode II – without

pressing the brake pedal, turn the start knob
clockwise and hold it there for about
4 seconds. Release the knob, which will
automatically return to its original position.

4. Move the gear selector to neutral and

release the parking brake.

If the battery charge level is too low, it may
not be possible to release the parking brake.
Connect an auxiliary battery to the vehicle if
the battery is discharged.
> The towing vehicle can now start driving.

5. Keep the towline taut when the towing vehi-

cle slows down by applying light pressure to
the brake pedal. This will help avoid jarring
movements.

6. Be prepared to apply the brakes to stop the

vehicle.

Jump starting

Do not tow the vehicle to start the engine. Use an
auxiliary battery if the start battery's charge level
is so low that the engine cannot be started.

CAUTION

Attempting to tow with the engine running
could result in damage to the three-way cata-
lytic converter.

Related information

Attaching and removing the towing eyelet
(p. 464)

Hazard warning flashers (p. 163)

Recovery (p. 466)

Jump starting using another battery (p. 456)

Selecting ignition mode (p. 417)

Attaching and removing the towing

eyelet

Use the towing eyelet when towing. Screw the
towing eyelet securely into place in the threaded
outlet behind the cover on the right-hand side of
the front and rear bumpers.

NOTE

If the vehicle is equipped with a towbar, there
is no rear attachment for the towing eye.

Attaching the towing eyelet

Take out the towing eyelet, which is stored in
a foam block under the floor in the cargo
compartment.

STARTING AND DRIVING

}}

* Option/accessory.

465

Front: Remove the cover by pressing on the
mark with a finger.
> The cover turns along its center line and

can then be removed.

Rear: Remove the cover - press the marker
with your finger while prying open the oppo-
site side/corner open with a coin or similar.
> The cover turns along its center line and

can then be removed.

4. Screw in the towing eyelet until it reaches its

stop.

Fasten the eyelet securing by, for example,
inserting a lug wrench* through it and using
this as a lever.

CAUTION

It is important that the towing eye is screwed
in securely as far as possible.


Content   ..  25  26  27  28   ..