Volvo XC60 Twin Engine (2019 year). Instruction - part 8


  Index      Volvo     Volvo XC60 Twin Engine - instruction 2019 year in english


Search            


Content   ..  6  7  8  9   ..


Volvo XC60 Twin Engine (2019 year). Instruction - part 8


DISPLAYS AND VOICE CONTROL

}}

* Option/accessory.

145

Calibrating the horizontal position

If the windshield or display unit has been
replaced, the head-up display's horizontal posi-
tion may need to be calibrated. Calibration means
that the projected image is rotated clockwise or
counterclockwise.

1. Tap 

Settings

 in the center display's Top

view.

2. Select 

My Car

Displays

Head-Up

Display Options

Head-Up Display

Calibration

.

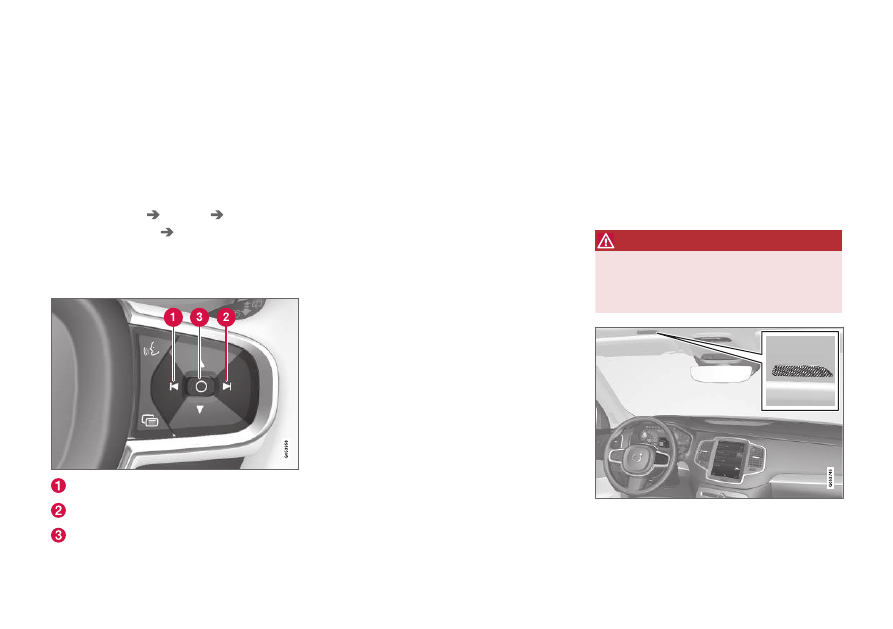
3. Calibrate the horizontal position of the image

using the right-side steering wheel keypad.

Rotate counterclockwise

Rotate clockwise

Confirm

Related information

Head-up display* (p. 142)

Activating and deactivating the head-up dis-
play* (p. 143)

Driver profiles (p. 136)

Storing positions for seats, mirrors and head-
up display* (p. 186)

Voice control

15

The driver can use voice commands to control
certain functions in the media player, a
Bluetooth-connected phone, the climate system
and the Volvo navigation system*.

Voice commands offer extra convenience and
help minimize distractions so drivers can concen-
trate on driving and keep their attention on the
road and traffic situation.

WARNING

The driver is always responsible for ensuring

that the vehicle is operated in a safe manner

and that all applicable traffic regulations are

followed.

Voice control microphone

Voice control is carried out as a dialog, with spo-
ken commands from the user and verbal respon-

||

DISPLAYS AND VOICE CONTROL

* Option/accessory.

146

ses from the system. The voice control system
uses the same microphone as devices connected
with Bluetooth, and the voice control system
responds through the vehicle's loudspeakers. In
certain cases, text messages will also be dis-
played in the instrument panel. The functions are
controlled using the right-side steering wheel
keypad and settings are made in the center dis-
play.

System updates

The voice control system is continuously
improved. For optimal functionality, always down-
load the latest update at support.volvocars.com.

Related information

Using voice commands (p. 146)

Voice control for cellular phones (p. 147)

Voice control for radio and media (p. 148)

Climate control system voice commands
(p. 201)

Voice control settings (p. 148)

Using voice commands

16

Press the button for voice con-
trol 

 on the right-side

steering wheel keypad to acti-
vate the system and initiate a
voice command dialog.

These may include:

Wait until after the tone, and then speak in
your normal voice at a normal speed.

Do not speak while the system is responding
(the system is unable to process commands
during this time).

Avoid background noises in the passenger
compartment by keeping doors, windows and
the panoramic roof* closed.

Voice control can be canceled by:

saying "

Cancel

".

pressing and holding the steering wheel key-
pad's voice command button 

.

To speed up the voice command dialog and skip
system responses, press the voice command but-
ton 

 while the system is responding and give

your next command.

Voice command examples

Press 

, say "

Call [First name]


[Last name]

[number category]

" - calls the selected contact

from the phone book. If the contact has several
phone numbers (e.g. home, cell, work), the right
category must also be given.

Press 

 and say "

Call Robyn


Smith

cellular

".

Commands/phrases

The following commands can always be used:

"

Repeat

" - repeats the most recent voice

command in the current dialog.

"

Cancel

" - cancels the dialog.

"

Help

" - initiates a help dialog. The system

responds with commands that can be used
in the current situation, an instruction or an
example.

Commands for specific functions, such as phone
and audio, are described in the sections related
to that function.

15

Certain markets only.

16

Certain markets only.

DISPLAYS AND VOICE CONTROL

* Option/accessory.

147

Numbers

Number commands can be given in different
ways depending on the function to be controlled:

Phone numbers and zip codes should be
given by stating each number individually, e.g.
zero three one two two four four three
(03122443).

Addresses can be given by stating each
number individually or in a group, e.g. two two
or twenty-two (22). For English and Dutch
language settings, groups of numbers can
also be said in sequence, e.g. twenty-two
twenty-two (22 22). For English, double or
triple digits can also be used, e.g. double
zero (00). Numbers in the range 0-2300 can
be used.

Frequencies can be given as ninety-eight
point eight (98.8), one hundred four point
two, or hundred four point two (104.2).

Related information

Voice control (p. 145)

Voice control for cellular phones (p. 147)

Voice control for radio and media (p. 148)

Climate control system voice commands
(p. 201)

Voice control settings (p. 148)

Voice control for cellular phones

17

Call a contact in the phone book, have a text
message read aloud or dictate short messages
using voice commands to a Bluetooth-con-
nected phone.

To access a contact in the phone book, the voice
command must contain the contact information
entered in the phone book. If a contact, e.g.

Robyn Smith

, has several phone numbers listed

in the phone book, a number category such as

home

 or 

cellular

 can also be specified, i.e. "

Call

Robyn


Smith


cellular

".

Tap 

 and say one of the following commands:

"

Call [contact]

" - call the selected contact

from the phone book.

"

Call


[phone number]

" - call a phone num-

ber.

"

Recent calls

" - display the list of recent

calls.

"

Read message

" - read a text message

aloud. If there are several messages, select
the message to read aloud.

"

Message to [contact]

" - the user is

prompted to dictate a short message. The
message will then be read aloud and the
user can choose to send

18

 or re-dictate the

message. The vehicle must be connected to
the Internet to access this function.

Related information

Voice control (p. 145)

Using voice commands (p. 146)

Voice control for radio and media (p. 148)

Climate control system voice commands
(p. 201)

Voice control settings (p. 148)

Internet-connected vehicle* (p. 537)

17

Certain markets only.

18

Only certain phones can send messages via the vehicle. For additional information on compatibility, see support.volvocars.com.

DISPLAYS AND VOICE CONTROL

* Option/accessory.

148

Voice control for radio and media

19

Voice commands for the radio and media play-
ers are shown below.

Tap 

 and say one of the following commands:

"

Media

" - initiates a dialog for media and

radio and displays examples of commands.

"

Play


[artist]

" - plays music by the selected

artist.

"

Play


[song title]

" - plays the selected

song.

"

Play


[song title]


from


[album]

" - plays

the selected song from the selected album.

"

Play


[radio station]

" - starts the selected

radio station.

"

Tune to [frequency]

" - tunes to the

selected radio frequency in the currently
active waveband. If no radio source is active,
the FM band will be started as default.

"

Tune to [frequency]


[waveband]

" - tunes

to the selected radio frequency on the
selected waveband.

"

Radio

" - starts FM radio.

"

Radio FM

" - starts FM radio.

"

SiriusXM

" - starts SiriusXM radio*

"

CD

" - starts playback from CD*.

"

USB

" - starts playback from USB.

"

iPod

" - starts playback from iPod.

"

Bluetooth

" - starts playback from a Blue-

tooth-connected media source.

"

Similar music

" - plays music from a USB-

connected device with music similar to that
currently playing.

Related information

Voice control (p. 145)

Using voice commands (p. 146)

Voice control for cellular phones (p. 147)

Climate control system voice commands
(p. 201)

Voice control settings (p. 148)

Voice control settings

20

Settings for the voice control system are made
here.

Settings

System

Voice Control

Settings can be personalized in the following
areas:

Repeat Voice Command

Gender

Speech Rate

Sound settings

Select sound settings under:

Settings

Sound

System Volumes

Voice Control

Language settings

The voice control system is not available for all
languages. The languages available for voice
commands are indicated by the 

 icon in the

list of languages.

Changing the language here will also change the
language in the menus, messages and help texts.

Settings

System

System Languages

and Units

System Language

19

Certain markets only.

LIGHTING

LIGHTING

* Option/accessory.

152

Lighting panel and controls

The lighting panel and controls can be used to
adjust both exterior and interior lighting. The
lighting ring on the left-side steering wheel lever
can be used to activate and adjust the exterior
lighting. The brightness of the interior lighting
can be adjusted using the thumb wheel on the
dashboard.

Exterior lighting

Lighting ring position.

When the vehicle's ignition is in mode II, the
lighting ring positions have the following func-
tions:

Position

Meaning

US: Daytime running lights and
parking lights are off.

Canada: Daytime running lights and
parking lights are on.

High beam flash can be used.

Parking lights when the vehicle is
parked.

US: Daytime running lights are off.

Canada: Daytime running lights are
on.

High beam flash can be used.

Low beams and parking lights.

High beams can be activated.

High beam flash can be used.

Position

Meaning

Daytime running lights and parking
lights in daylight conditions.

A

Low beams and parking lights in
weak daylight or dark conditions or
when the front fog lights* and/or
rear fog light are activated.

Active high beam can be activated.

High beams can be activated when
low beams are on.

High beam flash can be used.

Active high beams on/off.

A

US models only: Daytime running lights and parking lights can

be deactivated in the center display.

NOTE

Volvo recommends use of Daytime Running
Lights in the US. Its use is mandatory in Can-
ada.

Volvo recommends using position 

 when

the vehicle is in motion.

LIGHTING

* Option/accessory.

153

WARNING

The vehicle lighting system cannot in all situa-

tions determine when the daylight is too weak

or not strong enough, e.g. when there is fog

or rain.
The driver is always responsible for driving the

vehicle with lighting that is safe for the traffic

conditions and as specified by applicable traf-

fic regulations.

Thumbwheel in instrument panel

Thumb wheel (to the left) for adjusting interior bright-
ness.

Related information

Adjusting light functions via the center dis-
play (p. 153)

Interior Lighting (p. 162)

Parking lights (p. 154)

Using turn signals (p. 158)

Using high beam (p. 156)

Low beams (p. 155)

Rear fog light (p. 159)

Active Bending Lights* (p. 159)

Brake lights (p. 160)

Emergency brake lights (p. 160)

Hazard warning flashers (p. 161)

Adjusting light functions via the

center display

A number of light functions can be adjusted and
activated via the center display. These include
active high beams, home safe lighting and
approach lighting.

1. Tap 

Settings

 in the Top view.

2. Tap 

My Car

Lights and Lighting

.

3. Select 

Exterior Lights

 or 

Interior Lighting

and then the function that you would like to
adjust.

Related information

Lighting panel and controls (p. 152)

Active high beam (p. 157)

Using home safe lighting (p. 161)

Welcome Light (p. 161)

Using turn signals (p. 158)

Changing settings in the center display's Top
view (p. 132)

Function view in the center display (p. 122)

LIGHTING

154

Parking lights

The parking lights can be used to help other
road users see the vehicle if it is stopped or
parked. Use the lighting ring on the steering
wheel lever to turn on the parking lights.

Lighting ring in the parking light position.

Turn the lighting ring to the 

 position to

turn on the parking lights (the license plate light-
ing will also illuminate).

Canadian models: If the ignition is in the II posi-
tion, the daytime running lights will illuminate
instead of the front parking lights. With the light-
ing ring in this position, the parking lights will
remain on regardless of what position the ignition
is in.

US models: When 

 mode is selected, the

daytime running lights can be deactivated in the
center display. The parking lights will also be

deactivated. In weak daylight or dark conditions,
the parking lights and low beams will be illumi-
nated.

In dark conditions, the rear parking lights also
illuminate when the tailgate is opened to alert fol-
lowing traffic. This happens regardless of what
position the lighting ring or ignition is in.

Related information

Lighting panel and controls (p. 152)

Ignition modes (p. 433)

Daytime running lights

The vehicle has sensors that detect ambient
lighting conditions. With the lighting ring in the

 position, the daytime running lights will

always be activated when the ignition is in mode
II. In weak daylight or dark conditions, the head-
lights automatically switch to low beams.

Lighting ring in AUTO position.

LIGHTING

}}

* Option/accessory.

155

With the steering wheel lever's lighting ring in the

 position, the daytime running lights (DRL

1

)

will illuminate when the vehicle is driven in day-
light conditions. The headlights will switch auto-
matically from daytime running lights to low
beams in weak daylight or dark conditions. The
headlights will also switch to low beams if the
front fog lights* and/or rear fog light are acti-
vated.

US models: When 

 mode is selected, the

daytime running lights can be deactivated in the
center display. The parking lights will also be
deactivated. In weak daylight or dark conditions,
the parking lights and low beams will be illumi-
nated.

US models: With the lighting ring in the 
or 

 position, the daytime running lights will

be off.

Canadian models: With the lighting ring in the

 or 

 position, the daytime running

lights will be on.

NOTE

Volvo recommends use of Daytime Running
Lights in the US. Its use is mandatory in Can-
ada.

WARNING

The system is an energy saving aid – it cannot

in all situations determine when the daylight is

too weak or not strong enough, e.g. when

there is fog or rain.
The driver is always responsible for driving the

vehicle with lighting that is safe for the traffic

conditions and as specified by applicable traf-

fic regulations.

Related information

Lighting panel and controls (p. 152)

Ignition modes (p. 433)

Low beams (p. 155)

Low beams

When driving with the lighting ring in the 
position, low beam will be automatically acti-
vated in weak daylight or dark conditions, when
the ignition is in the II position.

Lighting ring in AUTO position.

With the lighting ring in the 

 position, the

low beams will also be automatically activated if
the rear fog light is activated.

With the lighting ring in the 

 position, low

beams will always be on when the ignition is in
the II position.

1

Daytime Running Lights

||

LIGHTING

156

Tunnel detection

The vehicle will detect if it enters a tunnel and
shift from daytime running lights to low beams.

Note that the left-hand steering wheel lever must
be in 

 position for tunnel detection to work.

Related information

Lighting panel and controls (p. 152)

Ignition modes (p. 433)

Daytime running lights (p. 154)

Using high beam

High beam is operated via the left-hand steering
wheel lever. High beam is the vehicle's strongest
lighting and should be used when driving in dark
conditions, provided it does not blind other road
users, to improve visibility.

Steering wheel lever with lighting ring.

High beam flash

Move the steering wheel lever slightly back-
ward to the high beam flash mode. The high
beams will illuminate until the lever is
released.

High beams

The high beams can be activated when the
lighting ring is in mode 

2

 or 

.

Activate high beams by moving the steering

wheel lever forward. Deactivate by moving
the steering wheel lever backward.

When the high beams are activated, the 
symbol will be illuminated in the instrument panel.

Related information

Lighting panel and controls (p. 152)

Active high beam (p. 157)

2

When the low beams are on.

LIGHTING

}}

* Option/accessory.

157

Active high beam

Active high beams is a function that uses cam-
era sensors in the upper edge of the windshield
to detect the headlights of approaching vehicles
or the taillights of the vehicle directly ahead.
When either of these is detected, the vehicle's
headlights will automatically switch from high
beams to low beams.

Active high beam is enabled by moving the lighting ring
on the steering wheel lever to 

.

The function can also detect street lighting.
When the camera sensor no longer detects an
approaching vehicle or a vehicle ahead, the head-
lights will return to high beams.

This function can be used in dark conditions
when the vehicle's speed is approx. 20 km/h
(approx. 12 mph) or higher.

If active high beams are deactivated when the
high beams are on, the headlights will automati-
cally switch to low beams.

When active high beams are activated, a white

 symbol will be displayed in the instrument

panel.

When high beams are on, the symbol will be blue.
For LED headlights, this applies even if the high
beams are partially dimmed, i.e. if the headlights
are illuminated with slightly more than low beams.

Vehicles with LED

3

 headlights*

If the active high beams are equipped with the
auto on/off function

4

, the headlights will return to

high beams a second or so after the camera sen-
sor no longer detects the headlights of approach-
ing vehicles or the taillights of a vehicle ahead.

Limitations for active high beams

The camera sensor on which the function is
based has limitations.

If this symbol and the message 

Active

High Beam


Temporarily

unavailable

 is displayed in the instru-

ment panel, switching between high

and low beams must be done manually. The light-
ing ring on the steering wheel lever can remain in
the 

 position. The 

 symbol will go out

when the message is displayed.

The same applies if this symbol along
with the message 

Windscreen

sensor


Sensor blocked, see

Owner's manual

 is displayed.

Active high beams may be temporarily unavailable
in certain situations, e.g. heavy fog or rain. When
active high beams become available again, or the
windshield sensors are no longer blocked, the
message will disappear and the 

 symbol will

be displayed.

WARNING

Automatic high beam is an aid in using the

best possible light based on prevailing condi-

tions.
The driver is always responsible for manually

switching between high and low beam when

traffic situations or weather conditions require

this.

3

LED (Light Emitting Diode)

4

Depends on the vehicle's equipment level.

||

LIGHTING

158

Related information

Lighting panel and controls (p. 152)

Using high beam (p. 156)

Camera limitations (p. 332)

Using turn signals

The vehicle's turn signals are controlled using
the left-side steering wheel lever. The turn sig-
nals flash three times or continuously, depend-
ing on how far up or down the lever is moved.

Turn signals.

Triple flash indicator

Move the steering wheel lever up or down to
the first position and release. The turn sig-
nals will flash three times. If the function is
deactivated via the center display, the signals
will flash once.

NOTE

This automatic flashing sequence can be
interrupted by immediately moving the
lever in the opposite direction.

If the turn signal indicator flashes more
quickly than normal, refer to the message
in the instrument panel.

Continuous flashing sequence

Move the lever up or down as far as possible.

The lever will stop in its end position and can be
moved back manually or automatically by moving
the steering wheel.

Related information

Hazard warning flashers (p. 161)

Adjusting light functions via the center dis-
play (p. 153)

LIGHTING

}}

* Option/accessory.

159

Active Bending Lights*

Active Bending Lights (ABL) are designed to
help provide maximum illumination in curves and
intersections. Depending on equipment level,
vehicles with LED

5

 headlights* may be equipped

with Active Bending Lights.

Headlight pattern with function deactivated (left) and
activated (right).

Active Bending Lights follow the movement of
the steering wheel to help provide maximum illu-
mination in curves and intersections, helping to
improve visibility for the driver.

The function is automatically activated when the
engine is started. If a fault is detected in the sys-
tem, the 

 symbol will illuminate in the

instrument panel and a message will be dis-
played.

The function is only active in weak daylight or
dark conditions and only when the vehicle is mov-
ing and the low beams are on.

Deactivating/activating the function

The function is activated as the default factory
setting and can be activated and deactivated in
the center display's Function view:

Tap the 

Active Bending

Lights

 button.

Related information

Adjusting light functions via the center dis-
play (p. 153)

Rear fog light

The rear fog light is considerably brighter than
ordinary taillights and should only be used to
help other road users see the vehicle when visi-
bility is reduced by conditions such as fog,
snow, smoke or dust.

Rear fog light button.

The rear fog light consists of a light on the rear
of the vehicle on the driver's side.

The rear fog light can only be switched on when
the ignition is in II mode and the lighting ring is in
position 

 or 

.

Press the button for On/Off. The 

 symbol in

the instrument panel illuminates when the rear
fog light is on.

5

LED (Light Emitting Diode)

||

LIGHTING

160

The rear fog light turns off automatically when
the ignition is switched off or when the steering
wheel lever lighting ring is in position 

 or

.

NOTE

Regulations concerning rear fog light use vary
from country to country.

Related information

Lighting panel and controls (p. 152)

Ignition modes (p. 433)

Brake lights

The brake lights are automatically illuminated
when braking.

The brake lights illuminate when the brake pedal
is depressed. They also illuminate when the
brakes are automatically applied by one of the
driver support systems.

Related information

Emergency brake lights (p. 160)

Brake functions (p. 434)

Emergency brake lights

The emergency brake lights are activated to
warn following vehicles of hard braking.

This function causes an additional taillight on
each side of the vehicle to illuminate.

The emergency brake lights are activated in the
event of hard braking or if the ABS system is
activated and the vehicle is traveling at a high
speed.

After the driver decelerates to a low speed and
then releases the brake, the brake lights resume
their normal brightness.

Related information

Brake lights (p. 160)

Brakes (p. 435)

Hazard warning flashers (p. 161)


Content   ..  6  7  8  9   ..