Volkswagen Golf / Golf GTI / Golf Variant. Manual - part 928


  Index      Volkswagen     Volkswagen Golf / Golf GTI / Golf Variant - service repair manual 2013 year


Search            copyright infringement  


Content   ..  926  927  928  929   ..


Volkswagen Golf / Golf GTI / Golf Variant. Manual - part 928


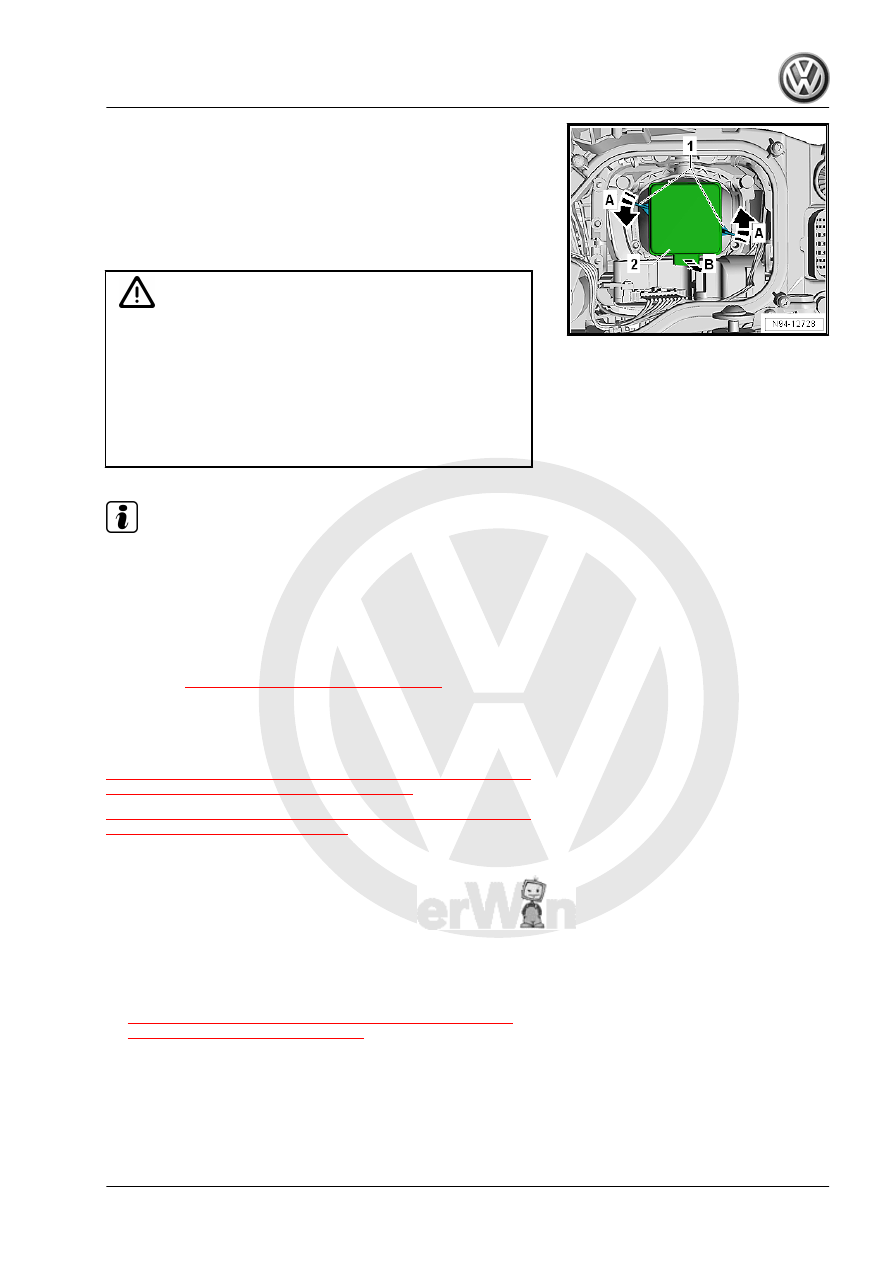
– Turn the locking mechanism -1- in the direction of the

-arrow A-.

– Remove the HID headlamp bulb -2- in the direction of the

-arrow B- from the housing.

Installing
Install in the reverse order of removal while paying attention to

the following:

Caution

There is a risk of damaging the headlamp.

♦ Do not touch glass cone of bulb with bare fingers. Fingers

will leave traces of grease on the glass which, when the

bulb is switched on, will evaporate and cloud the glass.

♦ Use clean cloth gloves to insert the bulbs.
♦ During installation, ensure proper seating of the housing

cover. Water getting in the headlamp will cause damage.

Note

Installation position: the electrical connection faces down.

– Perform a function test.
– Check and correct headlamp adjustment, if necessary. Refer

to ⇒ Maintenance ; Booklet  36.1 ; Procedure Descriptions .

Tightening Specifications
♦ Refer to 

⇒ “1.1 Overview - Headlamp”, page 92

1.12

Left/Right Position Lamp Bulb - M1- / -

M3- , Removing and Installing

⇒ “1.12.1 Left/Right Position Lamp Bulb M1 / M3 , Removing and

Installing, Halogen Dual Headlamp”, page 117
⇒ “1.12.2 Left/Right Position Lamp Bulb M1 / M3 , Removing and

Installing, HID Headlamp”, page 118

1.12.1

Left/Right Position Lamp Bulb - M1- / -

M3- , Removing and Installing, Halogen

Dual Headlamp

The Left Position Lamp Bulb - M1- and the Right Position Lamp

Bulb - M3- is integrated in the Left High Beam Headlamp Bulb -

M30- and in the Right High Beam Headlamp Bulb - M32- .
– Left/Right High Beam Headlamp Bulb -M30- / -M32- , Remov‐

ing and installing. Refer to

⇒ “1.10 Left/Right High Beam Headlamp Bulb M30 / M32 ,

Removing and Installing”, page 114

 .

1.12.2

Left/Right Position Lamp Bulb - M1- / -

M3- , Removing and Installing, HID

Headlamp

The Left Position Lamp Bulb - M1- and the Right Position Lamp

Bulb - M3- is integrated in the Left Daytime Running Lamp Bulb -

L174- and in the Right Daytime Running Lamp Bulb - L175- .
– Daytime Running Lamp Bulb -L174- / -L175- , Removing and

installing. Refer to

⇒ “1.13.2 Left/Right Daytime Running Lamp Bulb L174 / L175 ,

Removing and Installing, HID Headlamp”, page 118

 .

1.13

Left/Right Daytime Running Lamp Bulb

- L174- / -L175- , Removing and Instal‐

ling

⇒ “1.13.1 Left/Right Daytime Running Lamp Bulb L174 / L175 ,

Removing and Installing, Halogen Dual Headlamp”, page 118
⇒ “1.13.2 Left/Right Daytime Running Lamp Bulb L174 / L175 ,

Removing and Installing, HID Headlamp”, page 118

1.13.1

Left/Right Daytime Running Lamp Bulb

- L174- / -L175- , Removing and Instal‐

ling, Halogen Dual Headlamp

The Left Daytime Running Lamp Bulb - L174- and the Right Day‐

time Running Lamp Bulb - L175- is integrated in the Left High

Beam Headlamp Bulb - M30- and in the Right High Beam Head‐

lamp Bulb - M32- .
– Left/Right High Beam Headlamp Bulb -M30- / -M32- , Remov‐

ing and installing. Refer to

⇒ “1.10 Left/Right High Beam Headlamp Bulb M30 / M32 ,

Removing and Installing”, page 114

 .

1.13.2

Left/Right Daytime Running Lamp Bulb

-L174- / -L175- , Removing and Instal‐

ling, HID Headlamp

The removal and installation is described for the left side. Re‐

moving and installing on the right side is identical.
The Left Daytime Running Lamp Bulb - L174- and the Right Day‐

time Running Lamp Bulb - L175- has the function of the Left

Position Lamp Bulb - M1- and the Right Position Lamp Bulb - M3- .
Removing
– Turn off the ignition and all electrical equipment.
– Remove the ignition key, if equipped.
– Turn the housing cover -1- in the direction of the -arrow A- and

remove from the headlamp.

– Remove the Left Daytime Running Lamp Bulb - L174- on the

handle -1- in the direction of the -arrow A- rearward from the

reflector.

– Remove the Left Daytime Running Lamp Bulb - L174- from the

handle.

Installing
Install in the reverse order of removal while paying attention to

the following:

Caution

There is a risk of damaging the headlamp.

♦ Do not touch glass cone of bulb with bare fingers. Fingers

will leave traces of grease on the glass which, when the

bulb is switched on, will evaporate and cloud the glass.

♦ Use clean cloth gloves to insert the bulbs.
♦ During installation, ensure proper seating of the housing

cover. Water getting in the headlamp will cause damage.

– Perform a function test.
– Check and correct headlamp adjustment, if necessary. Refer

to ⇒ Maintenance ; Booklet  36.1 ; Procedure Descriptions .

1.14

Left/Right Daytime Running Lamp and

Position Lamp LED Module - L176- / -

L177- , Removing and Installing

The Left Daytime Running Lamp and Position Lamp LED Module

- L176- / Right Daytime Running Lamp and Position Lamp LED

Module - L177- is only installed with HID headlamps.
The daytime running lamp and position lamp bulbs are LED lamps

and are integrated in the headlamp. Changing the LEDs is not

possible. The headlamp must be completely replaced.
– Headlamps, Removing and installing. Refer to

⇒ “1.2 Headlamp, Removing and Installing”, page 101

 .

1.15

Left/Right Low Beam Headlamp Reflec‐

tor Motor -V294- / -V295- , Removing

and Installing

The Left Low Beam Headlamp Reflector Motor - V294- / Right

Low Beam Headlamp Reflector Motor - V295- is only installed with

HID headlamps without cornering lamps.
The low beam headlamp reflector motor sits in the headlamp and

cannot be replaced separately if it is faulty.
– Headlamps, Removing and installing. Refer to

⇒ “1.2 Headlamp, Removing and Installing”, page 101

 .

1.16

Left/Right Cornering Lamp Bulb - L148- /

-L149- , Removing and Installing

The Left Cornering Lamp Bulb - L148- / Right Cornering Lamp

Bulb - L149- is only installed with HID headlamps.
The removal and installation is described for the left side. Re‐

moving and installing on the right side is identical.
Removing
– Turn off the ignition and all electrical equipment.
– Remove the ignition key, if equipped.

– Turn the housing cover -1- in the direction of the -arrow A- and

remove from the headlamp.

– Push upward in the direction of the -arrow A- on the bulb sock‐

et -1-.

– Remove the bulb socket -1- from the reflector -2-.

– Disconnect the connector.
Installing
Install in the reverse order of removal while paying attention to

the following:

Caution

There is a risk of damaging the headlamp.

♦ Do not touch glass cone of bulb with bare fingers. Fingers

will leave traces of grease on the glass which, when the

bulb is switched on, will evaporate and cloud the glass.

♦ Use clean cloth gloves to insert the bulbs.
♦ During installation, ensure proper seating of the housing

cover. Water getting in the headlamp will cause damage.

– Perform a function test.
– Check and correct headlamp adjustment, if necessary. Refer

to ⇒ Maintenance ; Booklet  36.1 ; Procedure Descriptions .

1.17

Left/Right HID Headlamp Control Mod‐

ule - J343- / -J344- , Removing and In‐

stalling

The removal and installation is described for the left side. Re‐

moving and installing on the right side is identical.

WARNING

High voltage poses a life-endangering risk, injury risk and en‐

vironmental hazard.

♦ Pay attention to usage and safety information for HID

headlamps. Refer to

⇒ “1.3 HID Headlamps Usage and Safety Precautions”,

page 2

 .

♦ It is necessary to disconnect the battery wire strap before

working on HID headlamp components. These parts are

marked with yellow high voltage symbols.

Removing
– Turn off the ignition and all electrical equipment.
– Remove the ignition key, if equipped.


Content   ..  926  927  928  929   ..