Volkswagen Golf / Golf GTI / Golf Variant. Manual - part 918


  Index      Volkswagen     Volkswagen Golf / Golf GTI / Golf Variant - service repair manual 2013 year


Search            copyright infringement  


Content   ..  916  917  918  919   ..


Volkswagen Golf / Golf GTI / Golf Variant. Manual - part 918


8 - Spacer

❑ Quantity: 3

3.2

Wiper Blade, Removing and Installing

Caution

Risk of damaging the wiper blade.

♦ Joint-free windshield wipers are very flexible. Only take

hold of the wiper blades in the wiper blade mounting area

in order to lift them away from the rear window.

Removing
– Remove the wiper arm from the rear window.
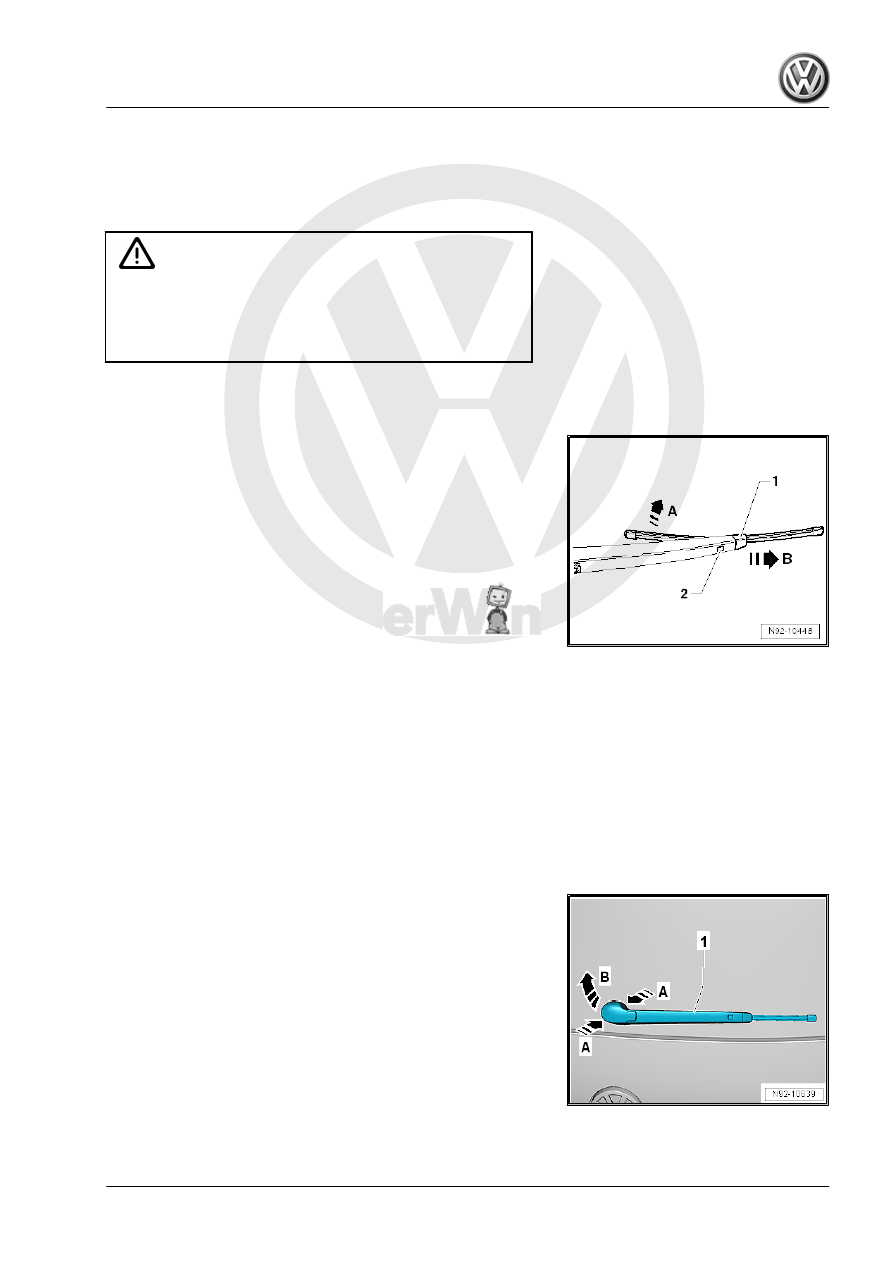
– Pivot the wiper blade in the direction of -arrow A- from the

windshield wiper arm.

– Push the release button -2-.
– Remove the wiper blade on the wiper blade mount -1- in the

direction of - arrow B- from the windshield wiper arm.

Installing
Install in the reverse order of removal while paying attention to

the following:
The wiper blade must audibly engage in the wiper arm.

3.3

Windshield Wiper Arm, Removing and

Installing

Special tools and workshop equipment required
♦ Puller - Wiper Arm Kit - T10369-
♦ Torque Wrench 1331 5-50Nm - VAG1331-
Removing
– Turn on the ignition.
– Activate “rear wiper” and let the wiper arm run to end position.
– Switch off the ignition and remove the ignition key, if equipped.
– Push together the rear window wiper cap -1- in the direction

of -arrow A-.

– Fold the cap in the direction of -arrow B- and unclip.
– Loosen the nut but do not remove it.
– Install the -T10369/5- on the windshield wiper arm -2-.
– Position the thrust piece -3- on the wiper arm shaft.
– Rotate the bolt -1- clockwise until the wiper arm is removed

from the wiper arm shaft.

– Completely remove the nut -4- and remove the windshield

wiper arm.

Installing
Install in the reverse order of removal while paying attention to

the following:
– Adjust the wiper arm. Refer to

⇒ “3.4 Wiper Arm, Adjusting”, page 78

 .

3.4

Wiper Arm, Adjusting

Special tools and workshop equipment required
♦ Torque Wrench 1331 5-50Nm - VAG1331-
Procedure
– Remove the wiper arm. Refer to

⇒ “3.3 Windshield Wiper Arm, Removing and Installing”, page

77

 .

– Turn on the ignition.
– Activate “rear wipe” and let wiper arm shaft run to end position.
– Turn off the ignition.
– Position the wiper arm with wiper blade installed at the wiper

arm shaft.

– Align the wiper blade on the rear window as follows.
The dimension is the gap between tip of wiper blade and lower

edge of window.
♦ Dimension -a- = 33 + 5 mm.
– Tighten the wiper arm nut.
– Turn on the ignition.
– Activate “rear wiper” and let the wiper arm run to end position.
– Check the wiper arm adjustment again and correct if neces‐

sary.

Tightening Specifications
♦ Refer to

⇒ “3.1 Overview - Rear Window Wiper System”, page 76

3.5

Rear Window Wiper Motor - V12- , Re‐

moving and Installing

Special tools and workshop equipment required
♦ Torque Wrench 1331 5-50Nm - VAG1331-
Removing
– Turn off the ignition and all electrical equipment.
– Remove the ignition key, if equipped.
– Remove the wiper arm. Refer to

⇒ “3.3 Windshield Wiper Arm, Removing and Installing”, page

77

 .

– Remove the lower rear lid trim panel. Refer to ⇒  Body Interior;

Rep. Gr.  70 ; Luggage Compartment Trim Panels; Rear Lid

Lower Trim Panel, Removing and Installing .

– Release and disconnect the connector -1-.
– Remove the nuts -2, 3, and 5-.
– Remove the Rear Window Wiper Motor - V12- -4-.
Installing
Install in the reverse order of removal while paying attention to

the following:
– Coat the inside of the seal in the rear window with a rubber-

and plastic-compatible lubricant (polyethylene glycol).

– Make sure the seal fits correctly in the rear window opening.

Marking -1- of seal must align with marking -2- on rear window.

– Adjust the wiper arm. Refer to

⇒ “3.4 Wiper Arm, Adjusting”, page 78

 .

Tightening Specifications
♦ Refer to

⇒ “3.1 Overview - Rear Window Wiper System”, page 76

4

Rear Window Washer System

⇒ “4.1 Overview - Rear Window Washer System”, page 80
⇒ “4.2 Washer Fluid Reservoir, Removing and Installing”,

page 82
⇒ “4.3 Rear Window Washer Pump, Removing and Installing”,

page 82
⇒ “4.4 Spray Nozzle, Removing and Installing”, page 83
⇒ “4.5 Spray Nozzle, Adjusting”, page 84

4.1

Overview - Rear Window Washer Sys‐

tem

⇒ “4.1.1 Overview - Rear Window Washer System, Sedan, Ex‐

cept GTI”, page 80
⇒ “4.1.2 Overview - Rear Window Washer System, Sedan, GTI”,

page 81
⇒ “4.1.3 Overview - Rear Window Washer System, Wagon”, page

82

4.1.1

Overview - Rear Window Washer System, Sedan, Except GTI

1 - High-Mounted Brake Lamp
2 - Washer Hose Connection

❑ For the rear window

washer system

3 - Spray Nozzle

❑ Removing and instal‐

ling. Refer to

⇒ “4.4.1 Spray Nozzle,

Removing and Instal‐

ling, Except GTI”,

page 83

 .

❑ Adjusting. Refer to

⇒ “4.5 Spray Nozzle,

Adjusting”, page 84

 .

4 - Washer Fluid Hose

❑ In the right side panel to

the rear window washer

system spray nozzle

5 - Washer Fluid Hose

❑ In the engine compart‐

ment to the rear window

washer system spray

nozzle

6 - Windshield and Rear Win‐

dow Washer Pump - V59-

❑ Removing and instal‐

ling. Refer to

⇒ “4.3 Rear Window

Washer Pump, Remov‐

ing and Installing”, page

82

 .

❑ With grommet, replace if

damaged.


Content   ..  916  917  918  919   ..