Volkswagen Golf / Golf GTI / Golf Variant. Manual - part 917


  Index      Volkswagen     Volkswagen Golf / Golf GTI / Golf Variant - service repair manual 2013 year


Search            copyright infringement  


Content   ..  915  916  917  918   ..


Volkswagen Golf / Golf GTI / Golf Variant. Manual - part 917


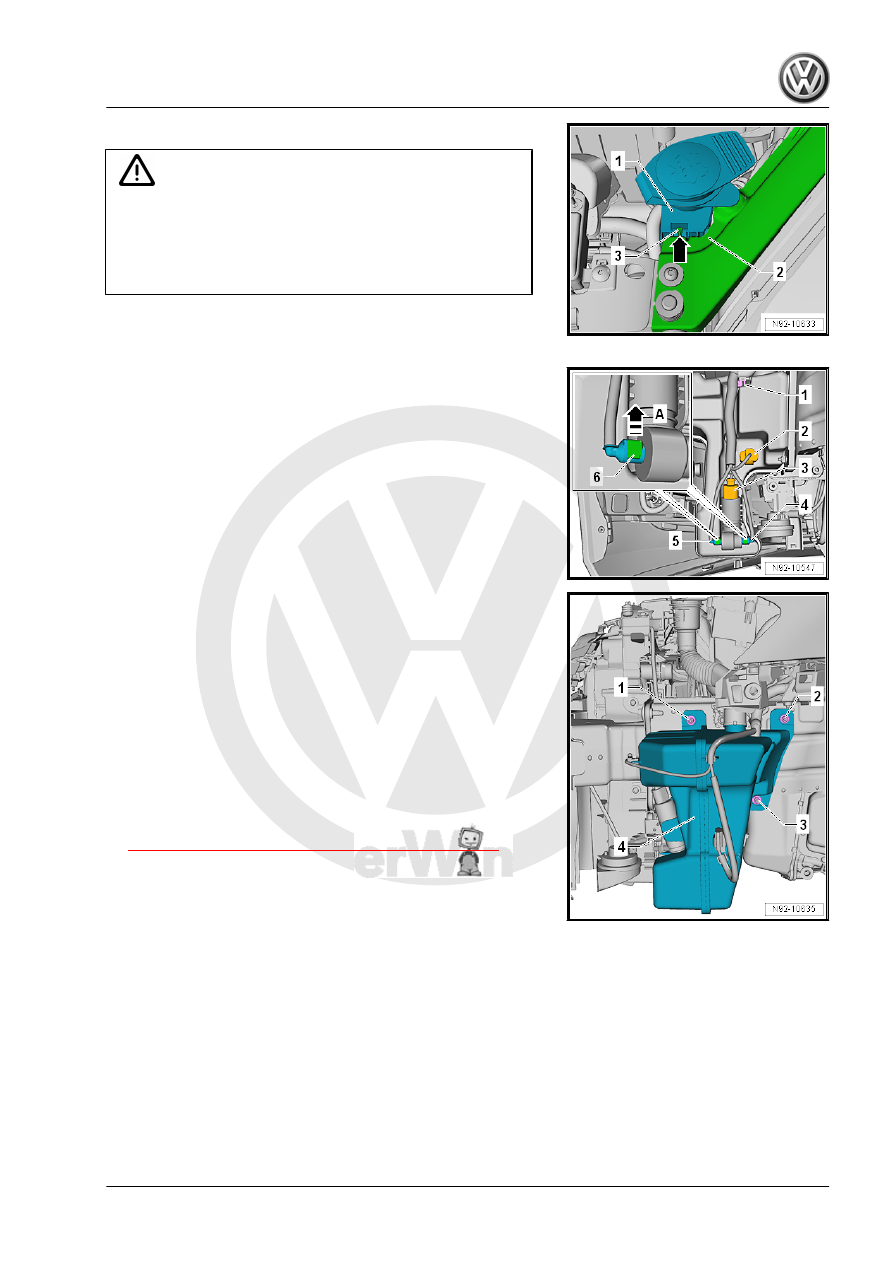
– Retainer the retaining tabs -3-.

Caution

There is a danger of leaks.

♦ The windshield washer fluid reservoir is one part. Sepa‐

rating between the washer fluid reservoir, filler tube and

filler neck is not possible. If the components are separated

nevertheless the connection can leak.

– Remove the filler neck -1- upward from the lock carrier -2-

bracket.

– Release and disconnect the connectors -2 and 3-.
– Release the clips -6- in the direction of the arrow -A-.
– Remove the washer fluid hoses -4 and 5- from the Windshield

and Rear Window Washer Pump - V59- .

– Loosen the wiring harness from the washer fluid reservoir

-1-.

– Remove the nuts -1, 2 and 3-.
– Remove the washer fluid reservoir -4- from the threaded pins.
Installing
Install in the reverse order of removal while paying attention to

the following:
In order to prevent interchanging washer fluid line connections at

Windshield and Rear Window Washer Pump - V59- , connections

at pump and hose lines are marked with colors. Hose connector

pieces must be connected to the corresponding colored pump

connections during installation.
Tightening Specifications
♦ Refer to

⇒ “2.1 Overview - Windshield Washer System”, page 69

2.3

Windshield Washer Fluid Level Sensor,

Removing and Installing

Special tools and workshop equipment required
♦ Drip Tray
The Windshield Washer Fluid Level Sensor - G33- can depending

on version be replaced individually or only with the entire con‐

tainer.
Removing
– Turn off the ignition and all electrical equipment.
– Remove the ignition key, if equipped.

– Remove the left front wheel housing liner. Refer to ⇒  Body

Exterior; Rep. Gr.  66 ; Wheel Housing Liner; Front Wheel

Housing Liner, Removing and Installing .

– Place a drip tray under the washer fluid reservoir.
– Release and disconnect the connector -2-.
– Remove the Windshield Washer Fluid Level Sensor - G33-

-1- from the washer fluid reservoir.

– When necessary remove the seal -3- from the washer fluid

reservoir.

Installing
Install in the reverse order of removal while paying attention to

the following:
– Install the seal correctly in the opening in the washer fluid res‐

ervoir.

– Coat the seal with washer fluid, so that the Windshield Washer

Fluid Level Sensor - G33- can be easily pushed in.

2.4

Windshield Washer Pump, Removing

and Installing

Special tools and workshop equipment required
♦ Drip Tray
Removing
– Turn off the ignition and all electrical equipment.
– Remove the ignition key, if equipped.
– Remove the left front wheel housing liner. Refer to ⇒  Body

Exterior; Rep. Gr.  66 ; Wheel Housing Liner; Front Wheel

Housing Liner, Removing and Installing .

– Release and disconnect the connector -1-.
The wiring harness -2- remains in the washer fluid reservoir.
– Place a drip tray under the washer fluid reservoir.
– Release the clamps -3 and 4- in the direction of -arrow A-.
– Remove the washer fluid hose from the Windshield and Rear

Window Washer Pump - V59- -5-.

– Remove the Windshield and Rear Window Washer Pump -

V59- -5- upward in the direction of -arrow B- from the washer

fluid reservoir.

Installing
Install in the reverse order of removal while paying attention to

the following:
In order to prevent interchanging washer fluid line connections at

Windshield and Rear Window Washer Pump - V59- , connections

at pump and hose lines are marked with colors. Hose connector

pieces must be connected to the corresponding colored pump

connections during installation.
– Check the sealing grommet for damage.

2.5

Spray Nozzles, Removing and Installing

The removal and installation is described for the left side. Re‐

moving and installing on the right side is identical.

Removing
– Open the hood.
– Push the spray nozzle upward -arrow A- and tilt it out from

under the flap -arrow B-.

– Release the hose clip -1- in the direction of -arrow- and remove

the hose connection -2- from the spray nozzle -4-.

– Disconnect the connector -3- and remove the spray nozzle

-4-.

Installing
Install in the reverse order of removal while paying attention to

the following:
When connecting the washer fluid line, ensure that the securing

clip engages audibly into the connection.
– Starting at the top, slide the spray nozzle into the installation

opening until it engages audibly.

– Adjust the spray nozzles. Refer to

⇒ “2.6 Spray Nozzles, Adjusting”, page 75

 .

2.6

Spray Nozzles, Adjusting

Caution

Risk of damage.

♦ Do not use any objects to clean the spray nozzles!

Remove the spray nozzles if the spraying field is uneven due to

dirt in the nozzle, and flush out in the opposite direction of the

spray. It is permissible to further blow through in opposite direc‐

tion of spray with compressed air. Do not use any objects to clean

the spray nozzles!
– Adjusting washer nozzles for front windshield washer system.

Refer to ⇒ Maintenance ; Booklet  36.1 ; Procedure Descrip‐

tions .

3

Rear Window Wiper System

⇒ “3.1 Overview - Rear Window Wiper System”, page 76
⇒ “3.2 Wiper Blade, Removing and Installing”, page 77
⇒ “3.3 Windshield Wiper Arm, Removing and Installing”,

page 77
⇒ “3.4 Wiper Arm, Adjusting”, page 78
⇒ “3.5  Rear Window Wiper Motor V12 , Removing and Installing”,

page 78

3.1

Overview - Rear Window Wiper System

1 - Cap
2 - Nut

❑ 12 Nm

3 - Wiper Arm with Joint-Free

Windshield Wiper

❑ Removing and instal‐

ling. Refer to

⇒ “3.3 Windshield Wiper

Arm, Removing and In‐

stalling”, page 77

 .

❑ Park position, adjusting.

Refer to

⇒ “3.4 Wiper Arm, Ad‐

justing”, page 78

 .

❑ Joint-free windshield

wiper, removing and in‐

stalling. Refer to

⇒ “3.2 Wiper Blade, Re‐

moving and Installing”,

page 77

 .

4 - Seal

❑ Inside the rear window
❑ Replace if damaged.

Refer to

⇒ “3.5  Rear Window

Wiper Motor V12 , Re‐

moving and Installing”,

page 78

 .

❑ Removing and instal‐

ling. Refer to

⇒ “3.5  Rear Window

Wiper Motor V12 , Re‐

moving and Installing”,

page 78

 .

5 - Rear Window Wiper Motor

- V12-

❑ Removing and installing. Refer to

⇒ “3.5  Rear Window Wiper Motor V12 , Removing and Installing”, page 78

 .

6 - Nut

❑ 8 Nm
❑ Quantity: 3

7 - Rubber Ring

❑ Quantity: 3


Content   ..  915  916  917  918   ..