Volkswagen Golf / Golf GTI / Golf Variant. Manual - part 637
 

  Index      Volkswagen     Volkswagen Golf / Golf GTI / Golf Variant - service repair manual 2013 year


Search            copyright infringement  


Content   ..  635  636  637  638   ..


Volkswagen Golf / Golf GTI / Golf Variant. Manual - part 637


Caution

This procedure contains mandatory replaceable parts. Refer

to component overview prior to starting procedure.

Mandatory Replacement Parts
♦ Seal - Left
Removing
– Remove the noise insulation. Refer to ⇒  Body Exterior; Rep.

Gr.  66 ; Noise Insulation; Overview - Noise Insulation .

– Remove the left drive axle. Refer to ⇒  Suspension, Wheels,

Steering; Rep. Gr.  40 ; Drive Axle; Drive Axle, Removing and

Installing .

– Place the Drip Tray for example Shop Crane - Drip Tray -

VAS6208- under the transmission.

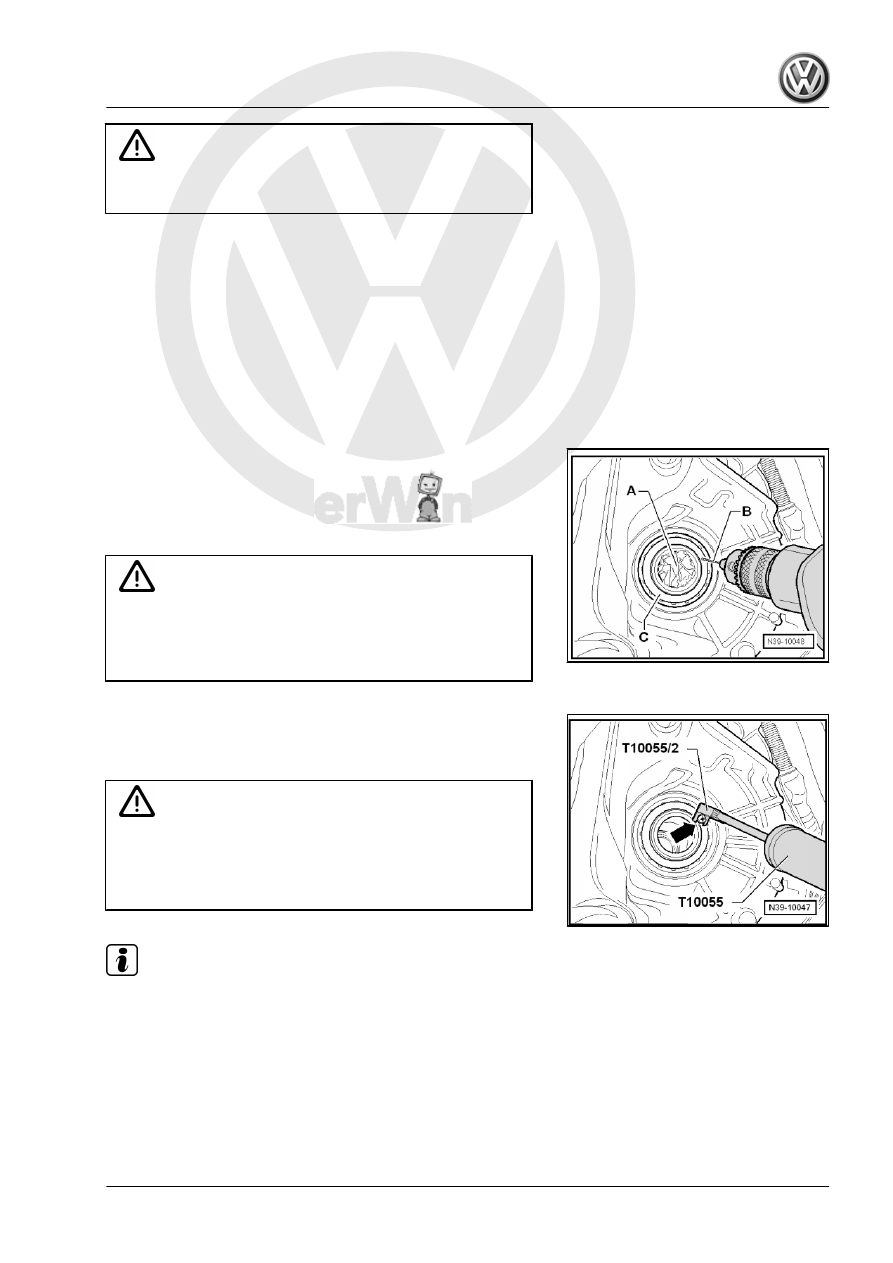
– Seal off the opening in the transmission for the drive axle with

a clean cloth -A-.

– Carefully drill a 2 to 4 mm hole -B- into the outer metal ring

-C- in the seal.

– Grease the drill -B- so that the shavings stick to the drill bit.

Caution

There is a risk of damage to the rear bearing seal.

♦ Only drill the seal metal ring.
♦ Do not install the screw too deep.

– Install a 4 mm screw into the drilled hole in the seal -arrow-.
– Remove the seal with the Puller - Unit Injector - T10055- and

the Puller - Unit Injector - Adapter 2 - T10055/2- .

Caution

Danger of causing damage to the transmission.

♦ Brill shavings must not get into the transmission or into the

opening for the driveshaft. Vacuum up any shavings if

necessary.

Note

♦

Be careful not to install the screw too deep otherwise the bear‐

ing underneath will get damaged.

♦

Remove the cloth and carefully clean the transmission and the

opening for the drive axle.

♦

If only metal ring of seal could be removed, carefully pry out

remaining seal using screwdriver.

Installing
Install in reverse order of removal. Note the following:
– Coat the outer circumference and the sealing lips -arrow- on

the new seal with ATF.

• Installed position: The open side of seal faces the transmis‐

sion.

– Install the new seal using Seal Installer - Selector Shaft Oil

Seal - T10176- . Do not tilt the seal.

– Install the drive axle. Refer to ⇒  Suspension, Wheels, Steer‐

ing; Rep. Gr.  40 ; Drive Axle; Drive Axle, Removing and

Installing .

– Check the ATF level and add if necessary. Refer to

⇒ “7 Automatic Transmission Fluid”, page 73

 .

– Install the noise insulation. Refer to ⇒  Body Exterior; Rep. Gr. 

66 ; Noise Insulation; Overview - Noise Insulation .

1.3

Right Seal, Replacing

Special tools and workshop equipment required
♦ Puller - Unit Injector - T10055-
♦ Seal Installer - Flange Shaft Oil Seal RH - T10177-
♦ Shop Crane - Drip Tray - VAS6208-

Caution

This procedure contains mandatory replaceable parts. Refer

to component overview prior to starting procedure.

Mandatory Replacement Parts
♦ Seal - Right
Removing
– Remove the noise insulation. Refer to ⇒  Body Exterior; Rep.

Gr.  66 ; Noise Insulation; Overview - Noise Insulation .

– Remove the heat shield (if equipped) above the right drive axle

-arrows-.

– Remove the right drive axle from the transmission. Refer to ⇒ 

Suspension, Wheels, Steering; Rep. Gr.  40 ; Drive Axle; Drive

Axle, Removing and Installing .

– Tie the drive axle as high up as possible. Be careful not to

damage the paint on the driveshaft.

– Place the Drip Tray for example Shop Crane - Drip Tray -

VAS6208- under the transmission.

– Seal off the opening in the transmission for the driveshaft with

a clean cloth -A-.

– Carefully drill a 2 to 4 mm hole -B- into the outer metal ring

-C- in the seal.

– Grease the drill -B- so that the shavings stick to the drill bit.

Caution

There is a risk of damage to the rear bearing seal.

♦ Only drill the seal metal ring.
♦ Do not install the screw too deep.

– Install a 4 mm screw into the drilled hole in the seal -arrow-.
– Remove the seal with the Puller - Unit Injector - T10055- and

the Puller - Unit Injector - Adapter 2 - T10055/2- .

Caution

Danger of causing damage to the transmission.

♦ Brill shavings must not get into the transmission or into the

opening for the driveshaft. Vacuum up any shavings if

necessary.

Note

♦

Be careful not to install the screw too deep otherwise the bear‐

ing underneath will get damaged.

♦

Remove the cloth and carefully clean the transmission and the

opening for the drives axle.

♦

If only metal ring of seal could be removed, carefully pry out

remaining seal using screwdriver.

Installing
Install in reverse order of removal. Note the following:
– Coat the outer circumference and the sealing lips -arrow- on

the new seal with ATF.

• Installed position: The open side of seal faces the transmis‐

sion.

– Install the new seal using Seal Installer - Flange Shaft Oil Seal

RH - T10177- . Do not tilt the seal.

– Mount the right drive axle to the transmission. Refer to ⇒  Sus‐

pension, Wheels, Steering; Rep. Gr.  40 ; Drive Axle; Drive

Axle, Removing and Installing .

– Check the ATF level and add if necessary. Refer to

⇒ “7 Automatic Transmission Fluid”, page 73

 .

– Install the noise insulation. Refer to ⇒  Body Exterior; Rep. Gr. 

66 ; Noise Insulation; Overview - Noise Insulation .


Content   ..  635  636  637  638   ..