Volkswagen Golf / Golf GTI / Golf Variant. Manual - part 585


  Index      Volkswagen     Volkswagen Golf / Golf GTI / Golf Variant - service repair manual 2013 year


Search            copyright infringement  


Content   ..  583  584  585  586   ..


Volkswagen Golf / Golf GTI / Golf Variant. Manual - part 585


– Remove the third bolt -arrow- from the reverse shaft support.

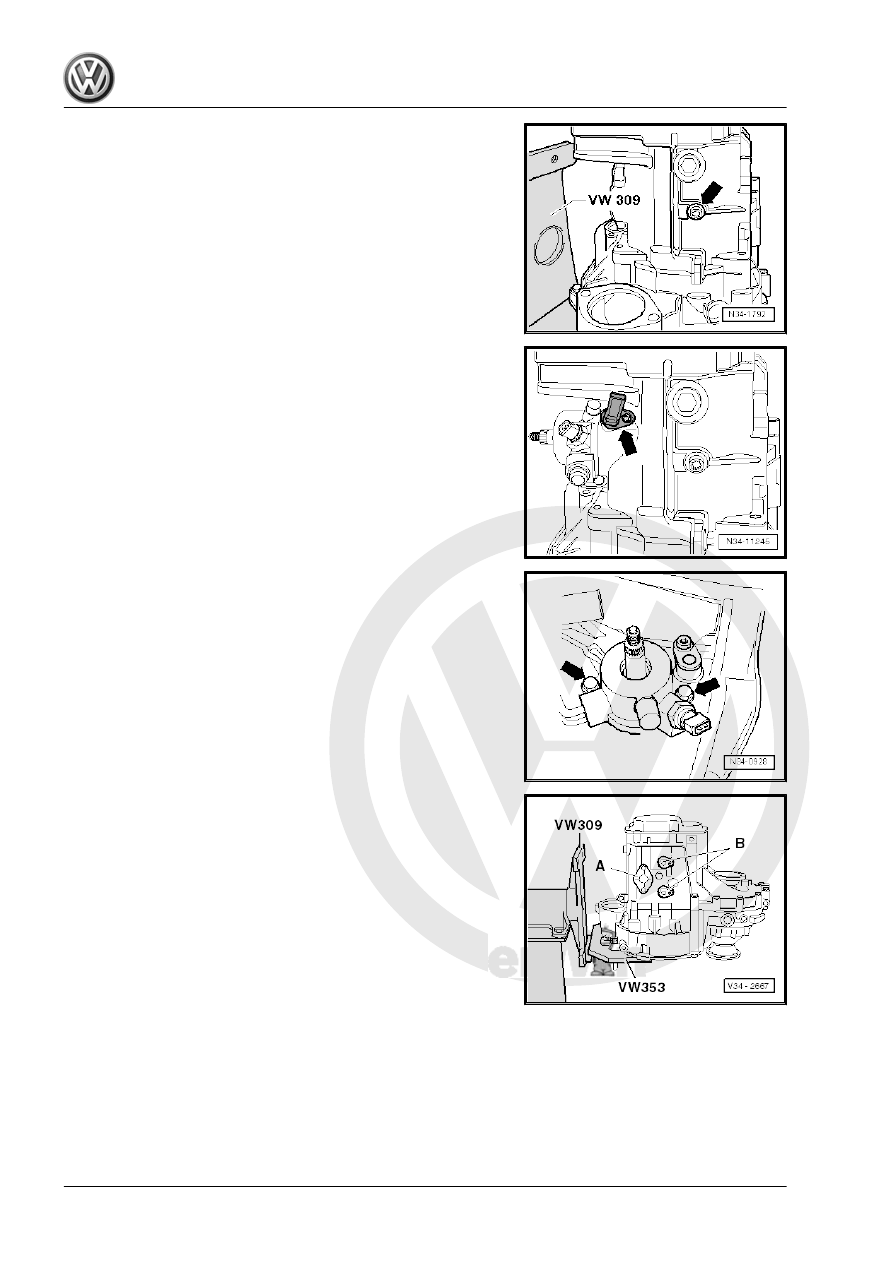
– Transmission on vehicles with Stop/Start system: remove the

Transmission Neutral Position Sensor - G701- -arrow-.

– Move the gearshift shaft into neutral and remove the gearshift

shaft with the gearshift cover. Remove the bolts -arrows- and

pull the gearshift shaft out of the transmission housing.

– Remove the cover -A- and pivot pin -B- on the bottom of the

transmission.

– Remove pivot pins -A- on top side of transmission and bolts

-B- for transmission housing to clutch housing in area of dif‐

ferential.

– Remove the bolts -A- that connect the clutch and transmission

housing.

Note

Do not remove the nuts -B- for the bearing mount on the output

shaft.

– Remove both flange shafts.
– Remove the flange shafts with the springs, thrust washers and

tapered rings.

Remove the Following Components Together with the Transmis‐

sion Housing:
♦ 5th Gear Synchronizer Hub
♦ 5th Gear Wheel
• Both Spacer Plate - T10408/3- must be attached to the 5th

gear wheel.

• The Spacer Plate must be located above the 2 ribs on the

housing, opposite each other -arrows-.

Note

There is a needle bearing under the 5th gear wheel.

Secure the Straps so that the needle bearing does not touch

the 5th gear wheel when removing the transmission housing.

Use the Puller - Transmission Gears - T10408- with the Following

Special Tools:
♦ Puller - Transmission Gears - Thrust Piece - T10408/2-
♦ Spacer Plate - T10408/3-
♦ Kukko 18/1 puller (quantity: 2)
– Install the Puller - Transmission Gears - T10408- in the threa‐

ded holes in the transmission housing cover using the bolts

-A-.

A - M7 x 35 Hex Bolts with Washers
Tightening specification 18 Nm
– Place the Puller - Transmission Gears - Thrust Piece -

T10408/2- on the shaft.

– Install Kukko puller 18/1 -A-.
– Remove the 5th gear synchronizer hub, the 5th gear wheel

and the transmission housing by tightening the spindles -A-

(approximately 

1

/2 turn), alternating from side to side.

– Warm the 5th gear wheel slightly using the Hot Air Blower -

VAG1416- .

– Remove the nuts -B- from the bearing mount/output shaft.

– Remove the shift forks -A- together with the gearshift rails.
– Remove the gearshift mechanism/reverse gear -B-.

– Remove the reverse gear -A-, the input shaft -B- and the output

shaft -C-, one after the other, from the clutch housing.

– Remove the differential.
Assembling the Transmission
– Install the differential.

– Replace the sealing rings -arrows- for output shaft bearing

mount after removing.

Note

The illustration only shows 3 of the 4 seals.

– Insert output shaft -1- and output shaft -2- together.
– Tighten the nuts for the bearing mount / output shaft.
– Install the reverse gear wheel -3- on the needle bearing inside

the clutch housing.

Shoulder -arrow- faces away from clutch housing.
– Make sure the reverse shaft -4- is complete. Refer to

⇒ “3.2 Reverse Shaft, Disassembling and Assembling”,

page 170

 . Do not mount the support on the reverse shaft.

– Install the reverse shaft into the clutch housing.
– Clean all threaded holes in reverse shaft supports of locking

compound; cleaning can be done with a thread tap.

– Mount the reverse shaft support.


Content   ..  583  584  585  586   ..