Volkswagen Golf / Golf GTI / Golf Variant. Manual - part 545


  Index      Volkswagen     Volkswagen Golf / Golf GTI / Golf Variant - service repair manual 2013 year


Search            copyright infringement  


Content   ..  543  544  545  546   ..


Volkswagen Golf / Golf GTI / Golf Variant. Manual - part 545


9 - Defroster- and Air Distribution Door Actuator

❑ Removing and installing. Refer to

⇒ “7.10 Air Distribution Door Adjuster, Removing and Installing”, page 147

 .

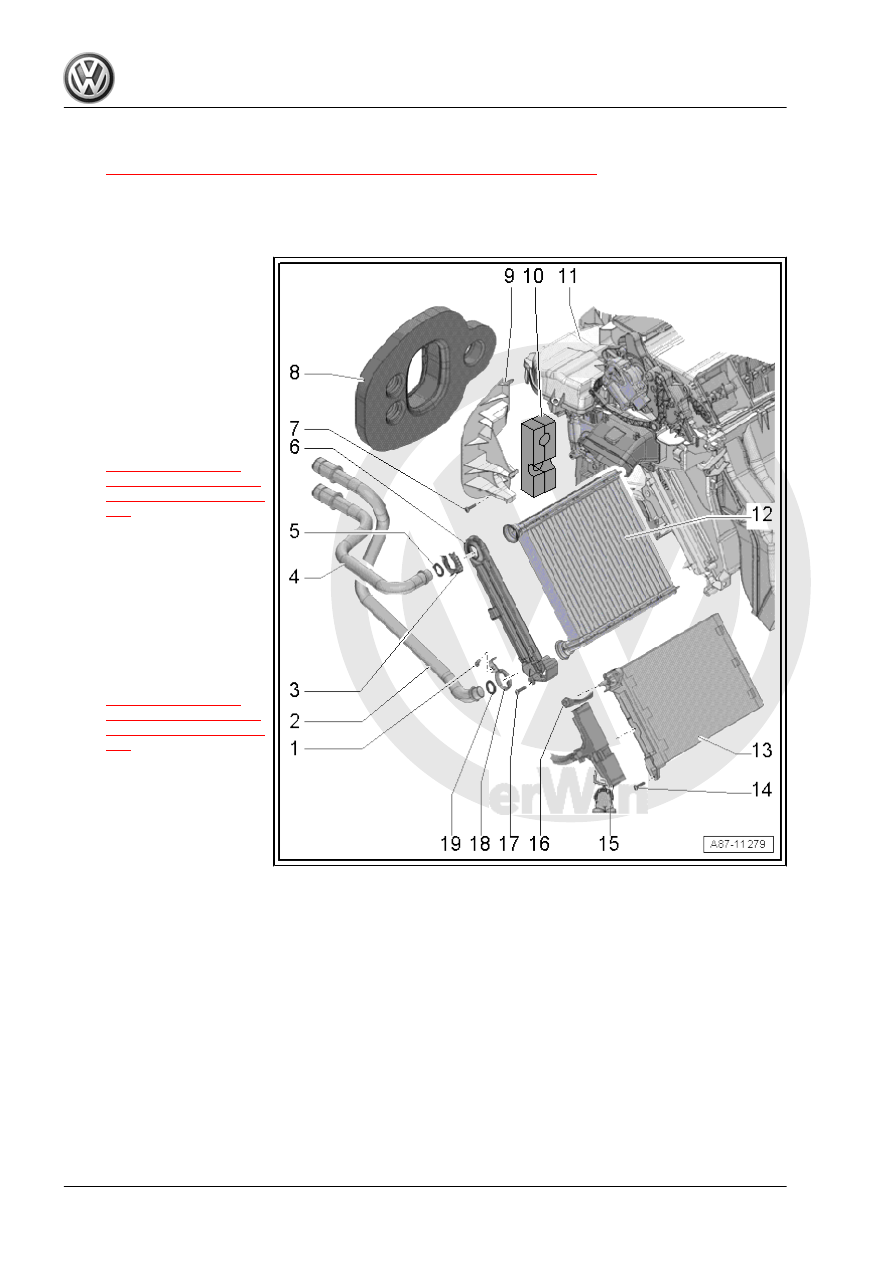
Heater, Heater Core, Auxiliary Heater Heating Element

1 - Screw

❑ 2 Nm

2 - Coolant Pipe for the Heater

Core

❑ There are different ver‐

sions. Refer to the Parts

Catalog.

❑ Coolant supply from en‐

gine

❑ Removing and instal‐

ling. Refer to

⇒ “4.16 Heater Core

Coolant Pipes, Remov‐

ing and Installing”, page

106

 .

3 - Clamp
4 - Coolant Pipe for the Heater

Core

❑ There are different ver‐

sions. Refer to the Parts

Catalog.

❑ Coolant return to engine
❑ Removing and instal‐

ling. Refer to

⇒ “4.16 Heater Core

Coolant Pipes, Remov‐

ing and Installing”, page

106

 .

5 - Seal

❑ There are different ver‐

sions. Refer to the Parts

Catalog.

❑ Replacing

6 - Cover

❑ For the heater core

7 - Screw

❑ 1 Nm

8 - Foam Spacer

❑ For sealing/insulating
❑ For vehicles without an A/C system, without opening for the expansion valve. Refer to the Parts Catalog.
❑ Observe installed position

9 - Bracket

❑ For the coolant pipes

10 - Foam Piece

❑ For insulating
❑ Observe installed position

11 - Heater

❑ For vehicles without an Auxiliary Heater Heating Element - Z35- with Auxiliary Air Heater Control Module

- J604- , the opening for the auxiliary heater is closed.

❑ Removing and installing. Refer to 

⇒ “4.5 Heater and A/C Unit, Removing and Installing”, page 83

 .

12 - Heater Core

❑ There are different versions. Refer to the Parts Catalog.
❑ Removing and installing. Refer to 

⇒ “4.15 Heater Core, Removing and Installing”, page 98

 .

13 - Auxiliary Heater Heating Element - Z35- with Auxiliary Air Heater Control Module - J604-

❑ Checking. Refer to

⇒ “4.13  Auxiliary Heater Heating Element Z35 with Auxiliary Air Heater Control Module J604 , Checking”,

page 96

 .

❑ Removing and installing. Refer to

⇒ “4.14  Auxiliary Heater Heating Element Z35 with Auxiliary Air Heater Control Module J604 , Removing

and Installing”, page 97

 .

14 - Screw

❑ 2 Nm
❑ Quantity: 2

15 - Wire

❑ For the Auxiliary Heater Heating Element - Z35- with Auxiliary Air Heater Control Module - J604-

16 - Ground (GND) Cable for the Auxiliary Heater Heating Element - Z35- with Auxiliary Air Heater Control

Module - J604-

❑ Nut 9 ± 1 Nm
❑ For the auxiliary heater

17 - Screw

❑ 2 Nm
❑ Quantity: 3

18 - Hose Clamp
19 - Seal

❑ There are different versions. Refer to the Parts Catalog.
❑ Replacing

Air Intake Duct, Dust and Pollen Filter, Fresh Air Blower, Door

Control

1 - Plastic Screw or Plug (de‐

pending on version)

❑ 0.3 Nm
❑ Quantity: 2

2 - Partition

❑ Removing and instal‐

ling. Refer to

⇒ “4.20 Partition, Re‐

moving and Installing”,

page 112

 .

3 - Fresh Air Blower Housing

and Dust and Pollen Filter
4 - Screw

❑ 1 Nm
❑ Quantity: 2

5 - Air Intake Duct

❑ Do not dismantle
❑ With fresh- and air recir‐

culation door

❑ There are different ver‐

sions. Refer to the Parts

Catalog.

❑ Removing and instal‐

ling. Refer to

⇒ “5.4 Air Intake Duct,

Removing and Instal‐

ling”, page 116

 .

6 - Not Installed
Only for vehicles with Clima‐

tronic.

7 - Not Installed
Only for vehicles with Clima‐

tronic.

8 - Recirculation Door Motor - V113-

❑ Without position sensor with end switches in the end stops. Refer to ⇒ Wiring diagrams, Troubleshooting

& Component locations.

❑ To check, use the Vehicle Diagnostic Tester in the “Guided Fault Finding” function. Refer to ⇒ Wiring

diagrams, Troubleshooting & Component locations.

❑ Removing and installing. Refer to

⇒ “7.4  Recirculation Door Motor V113 , Removing and Installing”, page 134

 .

9 - Screw

❑ 1 Nm
❑ Quantity: 2

10 - Dust and Pollen Filter

❑ There are different versions. Refer to the Parts Catalog.

Note

On vehicles without an A/C system

and on vehicles with electric-manual

climate control system without an

activated charcoal insert from the

manufacturer.

❑ Replacement interval. Refer to ⇒  Maintenance Intervals; Rep. Gr.  03 .

❑ Removing and installing. Refer to 

⇒ “4.11 Dust and Pollen Filter, Removing and Installing”, page 92

 .

11 - Cover

❑ For dust and pollen filter

12 - Fresh Air Blower - V2-

❑ To check, use the Vehicle Diagnostic Tester in the “Guided Fault Finding” function. Refer to ⇒ Wiring

diagrams, Troubleshooting & Component locations.

❑ Removing and installing. Refer to 

⇒ “4.12  Fresh Air Blower V2 , Removing and Installing”, page 95

 .

13 - Fresh Air Blower Control Module - J126-

❑ To check, use the Vehicle Diagnostic Tester in the “Guided Fault Finding” function. Refer to ⇒ Wiring

diagrams, Troubleshooting & Component locations.

❑ Removing and installing. Refer to

⇒ “4.10  Fresh Air Blower Control Module J126 , Removing and Installing”, page 91

 .

14 - Screw

❑ 1 Nm
❑ Quantity: 2

3.2

Fresh Air Blower - V2- , Removing and

Installing

The removal and installation is identical to vehicles with an Air

Conditioning (A/C) system. Refer to

⇒ “4.12  Fresh Air Blower V2 , Removing and Installing”,

page 95

 .

3.3

Fresh Air Blower Control Module -

J126- , Removing and Installing

The removal and installation is identical to vehicles with an Air

Conditioning (A/C) system. Refer to

⇒ “4.10  Fresh Air Blower Control Module J126 , Removing and

Installing”, page 91

 .

3.4

Dust and Pollen Filter, Removing and

Installing

The removal and installation is identical to vehicles with an Air

Conditioning (A/C) system. Refer to

⇒ “4.11 Dust and Pollen Filter, Removing and Installing”,

page 92

 .

3.5

Heater, Removing and Installing

It is not necessary to extract the refrigerant and remove the ex‐

pansion valve. The further removal and installation is identical to

vehicles with an Air Conditioning (A/C) system. Refer to

⇒ “4.5 Heater and A/C Unit, Removing and Installing”,

page 83

 .

3.6

Heater, Disassembling and Assembling

It is not necessary to extract the refrigerant and remove the ex‐

pansion valve and the evaporator or to disassemble. The further

procedure is identical to vehicles with an Air Conditioning (A/C)

system. Refer to

⇒ “4.6 Heater and A/C Unit, Disassembling and Assembling”,

page 87

 .


Content   ..  543  544  545  546   ..