Volkswagen Golf / Golf GTI / Golf Variant. Manual - part 474


  Index      Volkswagen     Volkswagen Golf / Golf GTI / Golf Variant - service repair manual 2013 year


Search            copyright infringement  


Content   ..  472  473  474  475   ..


Volkswagen Golf / Golf GTI / Golf Variant. Manual - part 474


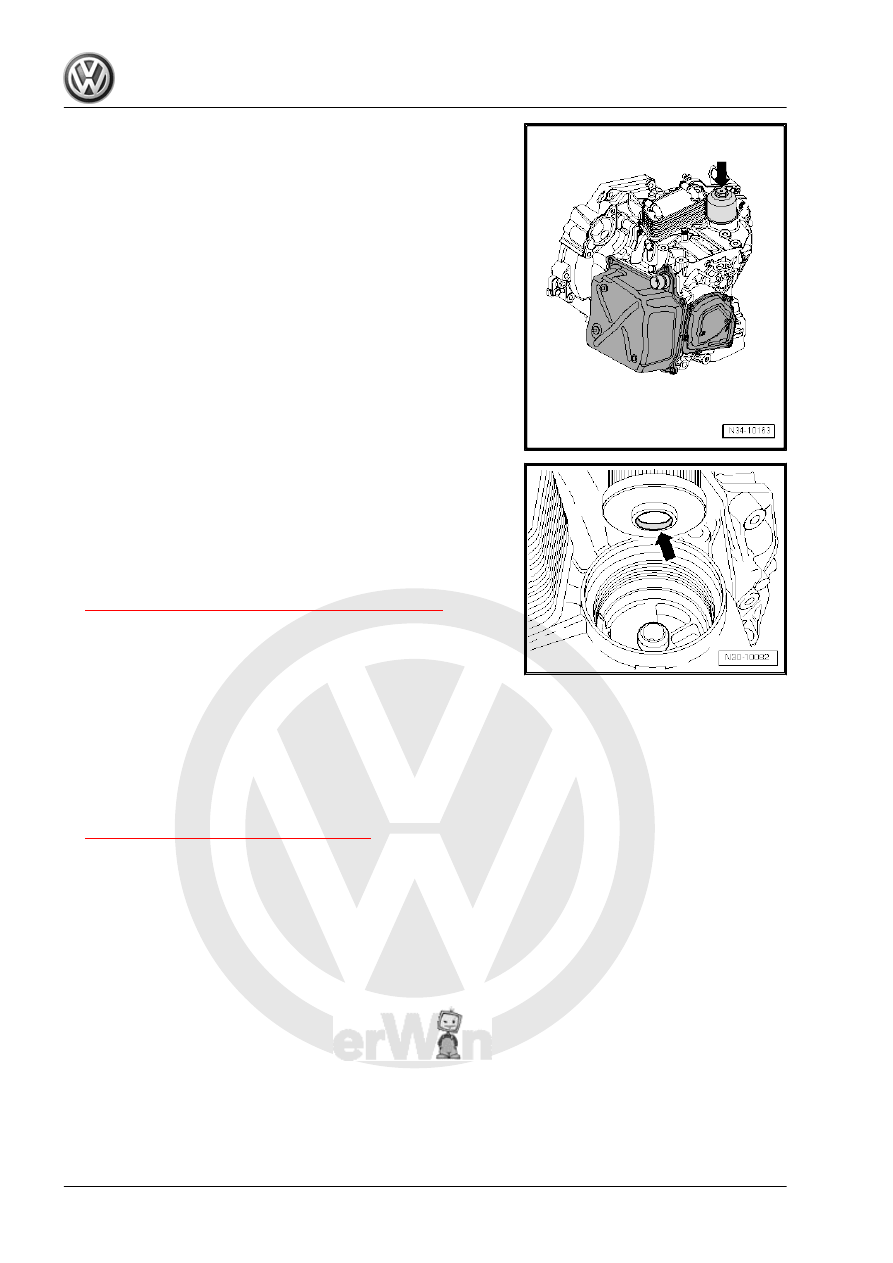
– Loosen the filter housing -arrow- approximately seven turns.
– Wait 10 seconds.
This way the fluid can flow from the filter housing back into the

transmission.
– Remove the filter housing and filter.
– Remove O-ring from filter housing.
Installing
Install in the reverse order of removal while noting the following:
– Clean thoroughly any areas on the transmission that get

stained with transmission fluid.

– Install the transmission fluid filter with the collar on the bottom

-arrow-.

– Install new O-ring on filter housing.
– Install and tighten the filter housing.
Install in reverse order of removal.
– Check the fluid level and fill if necessary. Refer to

⇒ “9.1 Transmission Fluid Level, Checking”, page 113

 .

– Install the battery tray and the battery. Refer to ⇒  Electrical

Equipment; Rep. Gr.  27 ; Battery; Battery, Removing and In‐

stalling .

– Install the complete air filter housing:
♦ Gasoline engine. Refer to ⇒  Rep. Gr.  24 ; Air Filter; Air Filter

Housing, Removing and Installing .

♦ Diesel engine. Refer to ⇒  Rep. Gr.  23 ; Air Filter; Air Filter

Housing, Removing and Installing .

Tightening Specifications
♦ Filter housing. Refer to

⇒ “6.1 Overview - Transmission”, page 101

 .

9

Transmission Fluid

⇒ “9.1 Transmission Fluid Level, Checking”, page 113
⇒ “9.2 Transmission Fluid, Draining and Filling”, page 116

9.1

Transmission Fluid Level, Checking

Special tools and workshop equipment required
♦ Torque Wrench 5-50Nm - VAG1331-
♦ Used Oil Collection and Extraction Unit - SMN372500-
♦ Vehicle Diagnostic Tester
♦ Shop Crane - Drip Tray - VAS6208-
♦ Oil Filler - VAS6262A-
♦ Brake Line Tool Kit - Pipe Cutter - VAS6056/2-
♦ Also for some fluid containers Oil Filler - Adapter 6 -

VAS6262/6-

♦ Vehicle Diagnostic Tester

Caution

This procedure contains mandatory replaceable parts. Refer

to component overview prior to starting procedure.

Mandatory Replacement Parts
♦ Seal - Transmission Fluid Drain - and Check Plug
Note the Following Information:
♦ Use the ATF available as a replacement part. Refer to the

Parts Catalog.

♦ It is necessary to use the Oil Filler - Adapter 6 - VAS6262/6-

on some fluid containers.

♦ It may be necessary to shorten the bleed pipe on the Adapter

For Oil Filling - VAS6262A- . Refer to 

⇒ page 114

 .

Shorten the Bleed Pipe on the Adapter For Oil Filling - VAS6262A-

as Follows:
– Shorten the pipe to dimension -a-. This assures the pipe on

the Adapter For Oil Filling - VAS6262A- will not touch the bot‐

tom on some fluid containers.

Dimension -a- = 210 mm

Note

Dimension -a- is measured starting from the shaft (the green sur‐

face) on the Adapter For Oil Filling - VAS6262A- .

If dimension -a- is greater than 210 mm:

– Make a mark on the bleed pipe, dimension -a-, and cut it, with

for example the Brake Line Tool Kit - Pipe Cutter -

VAS6056/2- .

Requirements
♦ The vehicle is level and all hoist supports are the same height.
♦ Noise insulation is removed. Refer to ⇒  Body Exterior; Rep.

Gr.  66 ; Noise Insulation; Overview - Noise Insulation .

♦ Vehicle Diagnostic Tester is connected
♦ To begin working, the fluid temperature should not be higher

than 45 °C (113 °F).

♦ Test temperature: 35 ° to 45 °C (95 ° to 113 °F).
Checking
– Vehicle Diagnostic Tester Connect and identify the vehicle in

Guided Functions

.

– Select 

DSG transmission

.

– Select 

Check Fluid Level

.

Note

Let the transmission cool down if the fluid temperature is higher

than 45 °C (113 °F).

The engine is idling in neutral and the selector lever is in “P”.
– Move the Used Oil Collection and Extraction Unit -

SMN372500- or a Drip Tray under the transmission near the

transmission fluid drain and check plug.

– Remove the transmission fluid drain- and check plug -arrow-.

– Always replace the seal for the drain plug -arrow-.

Note

Even if the level of transmission fluid is too low, first a small

amount of transmission fluid will flow out of the overflow tube,

because it fills during operation.

– Let the excess fluid drain.
– Install the drain plug with a new seal as soon as all the fluid

has drained out (it starts to drip).

– If no transmission fluid comes out, then fill.
Adding


Content   ..  472  473  474  475   ..