Volkswagen Golf / Golf GTI / Golf Variant. Manual - part 410


  Index      Volkswagen     Volkswagen Golf / Golf GTI / Golf Variant - service repair manual 2013 year


Search            copyright infringement  


Content   ..  408  409  410  411   ..


Volkswagen Golf / Golf GTI / Golf Variant. Manual - part 410


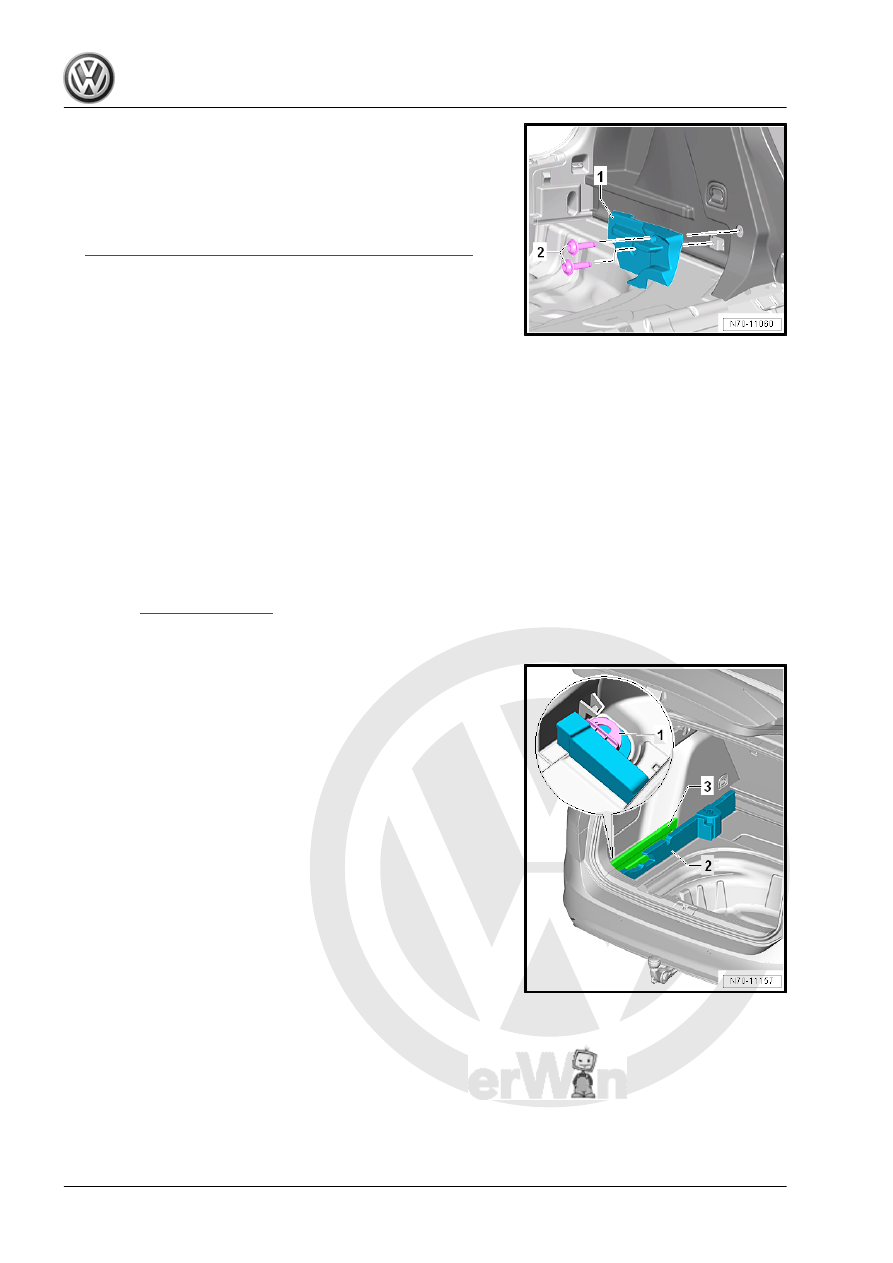
– Remove the luggage compartment floor covering bracket -1-.
Installing
Install in reverse order of removal.
Tightening Specifications
♦ Refer to

⇒ “6.4 Overview - Luggage Compartment Floor”, page 280

6.11.2

Luggage Compartment Floor Covering

Bracket, Removing and Installing, Wag‐

on

Special tools and workshop equipment required
♦ Torque Wrench 1783 - 2-10Nm - VAG1783-
Removing
– Fold the rear seat backrests forward.
– Release the mount on the left and right side on the luggage

compartment floor by it turning 90° and remove the luggage

compartment floor toward the rear out of the vehicle.

– Remove the luggage compartment floor support upward

-item 4- 

⇒ Item 4 (page 281)

 .

– Pull the sidewall -3- upward out of the left and right luggage

compartment side trim panels and remove it.

– Turn the installation bracket -1- on the left and right side 90°

counter-clockwise and remove upward.

– Remove the luggage compartment floor trim -2- on the left and

right side upward.

– Unclip the center luggage compartment floor trim -1- upward

from the carrier -3-.

– Remove the bolts -2-.

– Remove the support -3- for the center luggage compartment

liner -1- toward the rear.

Installing
Install in reverse order of removal.
Tightening Specifications
♦ Refer to

⇒ “6.4.2 Overview - Luggage Compartment Floor, Wagon”,

page 281

6.12

Luggage Compartment Side Trim Pan‐

el, Removing and Installing

⇒ “6.12.1 Luggage Compartment Side Trim Panel, Removing and

Installing, Sedan”, page 289
⇒ “6.12.2 Luggage Compartment Side Trim Panel, Removing and

Installing, Wagon”, page 291

6.12.1

Luggage Compartment Side Trim Pan‐

el, Removing and Installing, Sedan

Note

The following describes the removing and installing on the left

side of the vehicle. Removing and installing on the right side is

identical.

Special tools and workshop equipment required
♦ Torque Wrench 1783 - 2-10Nm - VAG1783-
♦ Pry Lever - 80-200-
Removing
– Remove the rear seat backrest. Refer to

⇒ “3.8 Rear Seat Backrest, Removing and Installing”,

page 384

 .

– Remove the rear shelf compartment. Refer to

⇒ “6.9 Rear Shelf Compartment, Removing and Installing”,

page 285

 .

– If equipped, remove the luggage compartment floor covering

bracket. Refer to

⇒ “6.11.1 Luggage Compartment Floor Covering Bracket, Re‐

moving and Installing, Sedan”, page 287

 .

– Remove the tie-down -2-. Refer to

⇒ “6.10 Tie Down, Removing and Installing”, page 287

 .

– Remove the clips -4-.
– Disengage and remove the luggage compartment side trim

panel -1-.

Installing

Note

Check all the fasteners for damage and replace if necessary.

Make sure the luggage compartment side trim panel fits inside

the rear lid seal molding after it is installed.

Install in reverse order of removal.
Tightening Specifications
♦ Refer to

⇒ “6.3.1 Overview - Luggage Compartment Side Trim Panel,

Sedan”, page 278

6.12.2

Luggage Compartment Side Trim Pan‐

el, Removing and Installing, Wagon

Note

The following describes the removing and installing on the left

side of the vehicle. Removing and installing on the right side is

identical.

Special tools and workshop equipment required
♦ Torque Wrench 1783 - 2-10Nm - VAG1783-
♦ Pry Lever - 80-200-
Removing
– Remove the luggage compartment cover. Refer to

⇒ “6.7 Luggage Compartment Cover, Removing and Instal‐

ling”, page 283

 .

– Remove the rear seat backrest. Refer to

⇒ “3.8 Rear Seat Backrest, Removing and Installing”,

page 384

 .

Vehicles with Side Cushion
– Remove the side cushion. Refer to

⇒ “3.16 Side Cushion, Removing and Installing”, page 391

 .

Vehicles without Side Cushion
– Remove the wheel housing trim panel. Refer to

⇒ “5.17.2 Wheel Housing Trim Panel, Removing and Instal‐

ling, Wagon”, page 269

 .

Continuation for All Vehicles
– Remove the D-pillar trim panel. Refer to

⇒ “5.15 D-Pillar Trim Panel, Removing and Installing”,

page 264

 .

– Remove the lock carrier trim panel. Refer to

⇒ “6.8 Lock Carrier Trim Panel, Removing and Installing”,

page 284

 .

– Remove the tie-down -7-. Refer to

⇒ “6.10 Tie Down, Removing and Installing”, page 287

 .


Content   ..  408  409  410  411   ..