Volkswagen Golf / Golf GTI / Golf Variant. Manual - part 403


  Index      Volkswagen     Volkswagen Golf / Golf GTI / Golf Variant - service repair manual 2013 year


Search            copyright infringement  


Content   ..  401  402  403  404   ..


Volkswagen Golf / Golf GTI / Golf Variant. Manual - part 403


B-Pillar Lower Trim Panel

Note

The following describes the removing and installing on the left side of the vehicle. Removing and installing on

the right side is identical.

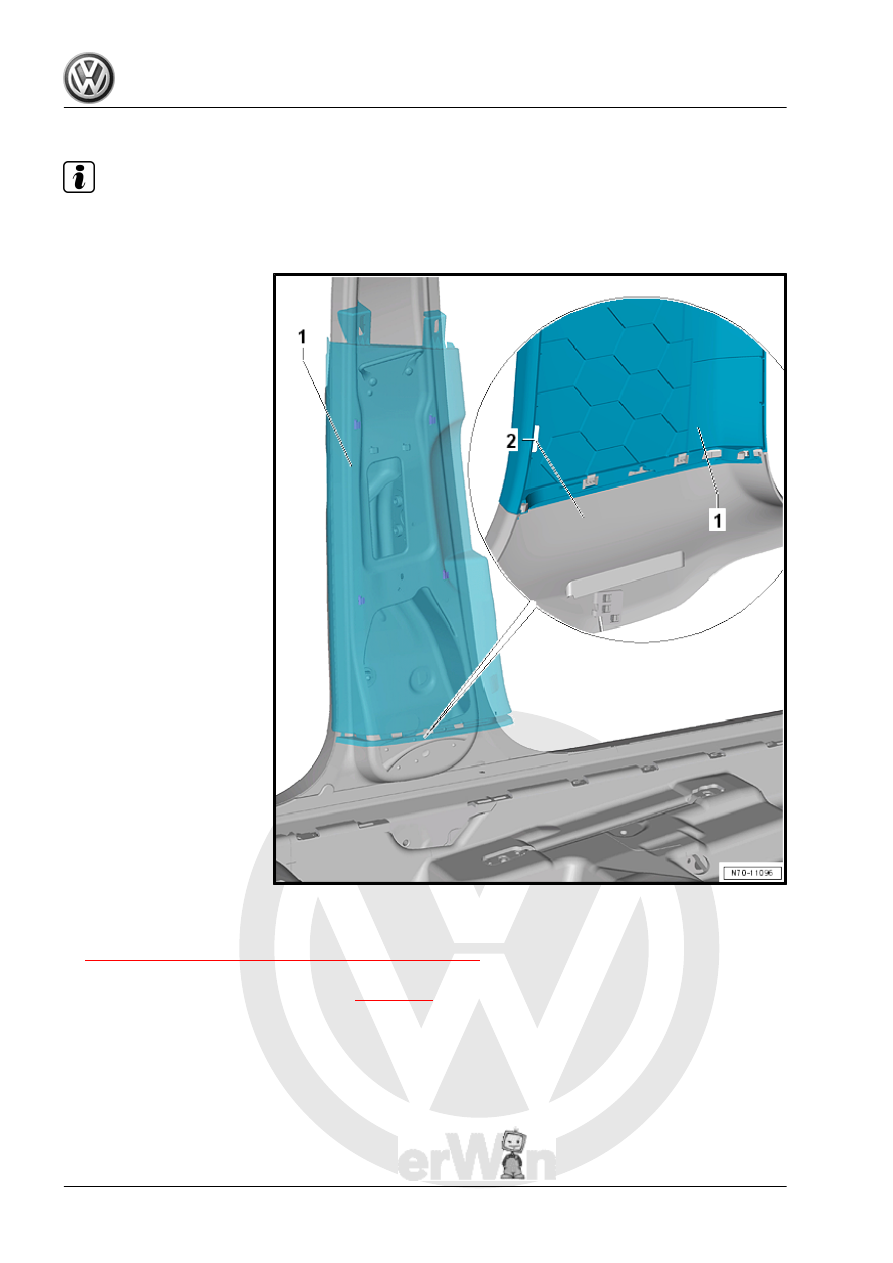
– Loosen the sill panel strip -2- near the transition area to the

lower B-pillar trim panel -1-. Refer to

⇒ “5.10 Sill Panel Strip, Removing and Installing”, page 249

 .

– Loosen the upper B-pillar trim panel in the transition area to

the lower B-pillar trim panel -1-. Refer to 

⇒ page 258

 .

– Loosen the lower B-pillar trim panel -1- from the door seal

molding.

– Loosen the lower B-pillar trim panel -1- near the clips from the

body mounts using the Wedge Set - T10383- .

– If equipped, disconnect the connector from the Interior Moni‐

toring and Vehicle Inclination Deactivation Button - E616- and

remove the B-pillar lower trim panel -1-.

Installing

Note

Check all the fasteners for damage and replace if necessary.

Remove any remaining clips in the body mounting points using

the Omega Clip Tool - T40280- . To install, insert into the B-

pillar trim panels.

Make sure that the B-pillar trim panels are inside the door seal

molding after installing.

Install in reverse order of removal.
Tightening Specifications
♦ Refer to 

⇒ “5.4 Overview - B-Pillar Trim Panel”, page 240

5.14

C-Pillar Trim Panel, Removing and In‐

stalling

⇒ “5.14.1 C-Pillar-Trim Panel, Removing and Installing, Sedan”,

page 261
⇒ “5.14.2 C-Pillar-Trim Panel, Removing and Installing, Wagon”,

page 262

5.14.1

C-Pillar-Trim Panel, Removing and In‐

stalling, Sedan

Note

The following describes the removing and installing on the left

side of the vehicle. Removing and installing on the right side is

identical.

Special tools and workshop equipment required
♦ Pry Lever - 80-200-

Removing
– Remove the rear shelf compartment. Refer to

⇒ “6.9 Rear Shelf Compartment, Removing and Installing”,

page 285

 .

– Remove the roof end strip. Refer to

⇒ “7.2 Roof End Strip, Removing and Installing”, page 299

 .

– Unclip the C-pillar trim panel near the clips from the body

mounts using the Pry Lever - 80-200- in direction of

-arrows A-.

– Remove the C-pillar trim panel downward in direction of

-arrow B-.

Installing

Note

Check all the fasteners for damage and replace if necessary.

Remove any remaining clips in the body mounting points using

the Omega Clip Tool - T40280- . To install, insert into the C-

pillar trim panel.

Make sure that the C-pillar trim panel is inside the rear lid seal

molding after it is installed.

Install in reverse order of removal.

5.14.2

C-Pillar-Trim Panel, Removing and In‐

stalling, Wagon

Note

The following describes the removing and installing on the left

side of the vehicle. Removing and installing on the right side is

identical.

Special tools and workshop equipment required
♦ Pry Lever - 80-200-

Caution

This procedure contains mandatory replaceable parts. Refer

to component overview prior to starting procedure.

Mandatory Replacement Parts
♦ Upper Clips -3-
Removing

– Remove the D-pillar trim panel. Refer to

⇒ “5.15 D-Pillar Trim Panel, Removing and Installing”,

page 264

 .

– Remove the wheel housing trim panel. Refer to

⇒ “5.17.2 Wheel Housing Trim Panel, Removing and Instal‐

ling, Wagon”, page 269

 .

– Only loosen the luggage compartment side trim panel near the

C-pillar, D-pillar and rear side window (do not remove com‐

pletely).

– Unclip the C-pillar trim panel -1- near the clips -2- from the

body mounts using the Pry Lever - 80-200- .

– Unclip the C-pillar trim panel from the clips -3-.
– Remove the C-pillar trim panel downward in direction of

-arrow-.


Content   ..  401  402  403  404   ..