Volkswagen Golf / Golf GTI / Golf Variant. Manual - part 390


  Index      Volkswagen     Volkswagen Golf / Golf GTI / Golf Variant - service repair manual 2013 year


Search            copyright infringement  


Content   ..  388  389  390  391   ..


Volkswagen Golf / Golf GTI / Golf Variant. Manual - part 390


Installing
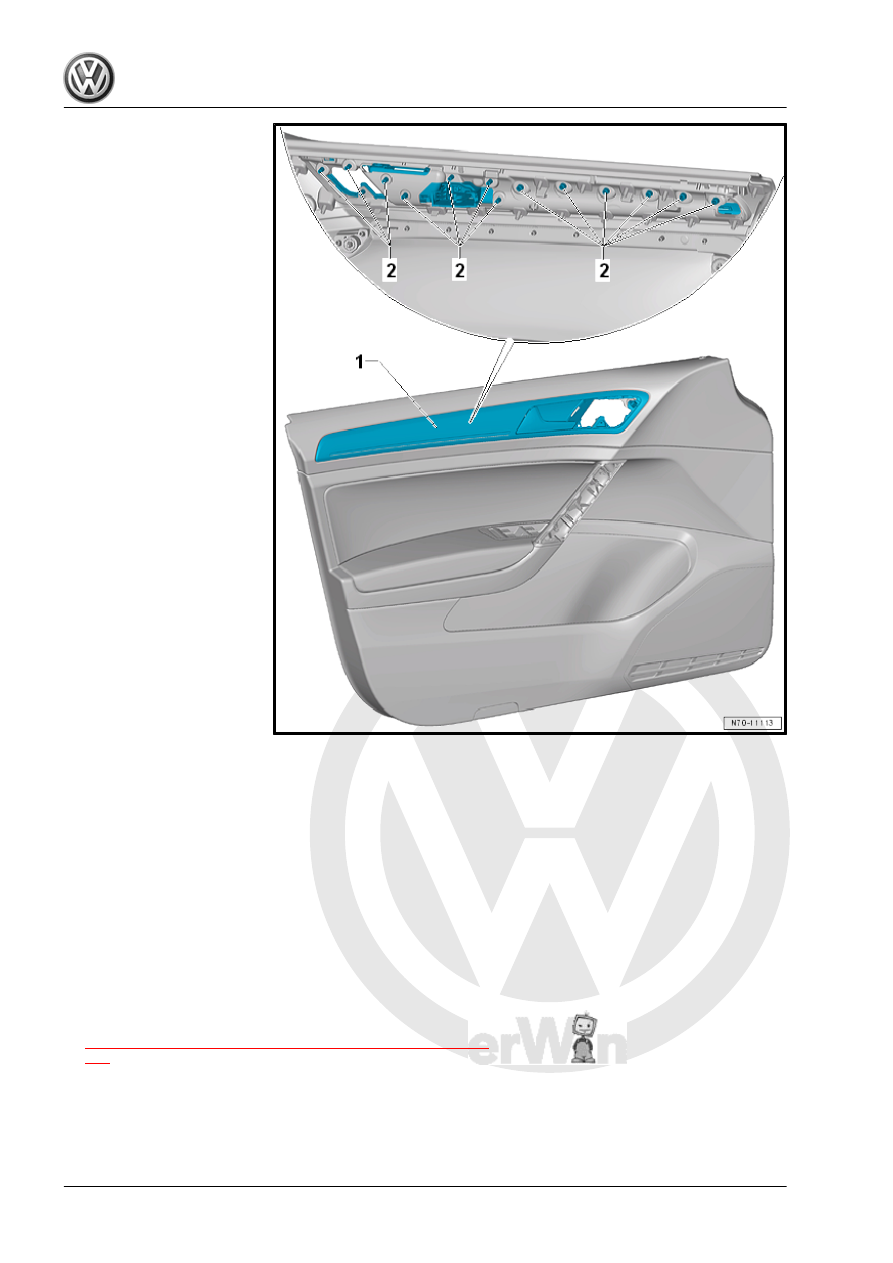
Lock washers near the trim strip: 17 mm × 7.5 mm, quantity: 7.

Allocation. Refer to the Parts Catalog.
Lock washers near the interior door mechanism: 13.4 mm × 6 mm,

quantity: 6. Allocation. Refer to the Parts Catalog.
– Insert the new trim molding -1- into the door trim panel.
– Press the lock washers -2- all the way onto the pins -3- of the

trim molding.

– Press the remaining lock washers near the interior door mech‐

anism onto the trim molding pins as described.

– Cut back the trim molding pins -3- above the lock washers

-2- so that the projecting end is a maximum of 2 mm.

– Install the rear door trim panel. Refer to

⇒ “2.2 Rear Door Trim Panel, Removing and Installing”, page

203

 .

3

Instrument Panel

⇒ “3.1 Overview - Instrument Panel”, page 210
⇒ “3.2 Instrument Panel Side Cover, Removing and Installing”,

page 211
⇒ “3.3 Instrument Panel Decorative Trim, Removing and Instal‐

ling”, page 211
⇒ “3.4 Light Switch Trim, Removing and Installing”, page 212
⇒ “3.5 Instrument Cluster Trim, Removing and Installing”,

page 212
⇒ “3.6 Instrument Panel, Removing and Installing”, page 213
⇒ “3.7 Instrument Panel Vent, Removing and Installing”,

page 220
⇒ “3.8 Side Defroster Vent, Removing and Installing”, page 223
⇒ “3.9 Front Passenger Side Impact Absorber, Removing and In‐

stalling”, page 223

3.1

Overview - Instrument Panel

1 - Side Defroster Vent

❑ Left and right
❑ Removing and instal‐

ling. Refer to

⇒ “3.8 Side Defroster

Vent, Removing and In‐

stalling”, page 223

 .

2 - Rubber Buffer

❑ Quantity: 2
❑ Pushed on the instru‐

ment panel mount under

the windshield frame

3 - Screw

❑ 1.5 Nm

4 - Sunlight Photo Sensor -

G107-

❑ Removing and instal‐

ling. Refer to ⇒  Heating,

Ventilation, and Air Con‐

ditioning; Rep. Gr.  87 ;

Additional Components

for Control and Regula‐

tion; Sunlight Photo

Sensor G107, Remov‐

ing and Installing .

5 - Instrument Panel

❑ Removing and instal‐

ling. Refer to

⇒ “3.6 Instrument Panel,

Removing and Instal‐

ling”, page 213

 .

6 - Instrument Panel Decora‐

tive Trim

❑ Allocation. Refer to the

Parts Catalog.

❑ Removing and installing. Refer to

⇒ “3.3 Instrument Panel Decorative Trim, Removing and Installing”, page 211

 .

7 - Center Vent with Front Information Display Control Head - J685- Trim

Note

Always remove the Front Informa‐

tion Display Control Head - J685-

trim together with the center vent.

❑ Removing and installing. Refer to 

⇒ “3.7 Instrument Panel Vent, Removing and Installing”, page 220

 .

8 - Instrument Cluster Trim

❑ Removing and installing. Refer to 

⇒ “3.5 Instrument Cluster Trim, Removing and Installing”, page 212

 .

9 - Rotary Light Switch - EX1-

❑ Removing and installing. Refer to ⇒  Electrical Equipment; Rep. Gr.  96 ; Controls; Rotary Light Switch

EX1, Removing and Installing .

10 - Light Switch Trim

❑ Removing and installing. Refer to 

⇒ “3.4 Light Switch Trim, Removing and Installing”, page 212

 .

11 - Side Instrument Panel Vent

❑ Left and right
❑ Removing and installing. Refer to 

⇒ “3.7 Instrument Panel Vent, Removing and Installing”, page 220

 .

3.2

Instrument Panel Side Cover, Removing

and Installing

Note

Removal and installation are described for the driver side instru‐

ment panel side cover. The removal and installation for the front

passenger side is identical.

Special tools and workshop equipment required
♦ Trim Removal Wedge - 3409-
Removing
– Pry off the instrument panel side cover -1- using the Trim Re‐

moval Wedge - 3409- .

– Remove the cover rearward from the A-pillar gap cover.
Installing

Note

Check all the fasteners for damage and replace if necessary.

Install in reverse order of removal.

3.3

Instrument Panel Decorative Trim, Re‐

moving and Installing

Special tools and workshop equipment required
♦ Trim Removal Wedge - 3409-


Content   ..  388  389  390  391   ..