Volkswagen Golf / Golf GTI / Golf Variant. Manual - part 388


  Index      Volkswagen     Volkswagen Golf / Golf GTI / Golf Variant - service repair manual 2013 year


Search            copyright infringement  


Content   ..  386  387  388  389   ..


Volkswagen Golf / Golf GTI / Golf Variant. Manual - part 388


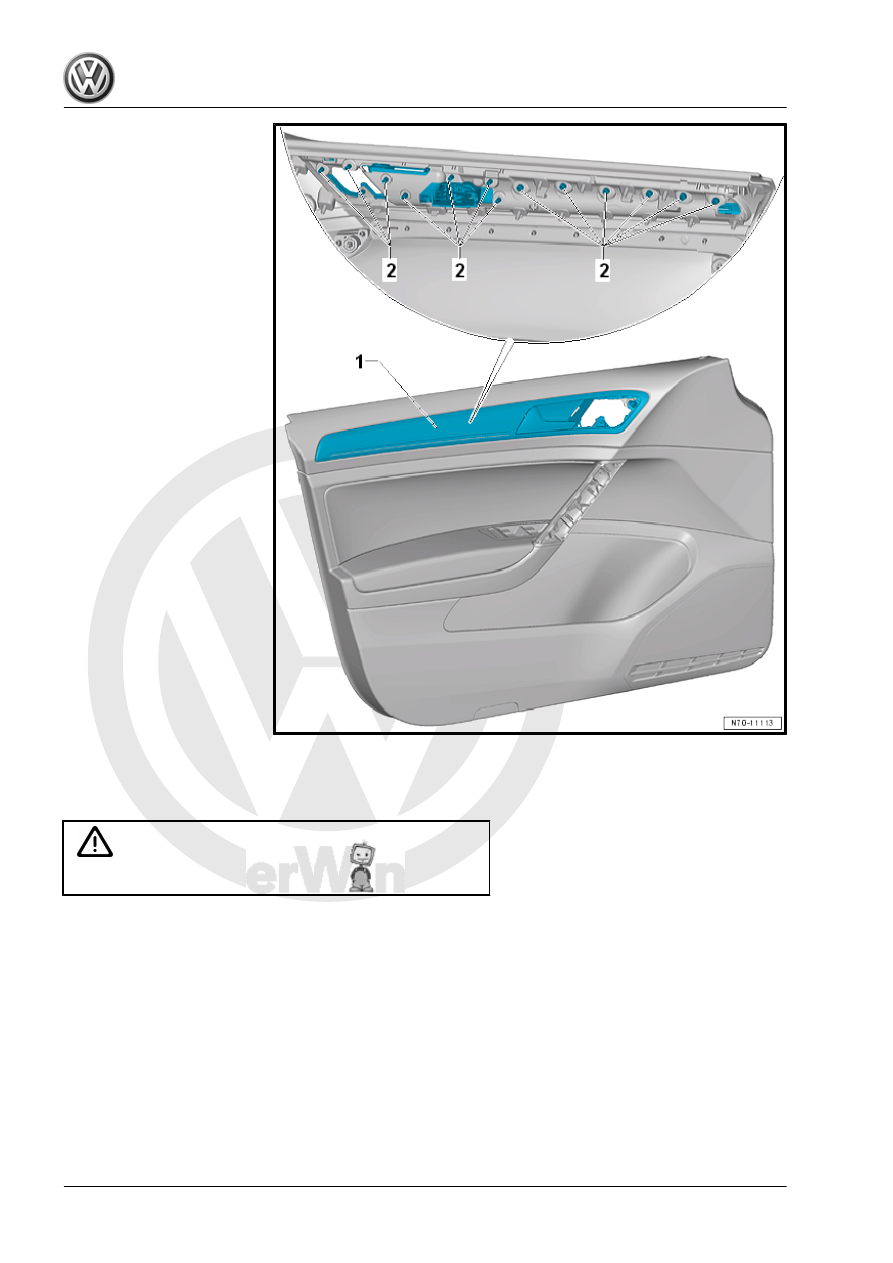
– Drill out the attachment points -2- for the trim molding -1- from

the door trim panel using an appropriate drill until the trim

molding starts to loosen from the door trim panel.

Caution

The door trim panel must not be damaged by drilling.

– Carefully loosen the attachment points -2- one after the other

and remove the trim molding -1- from the door trim panel.

Installing
Lock washers near the trim strip (4-door): 17 mm × 7.5 mm, quan‐

tity: 6. Allocation. Refer to the Parts Catalog.
Lock washers near the trim strip (2-door): 17 mm × 7.5 mm, quan‐

tity: 9. Allocation. Refer to the Parts Catalog.
Lock washers near the interior door mechanism: 13.4 mm × 6 mm,

quantity: 8. Allocation. Refer to the Parts Catalog.

– Insert the new trim molding -1- into the door trim panel.
– Press the lock washers -2- all the way onto the pins -3- of the

trim molding.

– Press the remaining lock washers near the interior door mech‐

anism onto the trim molding pins as described.

– Cut back the trim molding pins -3- above the lock washers

-2- so that the projecting end is a maximum of 2 mm.

– Install the Exterior Rearview Mirror Adjuster - EX11- with the

Driver Interior Locking Button - E308- . Refer to ⇒  Electrical

Equipment; Rep. Gr.  96 ; Component Location Overview -

Controls in Front Doors .

– Install the front door trim panel. Refer to

⇒ “1.2 Front Door Trim Panel, Removing and Installing”, page

194

 .

2

Rear Door Trim Panels

⇒ “2.1 Overview - Rear Door Trim Panel”, page 202
⇒ “2.2 Rear Door Trim Panel, Removing and Installing”,

page 203
⇒ “2.3 Interior Door Mechanism, Removing and Installing”,

page 206
⇒ “2.4 Trim Molding, Removing and Installing”, page 207

2.1

Overview - Rear Door Trim Panel

Note

The overview illustration shows the driver side rear door trim panel The illustration for the front passenger side

is identical.

1 - Door Trim Panel

❑ Removing and instal‐

ling. Refer to

⇒ “2.2 Rear Door Trim

Panel, Removing and

Installing”, page 203

 .

2 - Driver Side Rear Power

Window Button - E711-

❑ Only on vehicles with a

power window regulator

❑ Component Location

Overview. Refer to ⇒ 

Electrical Equipment;

Rep. Gr.  96 ; Controls;

Component Location

Overview - Controls in

Rear Doors .

3 - Screw

❑ 4.5 Nm
❑ Quantity: 2

4 - Window Crank

❑ Only on vehicles with a

manual window regula‐

tor

❑ Removing and instal‐

ling. Refer to ⇒  Body

Exterior; Rep. Gr.  58 ;

Door Components; Win‐

dow Crank, Removing

and Installing .

5 - Grip Recess Upper Section
6 - Rear Reflector

❑ Component Location

Overview. Refer to ⇒ 

Electrical Equipment;

Rep. Gr.  96 ; Lamps; Component Location Overview - Rear Door Lamps .

7 - Clip

❑ Quantity: 6
❑ Insert in the trim panel

❑ Replace damaged or deformed clips

2.2

Rear Door Trim Panel, Removing and

Installing

Note

The removal and installation for the driver side rear door trim

panel is described. The removal and installation for the front pas‐

senger side is identical.

Special tools and workshop equipment required
♦ Trim Removal Wedge - 3409-
♦ Wedge Set - T10383-
♦ Torque Wrench 1783 - 2-10Nm - VAG1783-
Removing
Vehicles without Power Window Regulator
– Remove the window crank. Refer to ⇒  Body Exterior; Rep.

Gr.  58 ; Door Components; Window Crank, Removing and

Installing .

Continuation for All Vehicles
– Turn off the ignition and all electrical equipment and remove

the ignition key.

– Remove the handle molding upper section -1- with the Trim

Removal Wedge - 3409- from the mounts in the door trim pan‐

el.

– Remove the bolts -1-.
– Remove the rear reflector. Refer to ⇒  Electrical Equipment;

Rep. Gr.  96 ; Lamps; Component Location Overview - Rear

Door Lamps for the component location overview.


Content   ..  386  387  388  389   ..