Volkswagen Golf / Golf GTI / Golf Variant. Manual - part 331


  Index      Volkswagen     Volkswagen Golf / Golf GTI / Golf Variant - service repair manual 2013 year


Search            copyright infringement  


Content   ..  329  330  331  332   ..


Volkswagen Golf / Golf GTI / Golf Variant. Manual - part 331


9.3.2

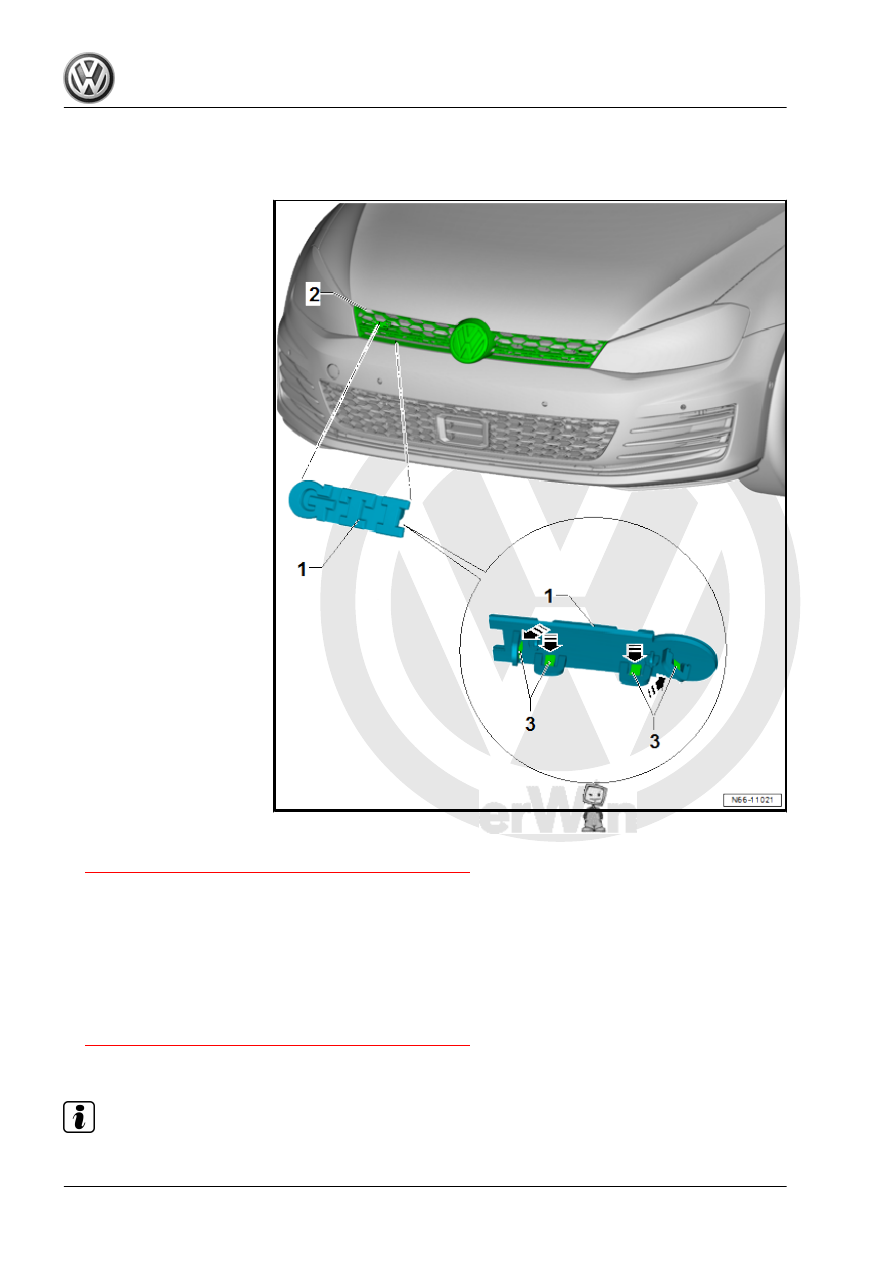
Front Emblem, Removing and Installing, Model Name GTI

Removing

– Remove the radiator grille. Refer to

⇒ “1.2 Radiator Grille, Removing and Installing”, page 396

 .

– Release the hooks on the back -3- using a screwdriver in di‐

rection of -arrows-.

– Pull the model name emblem -1- from the radiator grille -2-.
Installing
– Press the model name emblem -1- on the radiator grille -2-

until the hooks -3- engage audibly.

– Install the radiator grille. Refer to

⇒ “1.2 Radiator Grille, Removing and Installing”, page 396

 .

9.4

Rear Emblem, Removing and Installing

Note

The brand emblem cannot be removed without damaging it.

Removing

– Pry the brand emblem -1- carefully with a screwdriver -3- in

the direction of -arrow A- from the swiveling emblem -2- in di‐

rection of -arrow B-.

Installing
– Press the brand emblem -1- onto the swiveling emblem -2-

until it engages audibly.

9.5

Name Badges, Removing and Installing

Special tools and workshop equipment required
♦ Wiring Harness Repair Set - Hot Air Blower - VAS1978/14A-
♦ Adhesive Strip Remover - VAS6349-
♦ Adhesive Remover - D 002 000 10-
Assembly Instructions
♦ Warm the name badges or emblem before removing using a

Wiring Harness Repair Set - Hot Air Blower - VAS1978/14A- .

♦ When a name badge or emblem is removed and installed, use

only the Adhesive Remover - D 002 000 10- to remove the

adhesive residue.

♦ If necessary, remove any adhesive residue left by the tape

using Adhesive Strip Remover - VAS6349- .

♦ Make sure the adhesive surfaces are free of dust and grease.
♦ Attach the name badges or emblems immediately after clean‐

ing.

♦ Only remove the protective film right before assembly.
♦ The temperature must be approximately 21 °C (69.8 °F).
♦ It is not possible to remove the bonded name badges or em‐

blems without damaging them.

10

Trailer Hitch

⇒ “10.1 Overview - Trailer Hitch”, page 459
⇒ “10.2 Overview - Release Cable”, page 461
⇒ “10.3 Trailer Hitch, Removing and Installing”, page 462
⇒ “10.4 Release Cable, Removing and Installing”, page 468

10.1

Overview - Trailer Hitch

10.1.1

Overview - Trailer Hitch, Sedan

Note

Depending on the version, slight deviations must be considered.

The tightening specifications only apply to factory-installed trailer hitches.

If a different trailer hitch is installed, ask the manufacturer for the tightening specifications.

1 - Trailer Hitch

❑ Swiveling trailer hitch
❑ Removing and instal‐

ling. Refer to

⇒ “10.3.1 Trailer Hitch,

Removing and Instal‐

ling, Sedan”,

page 462

 .

2 - Bolt

❑ 20 Nm + 90°
❑ Gas-tight sealing threa‐

ded connections

❑ Quantity: 3

DANGER!

The  bolts  are  actually

sealing  threaded  con‐

nections and seal off the

vehicle  interior  from  ex‐

haust gas. They must al‐

ways be installed.

3 - Release Cable

❑ With profile

4 - Bolt

❑ 60 Nm + 90°
❑ Replace after removing
❑ Quantity: 2 on each side

5 - Locking Mechanism
6 - Release Lever

❑ Component of the trailer

hitch


Content   ..  329  330  331  332   ..