Volkswagen Golf / Golf GTI / Golf Variant. Manual - part 296


  Index      Volkswagen     Volkswagen Golf / Golf GTI / Golf Variant - service repair manual 2013 year


Search            copyright infringement  


Content   ..  294  295  296  297   ..


Volkswagen Golf / Golf GTI / Golf Variant. Manual - part 296


1.3

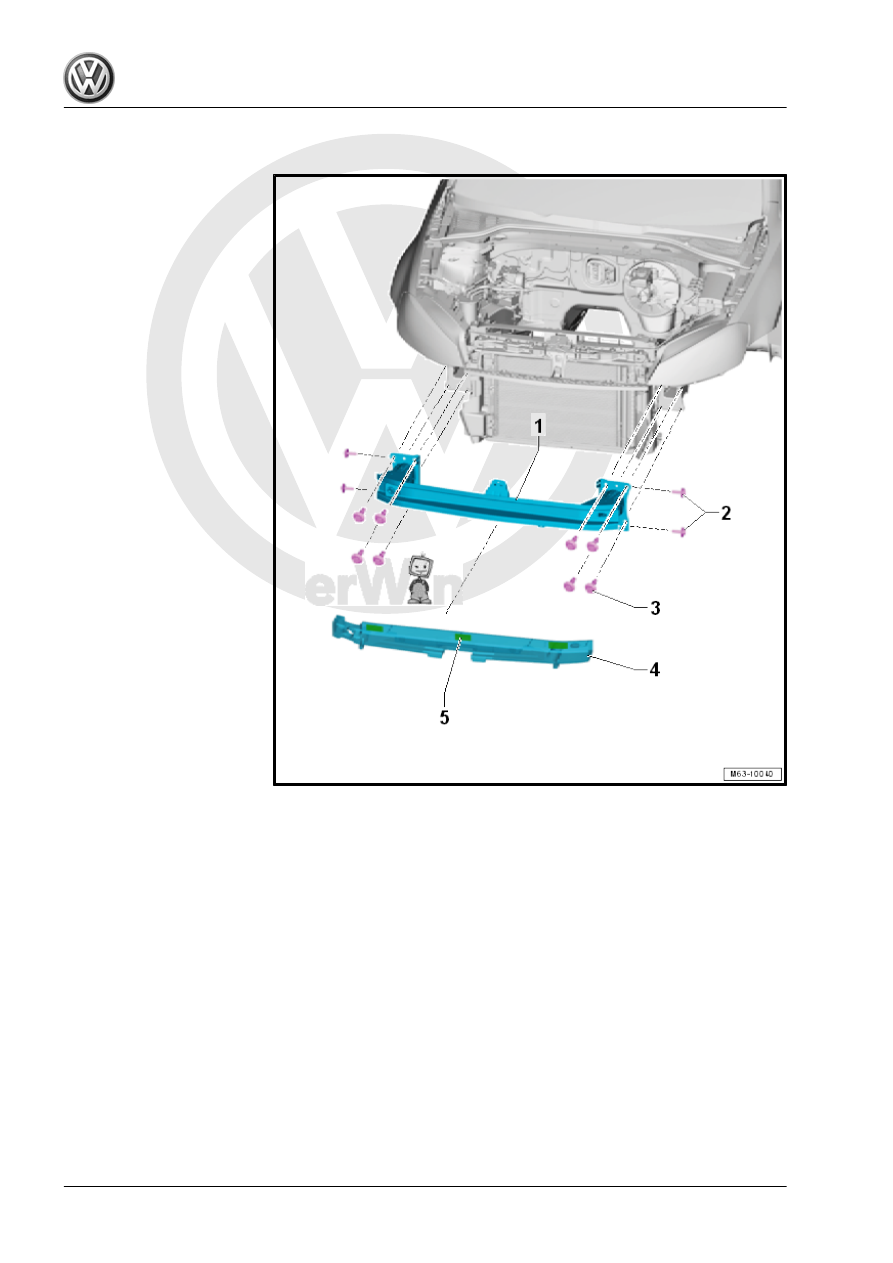
Overview - Impact Member

1 - Impact Member
2 - Bolt

❑ 8 Nm
❑ Quantity: 2 on each side

3 - Bolt

❑ 55 Nm
❑ Quantity: 4 on each side

4 - Foam Piece

❑ Self-adhesive
❑ Not installed in all model

versions

5 - Butyl Strips

❑ Quantity: 3 with adhe‐

sive film

1.4

Overview - Guides

1 - Side Guide

❑ Left and right

2 - Bolt

❑ Quantity: 1 on each side
❑ Tightening specifica‐

tion. Refer to ⇒  Electri‐

cal Equipment; Rep. Gr. 

94 ; Headlamp; Over‐

view - Headlamp .

3 - Nut

❑ 2 Nm
❑ Quantity: 2 on each side

4 - Center Guide
5 - Right Partition

❑ Clipped in the center

guide -4-.

6 - Bolt

❑ 8 Nm
❑ Quantity: 3

7 - Left Partition

❑ Clipped in the center

guide -4-.

1.5

Bumper Cover, Removing and Installing

Special tools and workshop equipment required
♦ Torque Wrench 1783 - 2-10Nm - VAG1783-

Note

Depending on the model version, slight deviations of the front bumper cover must be considered when removing

and installing.

Removing

– Remove the radiator grille. Refer to

⇒ “1.2 Radiator Grille, Removing and Installing”, page 396

 .

– Remove the bolts -2- in the wheel housing (pointing upward)

on the left and right sides.

– Remove the left and right bolts -3-.
– Remove the bolts -4- from underneath.
A second technician is required for the rest of the removal pro‐

cedure.
– Pull the bumper cover -1- out of the guide catches on the left

and right sides of the fender in direction of -a arrows-.

– Loosen the hooks in direction of -b arrows- from the lock car‐

rier.

– Remove the bumper cover -1- parallel from the vehicle in di‐

rection of -c arrows-.

– Disconnect the hose coupling for the washer fluid hoses

(where applicable). Refer to ⇒  Electrical Equipment; Rep. Gr. 

92 ; Headlamp Washer System; Overview - Headlamp Wash‐

er System .

– Disconnect the connectors for the electrical components

(where applicable).

For notes and procedures regarding the parking aid. Refer to ⇒ 

Electrical Equipment; Rep. Gr.  94 ; Parking Aid .
For notes and procedures regarding the parallel parking assis‐

tance. Refer to ⇒  Electrical Equipment; Rep. Gr.  94 ; Parallel

Parking Assist .
Installing

Installation is only possible with a second technician.
– Connect the connectors of any components.

Note

When positioning the bumper cover, make sure that the front wheel housing liner is seated correctly.

– Guide the bumper cover -1- parallel onto the lock carrier in

direction of -a arrows-, until the hooks engage.

– Push the bumper cover -1- into the side guides -5- on the left

and right of the fender until they engage in direction of

-arrow b-.


Content   ..  294  295  296  297   ..