Volkswagen Golf / Golf GTI / Golf Variant. Manual - part 17


  Index      Volkswagen     Volkswagen Golf / Golf GTI / Golf Variant - service repair manual 2013 year


Search            copyright infringement  


Content   ..  15  16  17  18   ..


Volkswagen Golf / Golf GTI / Golf Variant. Manual - part 17


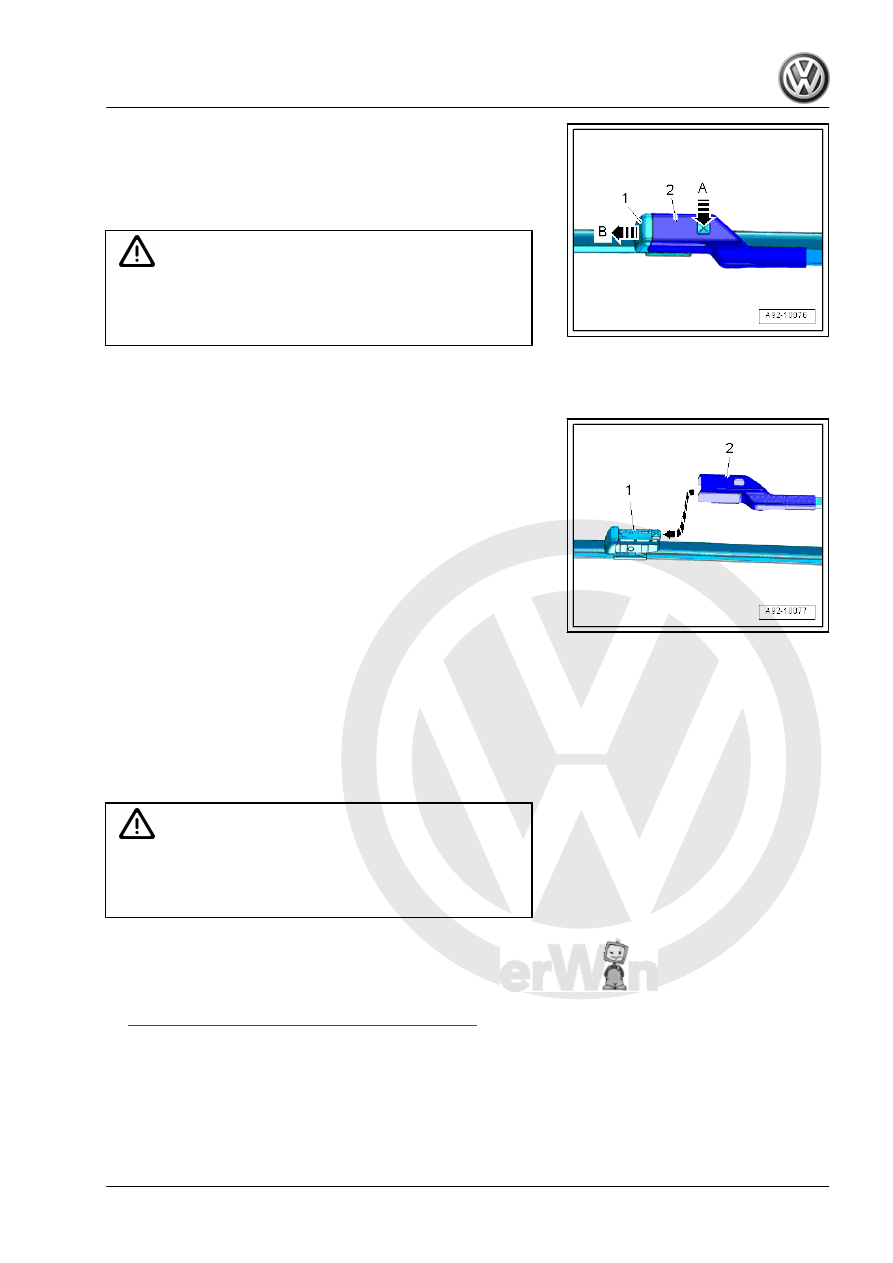
– Press the clip in direction of -arrow A- and remove the wiper

blade -1- from the windshield wiper arm -2- in direction of

-arrow B-.

– Remove the wiper blade -1-.
Installing

Caution

There is a risk of damaging the body.

♦ The driver and passenger side wiper blades are different

lengths.

Install in the reverse order of removal while paying attention to

the following:

– Guide the wiper blade -1- parallel into the windshield wiper arm

-2- in direction of -arrow-. Make sure to slide the wiper blade

-1- on until the retaining clips audibly lock in the wiper arm

-2-.

To leave the “service position:”
– Operate the windshield wiper switch.
Or
– Drive the vehicle faster than 6 km/h (4 mph).

1.4

Windshield Wiper Arms, Removing and

Installing

Special tools and workshop equipment required
♦ Puller - Wiper Arm Kit - T10369-
♦ Puller - Wiper Arm Kit - Puller 1 - T10369/1-
Removing

Caution

Risk of damaging the wiper arm shaft.

♦ The wiper arm shaft can get damaged when removing the

windshield wiper arms without using the -T10369/1- .

If the Windshield Wiper Motor - V- is to be run during the work

procedure, the hood must be closed, otherwise the voltage supply

of the Windshield Wiper Motor - V- will be interrupted.
– Bring the windshield wiper into service position. Refer to

⇒ “1.2 Wiper, Moving Into Service Position”, page 56

 .

– Pry the caps -3- off of the windshield wiper arms -1- with a

screwdriver.

– Loosen the nuts -2- several turns.
– Position the -T10369/1- on the wiper arm -1- as illustrated.
– Position the thrust piece -2- on the wiper arm shaft.
– Rotate the bolt -3- clockwise until the wiper arm -1- is removed

from the wiper arm shaft.

– Remove the nut completely and remove the windshield wiper

arm -1-.

Installing
Install in the reverse order of removal while paying attention to

the following:

Caution

There is a risk of damaging the body.

♦ The driver and front passenger side wiper arms are dif‐

ferent lengths.

– Adjust the windshield wiper arms. Refer to

⇒ “1.5 Windshield Wiper Arms, Adjusting”, page 58

 .

1.5

Windshield Wiper Arms, Adjusting

Special tools and workshop equipment required
♦ Torque Wrench 1331 5-50Nm - VAG1331-
If the Windshield Wiper Motor - V- is to be run during the work

procedure, the hood must be closed, otherwise the voltage supply

of the Windshield Wiper Motor - V- will be interrupted.
Procedure
– Deactivate the APP function. Refer to

⇒ “1.8 Windshield Wiper Motor, Deactivating Alternating Park

Position Function”, page 61

 .

– Remove the windshield wiper arms. Refer to

⇒ “1.4 Windshield Wiper Arms, Removing and Installing”, page

57

 .

– Turn on the ignition.
– Activate “one-tap wiping” and let the Windshield Wiper Motor

- V- run into its end position.

– Turn off the ignition.
– Position the wiper arm with wiper blade installed at the wiper

arm shaft.

– Align the wiper blade as follows on the windshield.
The dimensions give the distance of the wiper blade tips to the

plenum chamber cover on the lower edge of the windshield.
♦ Dimension -a- + 10 mm ± 5 mm.
♦ Dimension -b- + 10 mm ± 5 mm.
– Tighten the nuts -2- on the windshield wiper arms -1-.
– Turn on the ignition.
– Activate “one-touch wiping” and let the windshield wiper arms

run into their end position.

– Turn off the ignition.
– Check the wiper arm adjustment again and if necessary ad‐

just.

– Press the caps -3- onto the wiper arms.
Tightening Specifications
♦ Refer to

⇒ “1.1 Overview - Windshield Wiper System”, page 53

1.6

Windshield Wiper Motor - V- , Removing

and Installing

Special tools and workshop equipment required
♦ Torque Wrench 1410 - VAG1410-
♦ Torque Wrench 1331 5-50Nm - VAG1331-
If the control module is being replaced, use the Vehicle Diagnostic

Tester and select the “Replacing” function for the respective con‐

trol module in “Guided Fault Finding”.
Removing
– Turn off the ignition and all electrical equipment.
– Remove the ignition key, if equipped.
– Remove the windshield wiper arms. Refer to

⇒ “1.4 Windshield Wiper Arms, Removing and Installing”, page

57

 .

– Remove the left plenum chamber cover. Refer to ⇒  Body Ex‐

terior; Rep. Gr.  50 ; Bulkhead; Plenum Chamber Cover,

Removing and Installing .

– Remove the bolts -1, 3 and 4-.
– Disconnect the connector -5-.

– When necessary disconnect the damping regulation connec‐

tor.

– Remove the wiper frame -2- with linkage and the Windshield

Wiper Motor - V- from the plenum chamber.

Installing
Install in the reverse order of removal while paying attention to

the following:
– Adjust the windshield wiper arms. Refer to

⇒ “1.5 Windshield Wiper Arms, Adjusting”, page 58

 .

Tightening Specifications
♦ Refer to

⇒ Fig. ““Tightening Specifications and Sequence for the Wind‐

shield Wiper Motor -V- ”“ , page 55

1.7

Windshield Wiper Motor, Replacing

Special tools and workshop equipment required
♦ Pry Lever - 80-200-
♦ Torque Wrench 1410 - VAG1410-
♦ Torque Wrench 1331 5-50Nm - VAG1331-

WARNING

Risk of injury.

♦ When operating an uncovered windshield wiper system

there is a risk of pinching.

♦ The windshield wiper system can only be operated when

installed.

Caution

There is a risk of damaging the hood and the windshield wiper

arm.

♦ By operating the windshield wiper system with the hood

open, pay attention that the is enough clearance to moving

components.

So that the windshield wiper system can be operated with the front

lid open, the latch must be engaged in the »closed« position.
Removing
– Deactivate the wiper motor alternating park position. Refer to

⇒ “1.8 Windshield Wiper Motor, Deactivating Alternating Park

Position Function”, page 61

 .

– Remove the windshield wiper frame. Refer to

⇒ “1.6  Windshield Wiper Motor V , Removing and Installing”,

page 59

 .


Content   ..  15  16  17  18   ..