Volkswagen Jetta / Jetta Hybrid. Manual - part 29


  Index      Volkswagen     Volkswagen Jetta / Jetta Hybrid service manual 2011-2013 year


Search            copyright infringement  


Content   ..  27  28  29  30   ..


Volkswagen Jetta / Jetta Hybrid. Manual - part 29


Carry out following work:
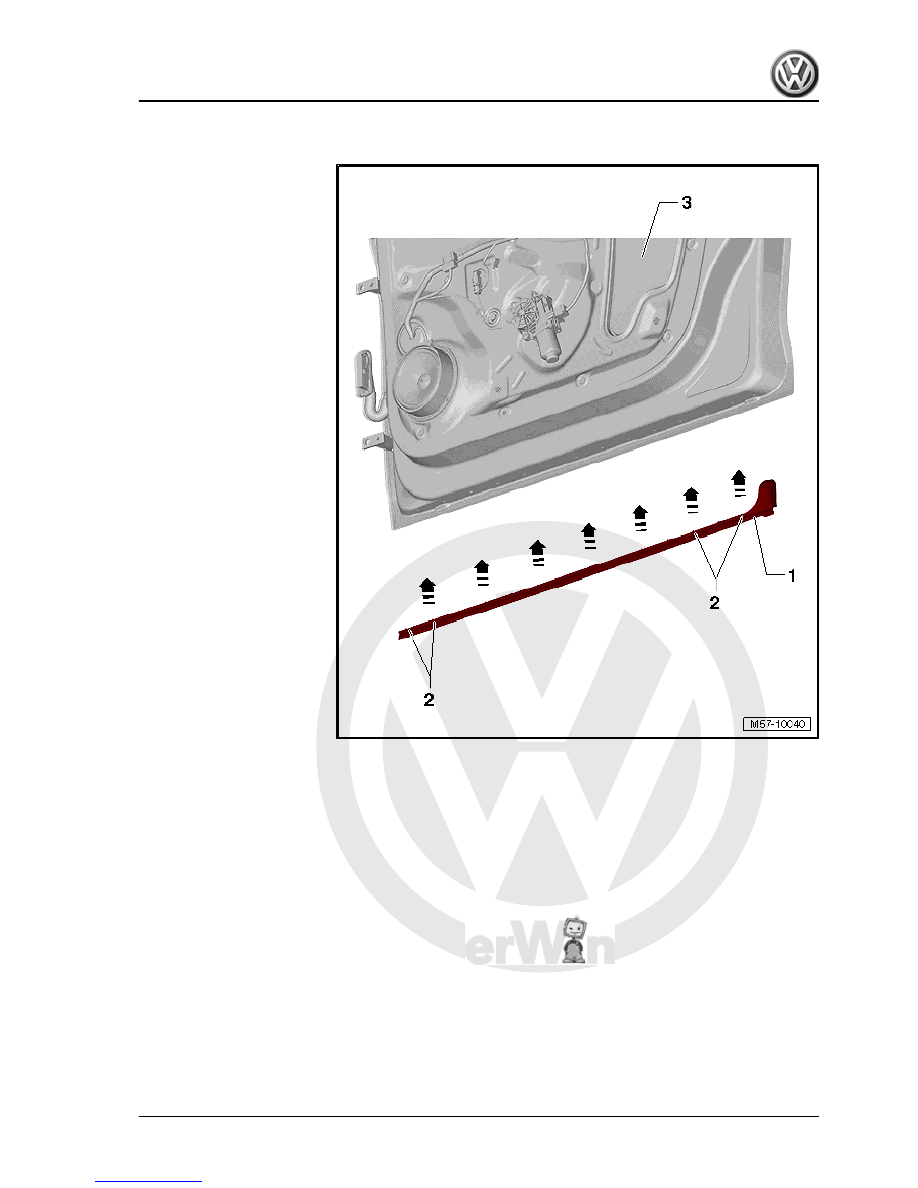
• The clips -2- are not damaged, otherwise renew.
– Press seal -1- with clips -2- onto door -3- beginning at A-pillar.

Jetta 2011 ➤ , Jetta Hybrid 2013 ➤

2. Door components    

113


WARNING

Before installing door trim, check that the holes in the door

panel are sealed with respective stickers 

⇒ page 114

 .

1 - Insulation

❑ Self-adhesive.
❑ Installing:
– Cut to size if necessary.

– Warm using hot air

blower -V.A.G 1416-

and push on to outer

door panel with force.

2 - Sticker

❑ If necessary, manufac‐

ture using commercially

available textile adhe‐

sive tape.

3 - Foam element

❑ Jammed into door.

Jetta 2011 ➤ , Jetta Hybrid 2013 ➤

114


3.1

Fitting location overview - central locking components

1 - Coupling station

❑ Fitting location: left A-

pillar

❑ To separate connec‐

tions, release bellows at

pillar.

2 - Front passenger door con‐

trol unit -J387-

❑ Integrated in window

regulator motor, front

passenger side -V148-

❑ Removing and installing

⇒ page 212

3 - Door lock on front passen‐

ger side

❑ Door lock is secured to

inner part of door.

❑ Electric central locking

is integrated into door

lock.

❑ Removing and installing

⇒ page 100

4 - Coupling station

❑ Fitting location: right B-

pillar.

❑ To separate connec‐

tions, release bellows at

pillar.

5 - Rear right door control unit

-J389-

❑ Integrated in rear right

window regulator motor

-V27-

❑ Removing and installing

⇒ page 225

6 - Rear right door lock

❑ Door lock is secured to inner part of door.
❑ Electric central locking is integrated into door lock.
❑ Removing and installing 

⇒ page 140

7 - Tank filler flap locking motor -V155-

❑ Removing and installing 

⇒ page 73

8 - Rear lid lock

❑ Fitting location: on rear lid
❑ Removing and installing 

⇒ page 66

9 - Rear lid handle release button -E234-

❑ Fitting location: on rear lid
❑ Removing and installing 

⇒ page 65

Jetta 2011 ➤ , Jetta Hybrid 2013 ➤

3. Central locking    

115


⇒ page 140

11 - Rear left door control unit -J388-

❑ Integrated in rear left window regulator motor -V26-
❑ Removing and installing 

⇒ page 225

12 - Door lock on driver side

❑ Door lock is secured to inner part of door.
❑ Electric central locking is integrated into door lock.
❑ Removing and installing 

⇒ page 100

13 - Coupling station

❑ Fitting location: left B-pillar
❑ To separate connections, release bellows at pillar.

14 - Driver door control unit -J386-

❑ Integrated in window regulator motor, driver side -V147-
❑ Removing and installing 

⇒ page 212

15 - Switch module of window regulator, driver side

and installing switch module of window regulator, driver side

16 - Coupling station

❑ Fitting location: right A-pillar
❑ To separate connections, release bellows at pillar.

17 - Onboard supply control unit -J519-

❑ Location: below driver side of dash panel, clipped onto relay carrier
❑ Removing and installing ⇒  Electrical system; Rep. gr.  97 ; Control units; Onboard supply control unit -

J519-

18 - Alarm horn -H12-

installing alarm horn -H12- .

19 - Bonnet contact switch -F266-

Removing and installing bonnet contact switch -F266-

3.2

Adapting keys with remote control

Keys with remote control are adapted using the vehicle diagnosis,

testing and information system -VAS 5051B- .
– Select “guided fault finding” in vehicle diagnostic tester -

VAS 5051 B- .

– Using the 

GoTo

 key, select “Function/component selection”

and the following menu items one after the other:

♦ Body
♦ Electrical system (Rep. Gr. 01; 27; 90…97)
♦ 01 - Systems capable of self-diagnosis

Jetta 2011 ➤ , Jetta Hybrid 2013 ➤

116


Content   ..  27  28  29  30   ..